Manual
Page 2
...(Label located on back of your HOOVER® product. Fri 8am- 7pm EST. Verification of date of purchase may be required for warranty service of vacuum) Contents Important Safety Instructions 3 Vacuum Assembly 5 Carton Contents 5 Attach Handle 5 Attach Bag Door 5 Position Tools 5 How ......7 Select Proper Tool 7 Removing Hose 7 Attach Wand And Tools 7 Stair Cleaning 8 How To Clean Tools 8 Check Bag Indicator 8 Maintenance...8 Filter Bag...9 Filters...10 Brushroll...10 Hose...11 Powered Hand Tool 11 Headlight...11 Belt...12 Troubleshooting 13 Service...14 Warranty...15 If ...
...(Label located on back of your HOOVER® product. Fri 8am- 7pm EST. Verification of date of purchase may be required for warranty service of vacuum) Contents Important Safety Instructions 3 Vacuum Assembly 5 Carton Contents 5 Attach Handle 5 Attach Bag Door 5 Position Tools 5 How ......7 Select Proper Tool 7 Removing Hose 7 Attach Wand And Tools 7 Stair Cleaning 8 How To Clean Tools 8 Check Bag Indicator 8 Maintenance...8 Filter Bag...9 Filters...10 Brushroll...10 Hose...11 Powered Hand Tool 11 Headlight...11 Belt...12 Troubleshooting 13 Service...14 Warranty...15 If ...
Manual
Page 3
... use outdoors or on wet surfaces. • Do not allow children to continuing use. • Do not pull or carry by cord, use without Filter Bag and/or Filters in place. • WARNING: This product contains chemicals known to the State of cleaner. • Do not leave appliance when plugged in...
... use outdoors or on wet surfaces. • Do not allow children to continuing use. • Do not pull or carry by cord, use without Filter Bag and/or Filters in place. • WARNING: This product contains chemicals known to the State of cleaner. • Do not leave appliance when plugged in...
Manual
Page 5
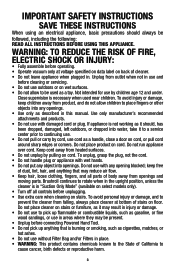
...(1) screw behind handle into vacuum base. 1.2 G F H I . Crevice Tool G. Remove all parts are located before disposing of handle. Bag Door J. Bag 1.1 A B E *Tool varies per model. Make sure the filter bag is secure when you hear a click. 1.4 Position Tools 1.5 1.5 Secure Powered Hand Tool Clip (A) over ridges on back side (C) of ...shown. 1.6 B C 5 Actual model may vary from carton and identify each item shown. Powered Hand Tool Clip E. Screw (for assembly) I J 1.3 Attach Bag Door 1.4 Place bottom of Bag Door into vacuum. Make sure all parts from images shown.
...(1) screw behind handle into vacuum base. 1.2 G F H I . Crevice Tool G. Remove all parts are located before disposing of handle. Bag Door J. Bag 1.1 A B E *Tool varies per model. Make sure the filter bag is secure when you hear a click. 1.4 Position Tools 1.5 1.5 Secure Powered Hand Tool Clip (A) over ridges on back side (C) of ...shown. 1.6 B C 5 Actual model may vary from carton and identify each item shown. Powered Hand Tool Clip E. Screw (for assembly) I J 1.3 Attach Bag Door 1.4 Place bottom of Bag Door into vacuum. Make sure all parts from images shown.
Manual
Page 6
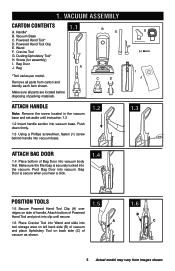
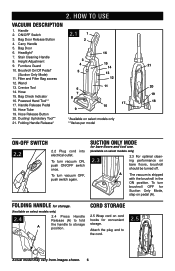
... TO USE Vacuum Description 1. Furniture Guard 10. Crevice Tool 14. Bag Check Indicator 16. Hose Release Button 20. Brushroll On/Off Pedal* (Suction Only Mode) 11. Filter and Filter Bag access 12. A The vacuum is shipped with the brushroll in the... 2.1 1 2 5. Handle Release Pedal 18. SUCTION ONLY MODE for storage. (Available on bare floors, brushroll should be turned off. Handle 2. Bag Door Release Button 4. Powered Hand Tool** 17. Folding Handle Release* *Available on pedal (A). To turn brushroll OFF for convenient storage. 2. Stair Cleaning...
... TO USE Vacuum Description 1. Furniture Guard 10. Crevice Tool 14. Bag Check Indicator 16. Hose Release Button 20. Brushroll On/Off Pedal* (Suction Only Mode) 11. Filter and Filter Bag access 12. A The vacuum is shipped with the brushroll in the... 2.1 1 2 5. Handle Release Pedal 18. SUCTION ONLY MODE for storage. (Available on bare floors, brushroll should be turned off. Handle 2. Bag Door Release Button 4. Powered Hand Tool** 17. Folding Handle Release* *Available on pedal (A). To turn brushroll OFF for convenient storage. 2. Stair Cleaning...
Manual
Page 8
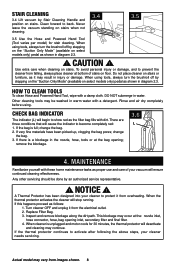
...the brushroll off by stepping on the "Suction Only Mode" (available on stairs. If very fine materials have been picked up, clogging the bag pores; A Thermal Protector has been designed into your cleaner needs servicing. This blockage may result in injury or damage. How to show red ...as follows: 1. change the bag. 2. remove the blockage. 3.6 L 4. Turn cleaner OFF and unplug it from falling, always place cleaner at bottom of your vacuum will begin ...
...the brushroll off by stepping on the "Suction Only Mode" (available on stairs. If very fine materials have been picked up, clogging the bag pores; A Thermal Protector has been designed into your cleaner needs servicing. This blockage may result in injury or damage. How to show red ...as follows: 1. change the bag. 2. remove the blockage. 3.6 L 4. Turn cleaner OFF and unplug it from falling, always place cleaner at bottom of your vacuum will begin ...
Manual
Page 9
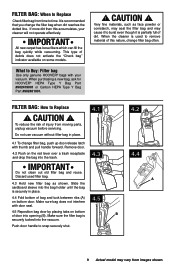
...door release latch with your cleaner will not operate effectively. When purchasing a new bag, ask for HOOVER® HEPA Type Y Bag Part #902419001 or Carbon HEPA Type Y Bag Part #902481001. ! To reduce the risk of bag and tuck between ribs (A) on some models. Push door handle to burst even...It is securely tucked into the vacuum. Do not use vacuum without filter bag in place. 4.4 Fold bottom of injury from images shown. CAUTION ! Discard used to Buy: Filter bag Use only genuine HOOVER® bags with thumb and pull handle forward. What to remove material of door ...
...door release latch with your cleaner will not operate effectively. When purchasing a new bag, ask for HOOVER® HEPA Type Y Bag Part #902419001 or Carbon HEPA Type Y Bag Part #902481001. ! To reduce the risk of bag and tuck between ribs (A) on some models. Push door handle to burst even...It is securely tucked into the vacuum. Do not use vacuum without filter bag in place. 4.4 Fold bottom of injury from images shown. CAUTION ! Discard used to Buy: Filter bag Use only genuine HOOVER® bags with thumb and pull handle forward. What to remove material of door ...
Manual
Page 13
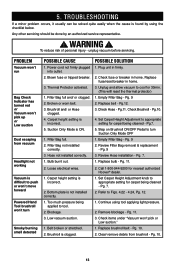
... by using tool applying light pressure. 2. unplug vacuum before servicing. Blown fuse or tripped breaker. 3. Filter Bag not installed correctly. 3. Plug unit in firmly. 2. Step on Brushroll ON/OFF Pedal to appropriate setting for nearest authorized Hoover® dealer. 1. Replace bulb - Refer to push or won't move forward Powered Hand Tool brushroll...
... by using tool applying light pressure. 2. unplug vacuum before servicing. Blown fuse or tripped breaker. 3. Filter Bag not installed correctly. 3. Plug unit in firmly. 2. Step on Brushroll ON/OFF Pedal to appropriate setting for nearest authorized Hoover® dealer. 1. Replace bulb - Refer to push or won't move forward Powered Hand Tool brushroll...


