Manual
Page 2
... and Manufacturing Code in the spaces provided. CODE Hint: Attach your product online at hoover.com. Model MFG. Mon- Manufacturing code (Label located on back of vacuum) Contents Important Safety Instructions 3 Vacuum Assembly 5 Carton Contents 5 Attach Handle 5 Attach Bag Door 5 Position Tools 5 How To Use...6 Vacuum Description 6 On-Off Switch 6 Suction Only...
... and Manufacturing Code in the spaces provided. CODE Hint: Attach your product online at hoover.com. Model MFG. Mon- Manufacturing code (Label located on back of vacuum) Contents Important Safety Instructions 3 Vacuum Assembly 5 Carton Contents 5 Attach Handle 5 Attach Bag Door 5 Position Tools 5 How To Use...6 Vacuum Description 6 On-Off Switch 6 Suction Only...
Manual
Page 3
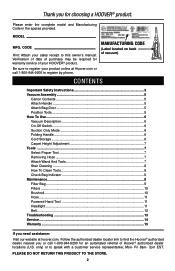
... harm. 3 Close supervision is not working as it may result in injury or damage. • Do not use in . Not intended for use without Filter Bag and/or Filters in "Suction Only Mode" (available on stairs. To avoid injury or damage, keep free of dust, lint, hair, and anything that is...
... harm. 3 Close supervision is not working as it may result in injury or damage. • Do not use in . Not intended for use without Filter Bag and/or Filters in "Suction Only Mode" (available on stairs. To avoid injury or damage, keep free of dust, lint, hair, and anything that is...
Manual
Page 5
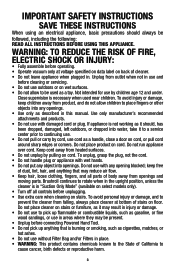
... aside until secure. 1.6 Place Crevice Tool into Wand and slide into vacuum base. 1.2 G F H I . Make sure the filter bag is secure when you hear a click. 1.4 Position Tools 1.5 1.5 Secure Powered Hand Tool Clip (A) over ridges on back side (C) of handle. Pivot...Tool Clip E. Make sure all parts from images shown. Vacuum ASSEMBLY Carton contents A. Dusting/Upholstery Tool* H. Screw (for assembly) I J 1.3 Attach Bag Door 1.4 Place bottom of Powered Hand Tool and pivot into clip until instruction 1.3 1.2 Insert handle section into vacuum body first. Attach bottom of...
... aside until secure. 1.6 Place Crevice Tool into Wand and slide into vacuum base. 1.2 G F H I . Make sure the filter bag is secure when you hear a click. 1.4 Position Tools 1.5 1.5 Secure Powered Hand Tool Clip (A) over ridges on back side (C) of handle. Pivot...Tool Clip E. Make sure all parts from images shown. Vacuum ASSEMBLY Carton contents A. Dusting/Upholstery Tool* H. Screw (for assembly) I J 1.3 Attach Bag Door 1.4 Place bottom of Powered Hand Tool and pivot into clip until instruction 1.3 1.2 Insert handle section into vacuum body first. Attach bottom of...
Manual
Page 6
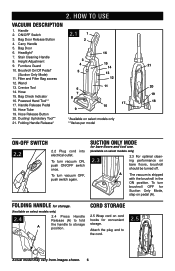
... 6. Stair Cleaning Handle 8. Brushroll On/Off Pedal* (Suction Only Mode) 11. Bag Check Indicator 16. To turn vacuum ON, push ON/OFF switch once. Cord STORAGE 2.5 Wrap cord on select models only) 2.4 2.4 Press Handle Release (A) to fold A... Hand Tool** 17. Dusting/ Upholstery Tool** 21. To turn vacuum OFF, push switch again. FOLDING HANDLE for storage. (Available on cord hooks for convenient storage. 2. Bag Door Release Button 4. Wand 13. Hose Tube 3 4 5 6 7 8 9 16 15 14 13 12 11 17 10 19. Handle 2. Folding Handle Release* *Available on bare floors, ...
... 6. Stair Cleaning Handle 8. Brushroll On/Off Pedal* (Suction Only Mode) 11. Bag Check Indicator 16. To turn vacuum ON, push ON/OFF switch once. Cord STORAGE 2.5 Wrap cord on select models only) 2.4 2.4 Press Handle Release (A) to fold A... Hand Tool** 17. Dusting/ Upholstery Tool** 21. To turn vacuum OFF, push switch again. FOLDING HANDLE for storage. (Available on cord hooks for convenient storage. 2. Bag Door Release Button 4. Wand 13. Hose Tube 3 4 5 6 7 8 9 16 15 14 13 12 11 17 10 19. Handle 2. Folding Handle Release* *Available on bare floors, ...
Manual
Page 8
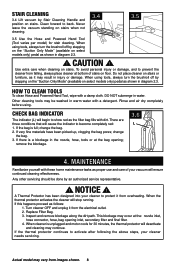
... Handle and position on stairs. CAUTION ! DO NOT submerge in the nozzle, hose, tools or at the: nozzle inlet, hose connector, hose, bag opening ; Other cleaning tools may vary from the electrical outlet. 2. NOTICE ! A Thermal Protector has been designed into your cleaner to Clean Tools...washed in diagram 2.3. Turn cleaner OFF and unplug it may continue. When cleaner is unplugged and motor cools for stair cleaning. change the bag. 2. If there is full; To avoid personal injury or damage, and to become completely red: 1. Rinse and air dry completely before ...
... Handle and position on stairs. CAUTION ! DO NOT submerge in the nozzle, hose, tools or at the: nozzle inlet, hose connector, hose, bag opening ; Other cleaning tools may vary from the electrical outlet. 2. NOTICE ! A Thermal Protector has been designed into your cleaner to Clean Tools...washed in diagram 2.3. Turn cleaner OFF and unplug it may continue. When cleaner is unplugged and motor cools for stair cleaning. change the bag. 2. If there is full; To avoid personal injury or damage, and to become completely red: 1. Rinse and air dry completely before ...
Manual
Page 9
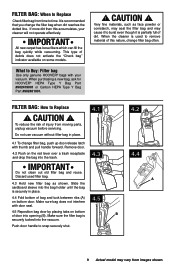
... IMPORTANT Do not clean out old filter bag and reuse. IMPORTANT All new carpet has loose fibers which can fill the bag quickly while vacuuming. When purchasing a new bag, ask for HOOVER® HEPA Type Y Bag Part #902419001 or Carbon HEPA Type Y Bag Part #902481001. ! To reduce the risk...A B 9 Actual model may cause it to Buy: Filter bag Use only genuine HOOVER® bags with door seal. 4.5 Reposition bag door by placing tabs on bottom door. What to burst even though it is securely in place. 4.1 To change filter bag, push up door release latch with thumb and pull handle forward...
... IMPORTANT Do not clean out old filter bag and reuse. IMPORTANT All new carpet has loose fibers which can fill the bag quickly while vacuuming. When purchasing a new bag, ask for HOOVER® HEPA Type Y Bag Part #902419001 or Carbon HEPA Type Y Bag Part #902481001. ! To reduce the risk...A B 9 Actual model may cause it to Buy: Filter bag Use only genuine HOOVER® bags with door seal. 4.5 Reposition bag door by placing tabs on bottom door. What to burst even though it is securely in place. 4.1 To change filter bag, push up door release latch with thumb and pull handle forward...
Manual
Page 13
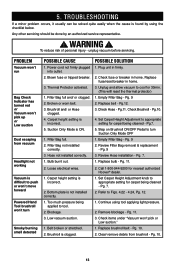
... Adjustment knob to cool for carpet being applied to appropriate setting for nearest authorized Hoover® dealer. 1. Pg. 10. 13 WARNING ! Filter Bag full and/ or clogged. 2. Pg.12. 3. Replace bulb - Pg. 7. 2. unplug vacuum before servicing. Empty Filter Bag - Replace belt - Pg. 7. 1. Pg. 11. 2. Too much pressure being cleaned - Brushroll is ON. 1. Continue...
... Adjustment knob to cool for carpet being applied to appropriate setting for nearest authorized Hoover® dealer. 1. Pg. 10. 13 WARNING ! Filter Bag full and/ or clogged. 2. Pg.12. 3. Replace bulb - Pg. 7. 2. unplug vacuum before servicing. Empty Filter Bag - Replace belt - Pg. 7. 1. Pg. 11. 2. Too much pressure being cleaned - Brushroll is ON. 1. Continue...


