Manual
Page 2
... PLEASE DO NOT RETURN THIS PRODUCT TO THE STORE. 2 Thank you for an automated referral of your HOOVER® product. only) or to this owner's manual. Mon- Fri 8am- 7pm EST. Please enter...HOOVER® product. Manufacturing code (Label located on back of vacuum) Contents Important Safety Instructions 3 Vacuum Assembly 5 Carton Contents 5 Attach Handle 5 Attach Bag Door 5 Position Tools 5 How To Use...6 Vacuum Description 6 On-Off Switch 6 Suction Only Mode 6 Folding Handle 6 Cord Storage 6 Carpet Height Adjustment 7 Tools ...7 Select Proper Tool 7 Removing Hose...
... PLEASE DO NOT RETURN THIS PRODUCT TO THE STORE. 2 Thank you for an automated referral of your HOOVER® product. only) or to this owner's manual. Mon- Fri 8am- 7pm EST. Please enter...HOOVER® product. Manufacturing code (Label located on back of vacuum) Contents Important Safety Instructions 3 Vacuum Assembly 5 Carton Contents 5 Attach Handle 5 Attach Bag Door 5 Position Tools 5 How To Use...6 Vacuum Description 6 On-Off Switch 6 Suction Only Mode 6 Folding Handle 6 Cord Storage 6 Carpet Height Adjustment 7 Tools ...7 Select Proper Tool 7 Removing Hose...
Manual
Page 4
... way. Questions or concerns? Always put the cleaner in upright position. If it on select models only) during tool use sharp objects to clean out hose as they can cause damage. This plug will fit in a dry place. PLEASE DO NOT RETURN THIS PRODUCT TO THE STORE. 4 Do not expose machine...
... way. Questions or concerns? Always put the cleaner in upright position. If it on select models only) during tool use sharp objects to clean out hose as they can cause damage. This plug will fit in a dry place. PLEASE DO NOT RETURN THIS PRODUCT TO THE STORE. 4 Do not expose machine...
Manual
Page 6
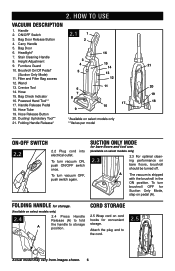
.... 6 HOW TO USE Vacuum Description 1. Headlight* 7. To turn vacuum ON, push ON/OFF switch once. Bag Door Release Button 4. Wand 13. Hose 15. To turn vacuum OFF, push switch again. FOLDING HANDLE for Suction Only Mode, step on select models only **Varies per model 21 20 19... 18 ON-OFF Switch 2.2 2.2 Plug cord into electrical outlet. Brushroll On/Off Pedal* (Suction Only Mode) 11. Crevice Tool 14. Powered Hand Tool** 17. Hose Tube 3 4 5 6 7 8 9 16 15 14 13 12 11 17 10 19. Dusting/ Upholstery Tool** 21. Carry Handle 2.1 1 2 5. Height Adjustment 9. Bag...
.... 6 HOW TO USE Vacuum Description 1. Headlight* 7. To turn vacuum ON, push ON/OFF switch once. Bag Door Release Button 4. Wand 13. Hose 15. To turn vacuum OFF, push switch again. FOLDING HANDLE for Suction Only Mode, step on select models only **Varies per model 21 20 19... 18 ON-OFF Switch 2.2 2.2 Plug cord into electrical outlet. Brushroll On/Off Pedal* (Suction Only Mode) 11. Crevice Tool 14. Powered Hand Tool** 17. Hose Tube 3 4 5 6 7 8 9 16 15 14 13 12 11 17 10 19. Dusting/ Upholstery Tool** 21. Carry Handle 2.1 1 2 5. Height Adjustment 9. Bag...
Manual
Page 7
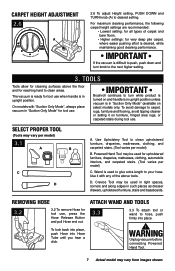
...tool use . IMPORTANT Brushroll continues to the next higher setting. 3. Removing Hose 3.2 3.2 To remove Hose for reaching hard to desired setting. Attach Wand and Tools 3.3 3.3 To attach tool or wand to your hose. Wand is desired, while maintaining good cleaning performance. D. WARNING Unplug vacuum...Only Mode", always place vacuum in such places as dresser drawers, upholstered furniture, stairs and baseboards. To lock back into place, push Hose into place. ! On models with any of carpet and bare floors. • Higher settings: for tool use . To avoid damage...
...tool use . IMPORTANT Brushroll continues to the next higher setting. 3. Removing Hose 3.2 3.2 To remove Hose for reaching hard to desired setting. Attach Wand and Tools 3.3 3.3 To attach tool or wand to your hose. Wand is desired, while maintaining good cleaning performance. D. WARNING Unplug vacuum...Only Mode", always place vacuum in such places as dresser drawers, upholstered furniture, stairs and baseboards. To lock back into place, push Hose into place. ! On models with any of carpet and bare floors. • Higher settings: for tool use . To avoid damage...
Manual
Page 8
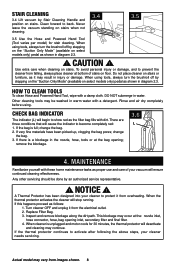
...from falling, always place cleaner at the bag opening inlet, secondary filter and final filter. 4. DO NOT submerge in the nozzle, hose, tools or at bottom of your cleaner needs servicing. Rinse and air dry completely before using tools, always turn the brushroll off by...to protect it from images shown. 8 Other cleaning tools may occur at the: nozzle inlet, hose connector, hose, bag opening ; Use extra care when cleaning on stairs when not cleaning. 3.4 3.5 3.5 Use the Hose and Powered Hand Tool (Tool varies per model) for 30 minutes, the thermal protector will stop...
...from falling, always place cleaner at the bag opening inlet, secondary filter and final filter. 4. DO NOT submerge in the nozzle, hose, tools or at bottom of your cleaner needs servicing. Rinse and air dry completely before using tools, always turn the brushroll off by...to protect it from images shown. 8 Other cleaning tools may occur at the: nozzle inlet, hose connector, hose, bag opening ; Use extra care when cleaning on stairs when not cleaning. 3.4 3.5 3.5 Use the Hose and Powered Hand Tool (Tool varies per model) for 30 minutes, the thermal protector will stop...
Manual
Page 11
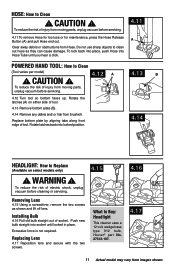
...two screws. Do not use or for maintenance, press the Hose Release Button (A) and pull Hose end out. Rotate the latches (A) on select models only) 4.15 ! What to Clean ! HOSE: How to Buy: Headlight This cleaner uses a 12 volt, wedge base type 912 bulb, Hoover® part No. 27313-107. 4.16 4.17 11... Actual model may vary from images shown. To reduce the risk of tool. 4.13 Remove bottom plate (B). 4.14 Remove any debris and/ or hair from Hose. Replace bottom plate by aligning tabs along front edge...
...two screws. Do not use or for maintenance, press the Hose Release Button (A) and pull Hose end out. Rotate the latches (A) on select models only) 4.15 ! What to Clean ! HOSE: How to Buy: Headlight This cleaner uses a 12 volt, wedge base type 912 bulb, Hoover® part No. 27313-107. 4.16 4.17 11... Actual model may vary from images shown. To reduce the risk of tool. 4.13 Remove bottom plate (B). 4.14 Remove any debris and/ or hair from Hose. Replace bottom plate by aligning tabs along front edge...
Manual
Page 13
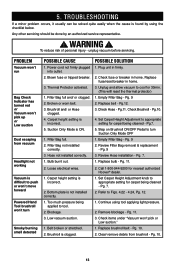
...using the checklist below. Carpet height setting is clogged. 2. Replace fuse/reset breaker in home. 3. Replace belt - Pg.7. 5. Review Hose installation - Carpet height setting is found by an authorized service representative. ! Set Carpet Height Adjustment knob to Figs. 4.22 - 4.24,...Filter Bag full. 2. Hose not installed correctly. 1. Bulb burnt out. Unplug and allow vacuum to tool. 2. Pg.11. Check Brushroll - Set Carpet Height Adjustment to appropriate setting for carpet being applied to cool for nearest authorized Hoover® dealer. 1. ...
...using the checklist below. Carpet height setting is clogged. 2. Replace fuse/reset breaker in home. 3. Replace belt - Pg.7. 5. Review Hose installation - Carpet height setting is found by an authorized service representative. ! Set Carpet Height Adjustment knob to Figs. 4.22 - 4.24,...Filter Bag full. 2. Hose not installed correctly. 1. Bulb burnt out. Unplug and allow vacuum to tool. 2. Pg.11. Check Brushroll - Set Carpet Height Adjustment to appropriate setting for carpet being applied to cool for nearest authorized Hoover® dealer. 1. ...


