Manual
Page 1
TM Upright Vacuum Cleaner by HOOVER Owner's Manual ENGLISH § pp.1-12 ESPAÑOL § pág. 14-21 FRANÇAIS § p. 23-30 Thank you for easy assembly (see page 3) www.hoover.com ® This product was designed for your purchase!
TM Upright Vacuum Cleaner by HOOVER Owner's Manual ENGLISH § pp.1-12 ESPAÑOL § pág. 14-21 FRANÇAIS § p. 23-30 Thank you for easy assembly (see page 3) www.hoover.com ® This product was designed for your purchase!
Manual
Page 2
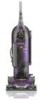
... Assembling Cleaner 3-4 Carton Contents 3 Cleaner Descriptions 4 How To Use 4-6 Cleaning Tools 6 Carpet Height Adjustment 5 Custom Control™ Switch 5 If You Have a Problem 11 Clearing Blockages 12 Important Safeguards 2 Lubrication 11 Maintenance Authorized Service 12 Cleaning filter 8 Emptying Dirt Cup 7 Replacing Powered Hand Tool Agitator Brush Roll 10 Replacing Power Hand Tool Belt ..10 Replacing Edge Groomers 9 Replacing Headlight 9 Thermal Protector 11 Warranty 12 © 2004 The Hoover Company www.hoover.com 2 Important Safeguards When using an electrical...
... Assembling Cleaner 3-4 Carton Contents 3 Cleaner Descriptions 4 How To Use 4-6 Cleaning Tools 6 Carpet Height Adjustment 5 Custom Control™ Switch 5 If You Have a Problem 11 Clearing Blockages 12 Important Safeguards 2 Lubrication 11 Maintenance Authorized Service 12 Cleaning filter 8 Emptying Dirt Cup 7 Replacing Powered Hand Tool Agitator Brush Roll 10 Replacing Power Hand Tool Belt ..10 Replacing Edge Groomers 9 Replacing Headlight 9 Thermal Protector 11 Warranty 12 © 2004 The Hoover Company www.hoover.com 2 Important Safeguards When using an electrical...

Manual
Page 3
Click on the "Service" button to find the service outlet nearest you need any assistance: Visit our website at www.hoover.com. only) OR Call 1-330-499-9499 to the store. 1. Hose holder Cleaner Assembly 1-3 1-4 D F H I . Powered hand tool H. Slide handle section onto back of packing materials. If you OR Call 1-800-944-9200 for assembly (Figs. 1-6 and 1-7). Cleaner body C. Furniture nozzle G. Crevice wand 1-5 A B Remove cardboard (A) and four screws...
Click on the "Service" button to find the service outlet nearest you need any assistance: Visit our website at www.hoover.com. only) OR Call 1-330-499-9499 to the store. 1. Hose holder Cleaner Assembly 1-3 1-4 D F H I . Powered hand tool H. Slide handle section onto back of packing materials. If you OR Call 1-800-944-9200 for assembly (Figs. 1-6 and 1-7). Cleaner body C. Furniture nozzle G. Crevice wand 1-5 A B Remove cardboard (A) and four screws...

Manual
Page 4
... other). turns brush rolls ON, for household use Place hose on back of carpet being cleaned. 15. Slide the 'Custom Control' switch to install the proper outlet. How to correct setting for storage. Handle 14. Powered hand tool 17. Edge groomers 18. Hose holder 8. Dirt cup handle 10. Final filter cord around hooks for height of handle (Fig. 1-6) and hose holder (Fig. 1-7). This cleaner is intended for cleaning carpets and rugs. (Brush rolls will fit in wand. If...
... other). turns brush rolls ON, for household use Place hose on back of carpet being cleaned. 15. Slide the 'Custom Control' switch to install the proper outlet. How to correct setting for storage. Handle 14. Powered hand tool 17. Edge groomers 18. Hose holder 8. Dirt cup handle 10. Final filter cord around hooks for height of handle (Fig. 1-6) and hose holder (Fig. 1-7). This cleaner is intended for cleaning carpets and rugs. (Brush rolls will fit in wand. If...

Manual
Page 5
Push forward. low for storage and when using dirt cup handle (B). 2-6 2-7 Handle positions The handle of your cleaner has three positions; Handle position For ease in sliding knob, place handle in upright position. Continued § 5 operating position for general operation on handle. Before reaching edge, push down on carpet and floors; Edge cleaning Special edge groomers are recommended. Carrying cleaner Use the carrying handle to start again, lower nozzle, and use only forward strokes...
Push forward. low for storage and when using dirt cup handle (B). 2-6 2-7 Handle positions The handle of your cleaner has three positions; Handle position For ease in sliding knob, place handle in upright position. Continued § 5 operating position for general operation on handle. Before reaching edge, push down on carpet and floors; Edge cleaning Special edge groomers are recommended. Carrying cleaner Use the carrying handle to start again, lower nozzle, and use only forward strokes...

Manual
Page 6
... tool storage area. Attach wand and tools Attach tool or wand to the hose (K) by pushing it is used for upholstered furniture, draperies, mattresses, clothing, automobile interiors, and carpeted stairs. Align end of extra reach hose with a detergent. With handle in water. I 2-13 2-11 J K L E Turn cleaner OFF before using cleaning tools, cleaner han- J. I . Select proper tool F. Furniture nozzle may be used to give extra length to hose tube (E). Powered hand tool may be in the upright position to wand...
... tool storage area. Attach wand and tools Attach tool or wand to the hose (K) by pushing it is used for upholstered furniture, draperies, mattresses, clothing, automobile interiors, and carpeted stairs. Align end of extra reach hose with a detergent. With handle in water. I 2-13 2-11 J K L E Turn cleaner OFF before using cleaning tools, cleaner han- J. I . Select proper tool F. Furniture nozzle may be used to give extra length to hose tube (E). Powered hand tool may be in the upright position to wand...
Manual
Page 7
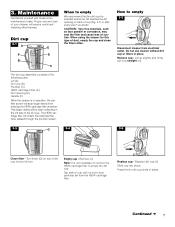
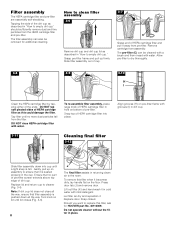
... maintenance tasks. Slide cup into place. Replace dirt cup lid. Note: It is in the left side of cup (Fig. 3-1) or after every use and care of the following parts: Lid (A) Dirt Cup (B) Pre-filter (C) HEPA Cartridge Filter (D) Dirt Opening (E) Handle (F) While the cleaner is not necessary to remove the HEPA cartridge filter to empty 3-2 Disconnect cleaner from the HEPA cartridge filter. When using the cleaner for this type of dirt cup lid one full turn. Tap side of suction...
... maintenance tasks. Slide cup into place. Replace dirt cup lid. Note: It is in the left side of cup (Fig. 3-1) or after every use and care of the following parts: Lid (A) Dirt Cup (B) Pre-filter (C) HEPA Cartridge Filter (D) Dirt Opening (E) Handle (F) While the cleaner is not necessary to remove the HEPA cartridge filter to empty 3-2 Disconnect cleaner from the HEPA cartridge filter. When using the cleaner for this type of dirt cup lid one full turn. Tap side of suction...
Manual
Page 8
... a light snap is felt. Ensure that no more dust particles fall from the HEPA cartridge filter and pre-filter. Snap closed. How to clean filter assembly 3-6 Remove dirt cup and dirt cup lid as this filter, ask for additional cleaning. The pre-filter (C) can also be cleaned with a brush and then rinsed with mild detergent. Slide filter assembly down all the way. Turn knob on the floor. Lift out filter (K) and hand wash it . Replace door...
... a light snap is felt. Ensure that no more dust particles fall from the HEPA cartridge filter and pre-filter. Snap closed. How to clean filter assembly 3-6 Remove dirt cup and dirt cup lid as this filter, ask for additional cleaning. The pre-filter (C) can also be cleaned with a brush and then rinsed with mild detergent. Slide filter assembly down all the way. Turn knob on the floor. Lift out filter (K) and hand wash it . Replace door...
Manual
Page 9
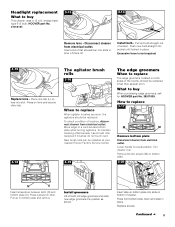
... buy This cleaner uses a 12 volt, wedge base type 912 bulb, HOOVER part No. 27313107. 3-13 3-14 Remove lens - Press outward on bottom plate. 3-20 N O Insert screwdriver between latch (N) and bottom plate (O). Continued § 9 Pull old bulb straight out of brushes, disconnect cleaner from electrical outlet. New brush rolls can be installed at your nearest Hoover Factory Service Center. 3-19 The edge groomers When to replace The edge groomers, located...
... buy This cleaner uses a 12 volt, wedge base type 912 bulb, HOOVER part No. 27313107. 3-13 3-14 Remove lens - Press outward on bottom plate. 3-20 N O Insert screwdriver between latch (N) and bottom plate (O). Continued § 9 Pull old bulb straight out of brushes, disconnect cleaner from electrical outlet. New brush rolls can be installed at your nearest Hoover Factory Service Center. 3-19 The edge groomers When to replace The edge groomers, located...
Manual
Page 10
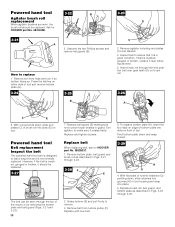
... section). 5. Inspect belt to replace 1. Pivot bottom plate down , slide end plates (C) of tool. Powered hand tool Belt replacement Inspect the belt The powered hand tool belt is in guard. Remove bottom plate, belt guard and brush roll as described in Figs. 3-21 through 3-26. Remove agitator including end plates (C) and discard. 4. Turn agitator, to last a long time and is cracked, gouged or broken, replace it rotates freely. Ask for HOOVER part No. 38528037. 1. Replace brush roll, belt guard, and bottom plate as described...
... section). 5. Inspect belt to replace 1. Pivot bottom plate down , slide end plates (C) of tool. Powered hand tool Belt replacement Inspect the belt The powered hand tool belt is in guard. Remove bottom plate, belt guard and brush roll as described in Figs. 3-21 through 3-26. Remove agitator including end plates (C) and discard. 4. Turn agitator, to last a long time and is cracked, gouged or broken, replace it rotates freely. Ask for HOOVER part No. 38528037. 1. Replace brush roll, belt guard, and bottom plate as described...

Manual
Page 11
... dirt cup. Problem: Powered hand tool brush roll won 't turn Possible cause Possible solution • Too much pressure being applied to 3-11). If this will reset the thermal protector) (see pg. 12). • Agitator brush rolls worn • Replace brush rolls • Dirt cup full • Empty dirt cup • Incorrect carpet height setting • Move nozzle control knob to lower setting • Blockage in air flow passage • Clear blockage • HEPA cartridge filter clogged • Clean HEPA cartridge filter by using tool applying light...
... dirt cup. Problem: Powered hand tool brush roll won 't turn Possible cause Possible solution • Too much pressure being applied to 3-11). If this will reset the thermal protector) (see pg. 12). • Agitator brush rolls worn • Replace brush rolls • Dirt cup full • Empty dirt cup • Incorrect carpet height setting • Move nozzle control knob to lower setting • Blockage in air flow passage • Clear blockage • HEPA cartridge filter clogged • Clean HEPA cartridge filter by using tool applying light...
Manual
Page 12
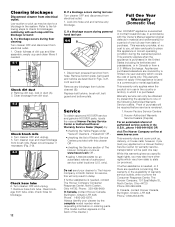
....hoover.com This warranty does not cover pick up may also have other rights which it is used in duct (A). 3. Military Exchange. This warranty does not apply if the appliance is purchased. Disconnect powered hand tool from tube. Hoover Factory Service Centers 2. If further assistance is needed . 4-1 A Check dirt duct 2. Refer to a blockage in correct operating condition during floor cleaning: Turn cleaner OFF and disconnect from a U.S. Turn cleaner OFF and unplug. 7. Remove...
....hoover.com This warranty does not cover pick up may also have other rights which it is used in duct (A). 3. Military Exchange. This warranty does not apply if the appliance is purchased. Disconnect powered hand tool from tube. Hoover Factory Service Centers 2. If further assistance is needed . 4-1 A Check dirt duct 2. Refer to a blockage in correct operating condition during floor cleaning: Turn cleaner OFF and disconnect from a U.S. Turn cleaner OFF and unplug. 7. Remove...


