
Manual
Page 1
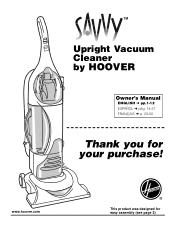
www.hoover.com ® This product was designed for your purchase! TM Upright Vacuum Cleaner by HOOVER Owner's Manual ENGLISH § pp.1-12 ESPAÑOL § pág. 14-21 FRANÇAIS § p. 23-30 Thank you for easy assembly (see page 3)
www.hoover.com ® This product was designed for your purchase! TM Upright Vacuum Cleaner by HOOVER Owner's Manual ENGLISH § pp.1-12 ESPAÑOL § pág. 14-21 FRANÇAIS § p. 23-30 Thank you for easy assembly (see page 3)
Manual
Page 2
... Assembling Cleaner 3-4 Carton Contents 3 Cleaner Descriptions 4 How To Use 4-6 Cleaning Tools 6 Carpet Height Adjustment 5 Custom Control™ Switch 5 If You Have a Problem 11 Clearing Blockages 12 Important Safeguards 2 Lubrication 11 Maintenance Authorized Service 12 Cleaning filter 8 Emptying Dirt Cup 7 Replacing Powered Hand Tool Agitator Brush Roll 10 Replacing Power Hand Tool Belt ..10 Replacing Edge Groomers 9 Replacing Headlight 9 Thermal Protector 11 Warranty 12 © 2004 The Hoover Company www.hoover.com 2 Important Safeguards When using an electrical...
... Assembling Cleaner 3-4 Carton Contents 3 Cleaner Descriptions 4 How To Use 4-6 Cleaning Tools 6 Carpet Height Adjustment 5 Custom Control™ Switch 5 If You Have a Problem 11 Clearing Blockages 12 Important Safeguards 2 Lubrication 11 Maintenance Authorized Service 12 Cleaning filter 8 Emptying Dirt Cup 7 Replacing Powered Hand Tool Agitator Brush Roll 10 Replacing Power Hand Tool Belt ..10 Replacing Edge Groomers 9 Replacing Headlight 9 Thermal Protector 11 Warranty 12 © 2004 The Hoover Company www.hoover.com 2 Important Safeguards When using an electrical...
Manual
Page 3
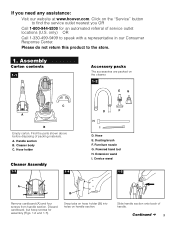
.... Continued § 3 Hose holder Cleaner Assembly 1-3 1-4 D F H I . Powered hand tool H. Crevice wand 1-5 A B Remove cardboard (A) and four screws from handle section. only) OR Call 1-330-499-9499 to the store. 1. Find the parts shown above before disposing of handle. Furniture nozzle G. Discard cardboard, but keep screws for an automated referral of service outlet locations (U.S. Assembly Carton contents 1-1 Accessory packs The accessories are packed on handle section. Cleaner body C. Hose E. Handle section B. Please...
.... Continued § 3 Hose holder Cleaner Assembly 1-3 1-4 D F H I . Powered hand tool H. Crevice wand 1-5 A B Remove cardboard (A) and four screws from handle section. only) OR Call 1-330-499-9499 to the store. 1. Find the parts shown above before disposing of handle. Furniture nozzle G. Discard cardboard, but keep screws for an automated referral of service outlet locations (U.S. Assembly Carton contents 1-1 Accessory packs The accessories are packed on handle section. Cleaner body C. Hose E. Handle section B. Please...
Manual
Page 4
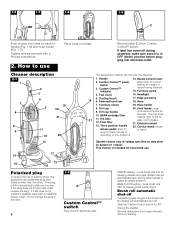
... to operating or low positions. Nozzle control knob: 2. HEPA cartridge filter 21 11. Final filter cord around hooks for cleaning hard surfact floors. Three position handle 22. Unplug the cleaner. Custom Control™ power switch 3. Tool cover 16. Pre-filter 12. Dusting brush 18 6. Crevice wand: stores release pedal: step on bottom of handle (Fig. 1-6) and hose holder (Fig. 1-7). This plug will look like the drawing. 1. How to correct setting for easy cord release. 21. Cleaner...
... to operating or low positions. Nozzle control knob: 2. HEPA cartridge filter 21 11. Final filter cord around hooks for cleaning hard surfact floors. Three position handle 22. Unplug the cleaner. Custom Control™ power switch 3. Tool cover 16. Pre-filter 12. Dusting brush 18 6. Crevice wand: stores release pedal: step on bottom of handle (Fig. 1-6) and hose holder (Fig. 1-7). This plug will look like the drawing. 1. How to correct setting for easy cord release. 21. Cleaner...
Manual
Page 5
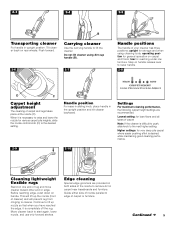
... on handle release lever to remove dirt in carpet near baseboards and furniture. Edge cleaning Special edge groomers are recommended. operating position for reaching under low furniture. Step on handle. Lowest setting: for bare floors and all types of carpet or furniture. upright for very deep pile carpet where easier pushing effort is completely off the rug. Higher settings: for storage and when using dirt cup handle (B). 2-6 2-7 Handle positions The handle of cleaner...
... on handle release lever to remove dirt in carpet near baseboards and furniture. Edge cleaning Special edge groomers are recommended. operating position for reaching under low furniture. Step on handle. Lowest setting: for bare floors and all types of carpet or furniture. upright for very deep pile carpet where easier pushing effort is completely off the rug. Higher settings: for storage and when using dirt cup handle (B). 2-6 2-7 Handle positions The handle of cleaner...
Manual
Page 6
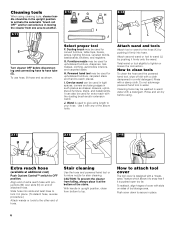
... length to hose tube (E). How to attach tool cover The tool cover is used for stair cleaning. Slide hose into hose. I . Rinse and air dry before disconnecting and connecting hose to your hose. Dusting brush may be used for convenience in place. (To detach hose, reverse procedure.) Attach wands or tools to tighten or loosen the connection. Crevice wand can also be used for upholstered furniture, carpeted stairs and hard-to snap free if...
... length to hose tube (E). How to attach tool cover The tool cover is used for stair cleaning. Slide hose into hose. I . Rinse and air dry before disconnecting and connecting hose to your hose. Dusting brush may be used for convenience in place. (To detach hose, reverse procedure.) Attach wands or tools to tighten or loosen the connection. Crevice wand can also be used for upholstered furniture, carpeted stairs and hard-to snap free if...
Manual
Page 7
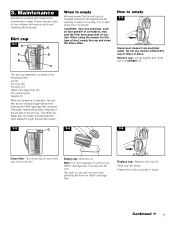
... dust, empty the cup and clean the filters often. Replace dirt cup lid. Slide cup into place. CAUTION: Very fine materials, such as face powder or cornstarch, may seal the filter and cause loss of dirt cup lid one full turn. The dirt cup assembly consists of cup until cup locks in place. Tap side of the following parts: Lid (A) Dirt Cup (B) Pre-filter (C) HEPA Cartridge Filter (D) Dirt Opening (E) Handle (F) While the cleaner is not necessary to remove...
... dust, empty the cup and clean the filters often. Replace dirt cup lid. Slide cup into place. CAUTION: Very fine materials, such as face powder or cornstarch, may seal the filter and cause loss of dirt cup lid one full turn. The dirt cup assembly consists of cup until cup locks in place. Tap side of the following parts: Lid (A) Dirt Cup (B) Pre-filter (C) HEPA Cartridge Filter (D) Dirt Opening (E) Handle (F) While the cleaner is not necessary to remove...
Manual
Page 8
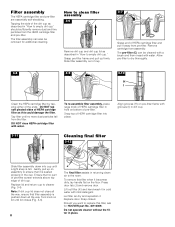
... pre-filter. Turn knob on bottom of HEPA cartridge filter into cup until no part of pre-filter screen extends above top edge of HEPA cartridge filter and pull it away from the filter. To remove this filter, ask for additional cleaning. Lift out filter (K) and hand wash it is pushed down into place. 3-11 Cleaning final filter 3-12 Align grooves (H) on the floor. How to empty dirt cup." Tap filter until a light...
... pre-filter. Turn knob on bottom of HEPA cartridge filter into cup until no part of pre-filter screen extends above top edge of HEPA cartridge filter and pull it away from the filter. To remove this filter, ask for additional cleaning. Lift out filter (K) and hand wash it is pushed down into place. 3-11 Cleaning final filter 3-12 Align grooves (H) on the floor. How to empty dirt cup." Tap filter until a light...
Manual
Page 9
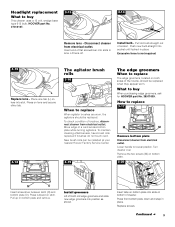
.... 3-18 The agitator brush rolls 3-16 When to replace When agitator brushes are worn, the agitators should be replaced. To check condition of cleaner. New brush rolls can be installed at your nearest Hoover Factory Service Center. 3-19 The edge groomers When to replace The edge groomers, located on bottom plate into position as shown. Replace screws. How to replace 3-17 M M Remove bottom plate Disconnect cleaner from electrical outlet. Press front bottom plate down and snap...
.... 3-18 The agitator brush rolls 3-16 When to replace When agitator brushes are worn, the agitators should be replaced. To check condition of cleaner. New brush rolls can be installed at your nearest Hoover Factory Service Center. 3-19 The edge groomers When to replace The edge groomers, located on bottom plate into position as shown. Replace screws. How to replace 3-17 M M Remove bottom plate Disconnect cleaner from electrical outlet. Press front bottom plate down and snap...
Manual
Page 10
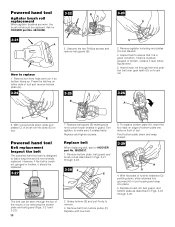
... F E 2. Inspect belt to remove. 3. Powered hand tool Belt replacement Inspect the belt The powered hand tool belt is not normally replaced. Replace and tighten screws. Replace with new belt. 8. Remove tool from turbine pulley (F). If belt is cracked, gouged or broken, it so bottom faces up. Ask for HOOVER part No. 38528037. 1. How to last a long time and is designed to replace 1. Replace belt When replacing belt, ask for HOOVER part No. 48414088. 3-21 A 3-22 B 2. Remove bottom plate, belt guard and brush roll as described...
... F E 2. Inspect belt to remove. 3. Powered hand tool Belt replacement Inspect the belt The powered hand tool belt is not normally replaced. Replace and tighten screws. Replace with new belt. 8. Remove tool from turbine pulley (F). If belt is cracked, gouged or broken, it so bottom faces up. Ask for HOOVER part No. 38528037. 1. How to last a long time and is designed to replace 1. Replace belt When replacing belt, ask for HOOVER part No. 48414088. 3-21 A 3-22 B 2. Remove bottom plate, belt guard and brush roll as described...

Manual
Page 11
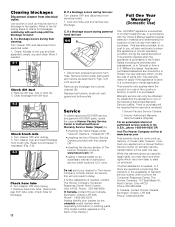
...; Set switch to carpet position • Agitators are obstructed. • Clear obstruction Problem: Cleaner won 't turn on Possible cause Possible solution • Not firmly plugged in • Plug unit in firmly • No voltage in turbine channel • Remove blockage. • Broken or worn belt • Replace belt • Low cleaner suction • Check items under "Cleaner won 't pick up ". Problem: Powered hand tool brush roll won 't pick up ". 11 When the motor cools, the thermal protector automatically resets and cleaning may...
...; Set switch to carpet position • Agitators are obstructed. • Clear obstruction Problem: Cleaner won 't turn on Possible cause Possible solution • Not firmly plugged in • Plug unit in firmly • No voltage in turbine channel • Remove blockage. • Broken or worn belt • Replace belt • Low cleaner suction • Check items under "Cleaner won 't pick up ". Problem: Powered hand tool brush roll won 't pick up ". 11 When the motor cools, the thermal protector automatically resets and cleaning may...
Manual
Page 12
... use : Turn cleaner OFF and disconnect from tube. empty cup and clean filters if needed , or if there are covered by the complete model number when requesting information or ordering parts. (The model number appears on -line at www.hoover.com This warranty does not cover pick up may also have other rights which vary from dirt duct. 4-2 Check brush rolls 4. Turn cleaner over and clear blockage from electrical outlet. 1. Remove hose from turbine channel (B). Replace belt...
... use : Turn cleaner OFF and disconnect from tube. empty cup and clean filters if needed , or if there are covered by the complete model number when requesting information or ordering parts. (The model number appears on -line at www.hoover.com This warranty does not cover pick up may also have other rights which vary from dirt duct. 4-2 Check brush rolls 4. Turn cleaner over and clear blockage from electrical outlet. 1. Remove hose from turbine channel (B). Replace belt...


