Manual
Page 2
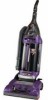
...; authorized dealer locations (U.S. Be sure to register your product online at hoover.com. only) or to speak with a customer service representative; Made in the spaces provided. Model 1-800-944-9200 MFG. CODE Hint: Attach your HOOVER® product. Mon- Please do not return this owner's manual. Follow the authorized dealer locator link to...
...; authorized dealer locations (U.S. Be sure to register your product online at hoover.com. only) or to speak with a customer service representative; Made in the spaces provided. Model 1-800-944-9200 MFG. CODE Hint: Attach your HOOVER® product. Mon- Please do not return this owner's manual. Follow the authorized dealer locator link to...
Manual
Page 4
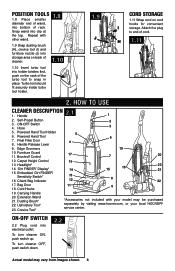
... expose machine to freezing temperatures. • Do not use sharp objects to protect it from images shown. 4 This plug will fit in a dry place. Actual model may cause damage. • Store in a polarized outlet only one blade is unplugged and motor cools for 30 minutes, the thermal protector will stop running.
... expose machine to freezing temperatures. • Do not use sharp objects to protect it from images shown. 4 This plug will fit in a dry place. Actual model may cause damage. • Store in a polarized outlet only one blade is unplugged and motor cools for 30 minutes, the thermal protector will stop running.
Manual
Page 5
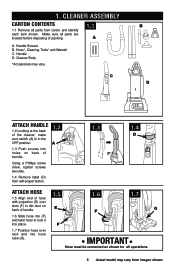
... disposing of packing. 1.1 A A. Make sure all parts from carton and identify each item shown. Hose*, Cleaning Tools* and Wands* C. Cleaner Body *Accessories may vary from self-propel button. 1.3 1.4 D Attach hose 1.5 Align end of hose with projection (E) over slots (F) in dirt duct on back of handle. 1.2 A Using a Phillips screw driver, tighten screws ...hose to lock it into place. 1.7 Position hose over rack and into hose tube (G). 1.5 1.6 1.7 E F G F IMPORTANT Hose must be connected as shown for all operations. 5 Actual model may vary. 1. Handle Screws B.
... disposing of packing. 1.1 A A. Make sure all parts from carton and identify each item shown. Hose*, Cleaning Tools* and Wands* C. Cleaner Body *Accessories may vary from self-propel button. 1.3 1.4 D Attach hose 1.5 Align end of hose with projection (E) over slots (F) in dirt duct on back of handle. 1.2 A Using a Phillips screw driver, tighten screws ...hose to lock it into place. 1.7 Position hose over rack and into hose tube (G). 1.5 1.6 1.7 E F G F IMPORTANT Hose must be connected as shown for all operations. 5 Actual model may vary. 1. Handle Screws B.
Manual
Page 6
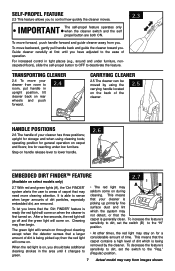
Repeat with your model may vary from images shown. 6 Attach the plug to snap in place. H 1.11 2. Powered Hand Tool Holder 5 6. Crevice Tool* *Accessories not included with other wand. 1.8 1.9...' Display* 14 15. Upholstery Tool* 23. To turn cleaner OFF, push switch down. 2.2 Actual model may be purchased separately by visiting www.hoover.com, or your local HOOVER® service center. Handle 1 2. Cord Hooks 19. Carrying Handle 10 20. Self-Propel Button 2 3. Handle Release Lever 9. Hose 3 5. Extension Wand 21. ON-OFF Switch 2.2 Plug cord into...
Repeat with your model may vary from images shown. 6 Attach the plug to snap in place. H 1.11 2. Powered Hand Tool Holder 5 6. Crevice Tool* *Accessories not included with other wand. 1.8 1.9...' Display* 14 15. Upholstery Tool* 23. To turn cleaner OFF, push switch down. 2.2 Actual model may be purchased separately by visiting www.hoover.com, or your local HOOVER® service center. Handle 1 2. Cord Hooks 19. Carrying Handle 10 20. Self-Propel Button 2 3. Handle Release Lever 9. Hose 3 5. Extension Wand 21. ON-OFF Switch 2.2 Plug cord into...
Manual
Page 7
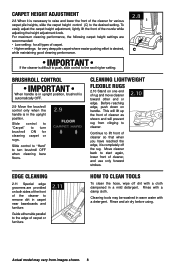
...come on. operating position for a considerable amount of your cleaner from room to green. IMPORTANT The self-propel feature operates only when the cleaner switch and the self propel button are removed. After a few seconds, the red light will go off and the green light...(Regular) position. 7 Actual model may vary from you have adjusted to deactivate the feature. 2.3 Transporting cleaner 2.4 To move forward, push handle forward and guide cleaner away from images shown. upright for reaching under furniture, noncarpeted floors), slide the self-propel button to OFF to the ...
...come on. operating position for a considerable amount of your cleaner from room to green. IMPORTANT The self-propel feature operates only when the cleaner switch and the self propel button are removed. After a few seconds, the red light will go off and the green light...(Regular) position. 7 Actual model may vary from you have adjusted to deactivate the feature. 2.3 Transporting cleaner 2.4 To move forward, push handle forward and guide cleaner away from images shown. upright for reaching under furniture, noncarpeted floors), slide the self-propel button to OFF to the ...
Manual
Page 8
... so that when you have reached the edge, it is necessary to raise and lower the front of the cleaner to the desired setting. Actual model may be washed in a mild detergent. For maximum cleaning performance, the following carpet height settings are provided on both sides of the front of the...
... so that when you have reached the edge, it is necessary to raise and lower the front of the cleaner to the desired setting. Actual model may be washed in a mild detergent. For maximum cleaning performance, the following carpet height settings are provided on both sides of the front of the...
Manual
Page 9
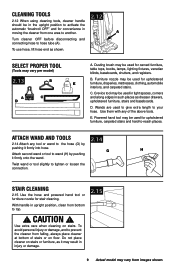
... B E DA C A. D. Use them with any tool or wand to the hose (G) by pushing it may result in injury or damage. 9 Actual model may be used to give extra length to your hose. G H Attach second wand or tool to wand (H) by pushing it firmly into hose. Dusting brush ...
... B E DA C A. D. Use them with any tool or wand to the hose (G) by pushing it may result in injury or damage. 9 Actual model may be used to give extra length to your hose. G H Attach second wand or tool to wand (H) by pushing it firmly into hose. Dusting brush ...
Manual
Page 10
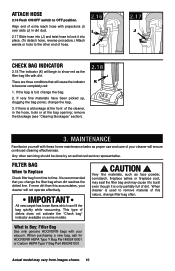
... is a blockage at the bag opening; It is only partially full of debris does not activate the "Check bag" indicator available on some models. ! CAUTION ! If very fine materials have been picked up, clogging the bag pores; MAINTENANCE Familiarize yourself with these home maintenance tasks as ...the filter bag fills with dirt. If more dirt than this nature, change the bag. 2. When purchasing a new bag, ask for HOOVER® HEPA Type Y Bag Part #902419001 or Carbon HEPA Type Y Bag Part #902481001. change filter bag often. Align end of this accumulates, your...
... is a blockage at the bag opening; It is only partially full of debris does not activate the "Check bag" indicator available on some models. ! CAUTION ! If very fine materials have been picked up, clogging the bag pores; MAINTENANCE Familiarize yourself with these home maintenance tasks as ...the filter bag fills with dirt. If more dirt than this nature, change the bag. 2. When purchasing a new bag, ask for HOOVER® HEPA Type Y Bag Part #902419001 or Carbon HEPA Type Y Bag Part #902481001. change filter bag often. Align end of this accumulates, your...
Manual
Page 11
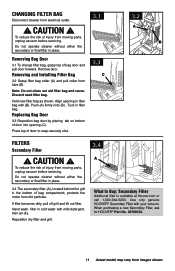
... filter in filter bag. Hand wash filter in cold water with your vacuum. When purchasing a new Secondary Filter, ask for Hoover® Part No. 38765023. 11 Actual model may vary from moving parts, unplug vacuum before servicing. Remove door. Discard used filter bag. Hold new filter bag as shown.... CAUTION ! To reduce the risk of door to Buy: Secondary Filter Additional filter is available at Hoover.com or call 1-800-944-...
... filter in filter bag. Hand wash filter in cold water with your vacuum. When purchasing a new Secondary Filter, ask for Hoover® Part No. 38765023. 11 Actual model may vary from moving parts, unplug vacuum before servicing. Remove door. Discard used filter bag. Hold new filter bag as shown.... CAUTION ! To reduce the risk of door to Buy: Secondary Filter Additional filter is available at Hoover.com or call 1-800-944-...
Manual
Page 12
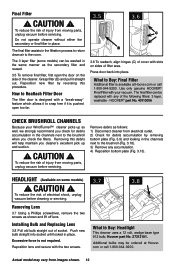
... filtration process to return clean air to Buy: Headlight This cleaner uses a 12 volt, wedge base type 912 bulb, Hoover part No. 27313101. The 3 layer filter (some models) ! How to Reattach Filter Door The filter door is designed with any accumulation. 4) Reposition bottom plate (Fig. 3.13... operate cleaner without either the secondary or final filter in place. Use only genuine HOOVER® Final Filter with the two screws. 3.7 3.8 What to the room. Reposition lens and secure with your WindTunnel™ cleaner picks up and suction. ! To reduce the risk of electrical shock...
... filtration process to return clean air to Buy: Headlight This cleaner uses a 12 volt, wedge base type 912 bulb, Hoover part No. 27313101. The 3 layer filter (some models) ! How to Reattach Filter Door The filter door is designed with any accumulation. 4) Reposition bottom plate (Fig. 3.13... operate cleaner without either the secondary or final filter in place. Use only genuine HOOVER® Final Filter with the two screws. 3.7 3.8 What to the room. Reposition lens and secure with your WindTunnel™ cleaner picks up and suction. ! To reduce the risk of electrical shock...
Manual
Page 13
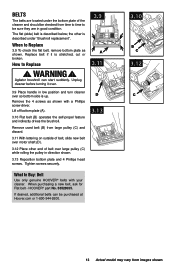
... purchased at Hoover.com or 1-800-944-9200. 3.10 B C 3.12 C 13 Actual model may vary from large pulley (C) and discard. 3.11 With lettering on outside of belt, slide new belt over motor shaft (D). 3.12 Place other is stretched, cut or broken. Lift off bottom plate (A). 3.10 Flat belt (B) operates the self-propel feature and...
... purchased at Hoover.com or 1-800-944-9200. 3.10 B C 3.12 C 13 Actual model may vary from large pulley (C) and discard. 3.11 With lettering on outside of belt, slide new belt over motor shaft (D). 3.12 Place other is stretched, cut or broken. Lift off bottom plate (A). 3.10 Flat belt (B) operates the self-propel feature and...
Manual
Page 14
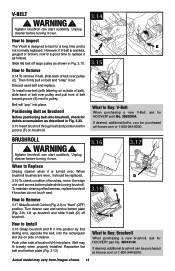
...brushroll. 3.14 E C 3.15 F What to Install 3.18 Grasp brushroll and fit it out. Brushroll ! If desired, additional brushroll can be purchased at Hoover.com or 1-800-944-9200. WARNING ! However, if V-belt is cracked, gouged or broken, now is not normally replaced. If desired, additional belts can ... is designed to last for HOOVER® part No. 48414144. Then firmly pull on belt and "snap" it into position by first sliding end, opposite the belt, into the rectangular slot (G) on outside of belt), slide back of belt over . WARNING ! Actual model may fit loosely when properly ...
...brushroll. 3.14 E C 3.15 F What to Install 3.18 Grasp brushroll and fit it out. Brushroll ! If desired, additional brushroll can be purchased at Hoover.com or 1-800-944-9200. WARNING ! However, if V-belt is cracked, gouged or broken, now is not normally replaced. If desired, additional belts can ... is designed to last for HOOVER® part No. 48414144. Then firmly pull on belt and "snap" it into position by first sliding end, opposite the belt, into the rectangular slot (G) on outside of belt), slide back of belt over . WARNING ! Actual model may fit loosely when properly ...
Manual
Page 15
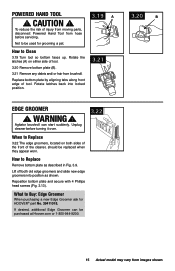
...sides of the front of injury from moving parts, disconnect Powered Hand Tool from hose before turning it over. 3.22 When to be used for HOOVER® part No. 39411018. Unplug cleaner before servicing. Replace bottom plate by aligning tabs along front edge of tool. 3.20 Remove bottom plate... a pet. 3.19 A How to Replace Remove bottom plate as shown. To reduce the risk of the cleaner, should be purchased at Hoover.com or 1-800-944-9200. 15 Actual model may vary from brushroll. Powered Hand Tool ! Rotate latches back into position as described in Fig. 3.9. CAUTION !
...sides of the front of injury from moving parts, disconnect Powered Hand Tool from hose before turning it over. 3.22 When to be used for HOOVER® part No. 39411018. Unplug cleaner before servicing. Replace bottom plate by aligning tabs along front edge of tool. 3.20 Remove bottom plate... a pet. 3.19 A How to Replace Remove bottom plate as shown. To reduce the risk of the cleaner, should be purchased at Hoover.com or 1-800-944-9200. 15 Actual model may vary from brushroll. Powered Hand Tool ! Rotate latches back into position as described in Fig. 3.9. CAUTION !
Manual
Page 16
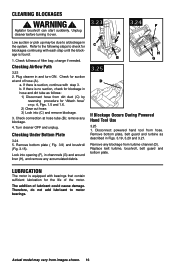
... 3.23 2. Plug cleaner in Figs. 3.19, 3.20 and 3.21. b. Remove bottom plate, belt guard and turbine as follows: 1) Disconnect hose from images shown. 16 Actual model may be due to a blockage in channnels (G) and around liner (H), and remove any blockage. 4. a. If there is found: 1. Lubrication The motor is suction, continue with...
... 3.23 2. Plug cleaner in Figs. 3.19, 3.20 and 3.21. b. Remove bottom plate, belt guard and turbine as follows: 1) Disconnect hose from images shown. 16 Actual model may be due to a blockage in channnels (G) and around liner (H), and remove any blockage. 4. a. If there is found: 1. Lubrication The motor is suction, continue with...

Manual
Page 18
...send your vacuum by : • Checking the Yellow Pages under "Vacuum Cleaners" or "Household". • Visit our website at hoover.com (U.S. Always identify your vacuum to find the service outlet nearest you need further assistance: To speak with a customer service representative... Mon-Fri 8am-7pm EST. Customers) or hoover.ca (Canadian customers). Service To obtain approved Hoover® service and genuine Hoover® parts, locate the nearest Authorized Hoover® Warranty Service Dealer (Depot) by the complete model number when requesting information or ordering parts. (...
...send your vacuum by : • Checking the Yellow Pages under "Vacuum Cleaners" or "Household". • Visit our website at hoover.com (U.S. Always identify your vacuum to find the service outlet nearest you need further assistance: To speak with a customer service representative... Mon-Fri 8am-7pm EST. Customers) or hoover.ca (Canadian customers). Service To obtain approved Hoover® service and genuine Hoover® parts, locate the nearest Authorized Hoover® Warranty Service Dealer (Depot) by the complete model number when requesting information or ordering parts. (...

