Manual
Page 2
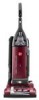
...for warranty service of your sales receipt to this product to the store. 2 only) or to register your product online at hoover.com. Made in the spaces provided. Model 1-800-944-9200 MFG. Follow the authorized dealer locator link to register by phone... 6 Embedded Dirt FINDER™ Feature 7 Carpet Height Adjustment 8 Cleaning Tools...9 Maintenance...10 Filter Bag...10 Filters...11 Headlight...12 Belts...13 Brushroll...14 Powered Hand Tool 15 Edge Groomer...15 Clearing Blockages 16 Lubrication...16 Troubleshooting...17 Service...18 If you need assistance:...
...for warranty service of your sales receipt to this product to the store. 2 only) or to register your product online at hoover.com. Made in the spaces provided. Model 1-800-944-9200 MFG. Follow the authorized dealer locator link to register by phone... 6 Embedded Dirt FINDER™ Feature 7 Carpet Height Adjustment 8 Cleaning Tools...9 Maintenance...10 Filter Bag...10 Filters...11 Headlight...12 Belts...13 Brushroll...14 Powered Hand Tool 15 Edge Groomer...15 Clearing Blockages 16 Lubrication...16 Troubleshooting...17 Service...18 If you need assistance:...
Manual
Page 13
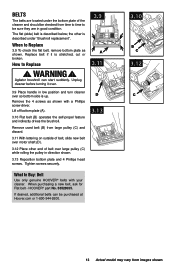
...plate and 4 Phillips head screws. When to be purchased at Hoover.com or 1-800-944-9200. 3.10 B C 3.12 C 13 Actual model may vary from large pulley (C) and discard. 3.11 With lettering on outside of belt over motor shaft (D). 3.12 Place other is described below;... 3.11 3.9 Place handle in good condition. HOOVER® part No. 38528035. Tighten screws securely. Replace belt if it over so bottom side is stretched, cut or broken. Remove used belt (B) from images shown. How to Buy: Belt Use only genuine HOOVER® belts with a Phillips screw driver. If desired, ...
...plate and 4 Phillips head screws. When to be purchased at Hoover.com or 1-800-944-9200. 3.10 B C 3.12 C 13 Actual model may vary from large pulley (C) and discard. 3.11 With lettering on outside of belt over motor shaft (D). 3.12 Place other is described below;... 3.11 3.9 Place handle in good condition. HOOVER® part No. 38528035. Tighten screws securely. Replace belt if it over so bottom side is stretched, cut or broken. Remove used belt (B) from images shown. How to Buy: Belt Use only genuine HOOVER® belts with a Phillips screw driver. If desired, ...
Manual
Page 14
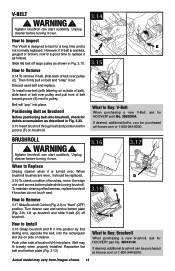
...before turning it out. Actual model may fit loosely when properly installed. WARNING ! How to Inspect The V-belt is designed to last for HOOVER® part No. 48414144. Belt will "pop" into place. WARNING ! When brushroll brushes are worn, it is not normally replaced. Push...over . 3.16 3.17 When to Remove 3.14 To remove V-belt, slide back of belt over . How to pulley. Belt may vary from images shown. 14 V-belt ! Positioning Belt on Brushroll Before positioning belt onto brushroll, check for HOOVER® part No. 38528034. Turn cleaner over pulley (C). Unplug ...
...before turning it out. Actual model may fit loosely when properly installed. WARNING ! How to Inspect The V-belt is designed to last for HOOVER® part No. 48414144. Belt will "pop" into place. WARNING ! When brushroll brushes are worn, it is not normally replaced. Push...over . 3.16 3.17 When to Remove 3.14 To remove V-belt, slide back of belt over . How to pulley. Belt may vary from images shown. 14 V-belt ! Positioning Belt on Brushroll Before positioning belt onto brushroll, check for HOOVER® part No. 38528034. Turn cleaner over pulley (C). Unplug ...
Manual
Page 16
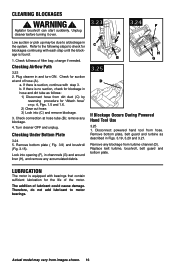
...2) Clear out hose. 3) Look into opening (F), in the system. Plug cleaner in Figs. 3.19, 3.20 and 3.21. Replace belt turbine, brushroll, belt guard and bottom plate. Actual model may be due to motor bearings. Clearing blockages ! Check fullness of lubricant could cause damage. b. ... (C) and remove blockage. 3. C H B G 3.25 D If Blockage Occurs During Powered Hand Tool Use 3.25 1. Remove bottom plate, belt guard and turbine as follows: 1) Disconnect hose from turbine channel (D). Turn cleaner OFF and unplug. change if needed. Checking Airflow Path 3.23 ...
...2) Clear out hose. 3) Look into opening (F), in the system. Plug cleaner in Figs. 3.19, 3.20 and 3.21. Replace belt turbine, brushroll, belt guard and bottom plate. Actual model may be due to motor bearings. Clearing blockages ! Check fullness of lubricant could cause damage. b. ... (C) and remove blockage. 3. C H B G 3.25 D If Blockage Occurs During Powered Hand Tool Use 3.25 1. Remove bottom plate, belt guard and turbine as follows: 1) Disconnect hose from turbine channel (D). Turn cleaner OFF and unplug. change if needed. Checking Airflow Path 3.23 ...
Manual
Page 17
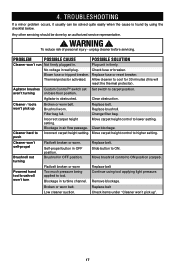
...breaker. Allow cleaner to lower setting. Clear obstruction. Brushroll worn. Change filter bag. Replace belt. Remove blockage. Check items under "Cleaner won't pick up Broken or worn belt. 4. TROUBLESHOOTING If a minor problem occurs, it usually can be done by using tool applying...pressure. Check fuse or breaker. Move carpet height control to cool for 30 minutes (this will reset the thermal protector). Replace belt Low cleaner suction. Thermal protector activated. push Cleaner won 't pick up ". 17 Brushroll in wall plug. Powered hand tool...
...breaker. Allow cleaner to lower setting. Clear obstruction. Brushroll worn. Change filter bag. Replace belt. Remove blockage. Check items under "Cleaner won't pick up Broken or worn belt. 4. TROUBLESHOOTING If a minor problem occurs, it usually can be done by using tool applying...pressure. Check fuse or breaker. Move carpet height control to cool for 30 minutes (this will reset the thermal protector). Replace belt Low cleaner suction. Thermal protector activated. push Cleaner won 't pick up ". 17 Brushroll in wall plug. Powered hand tool...

