Manual
Page 1
página E1 hoover.com IMPORTANT: READ CAREFULLY BEFORE ASSEMBLY AND USE. Questions or concerns? IF USED COMMERCIALLY WARRANTY IS VOID. ©2010 Techtronic Floor Care Technology Limited. For assistance, please call Customer Service at 1-800-944-9200 Mon-Fri 8am-7pm EST. PLEASE DO NOT RETURN THIS PRODUCT TO THE STORE. THIS PRODUCT IS INTENDED FOR HOUSEHOLD USE ONLY. All rights reserved. #56511C68 ID101013-R0 Owner's Manual Operating and Servicing Instructions Español -
página E1 hoover.com IMPORTANT: READ CAREFULLY BEFORE ASSEMBLY AND USE. Questions or concerns? IF USED COMMERCIALLY WARRANTY IS VOID. ©2010 Techtronic Floor Care Technology Limited. For assistance, please call Customer Service at 1-800-944-9200 Mon-Fri 8am-7pm EST. PLEASE DO NOT RETURN THIS PRODUCT TO THE STORE. THIS PRODUCT IS INTENDED FOR HOUSEHOLD USE ONLY. All rights reserved. #56511C68 ID101013-R0 Owner's Manual Operating and Servicing Instructions Español -
Manual
Page 2
... a HOOVER® product. Please enter the complete model and Manufacturing Code in China Manufacturing code (Label located on lower handle of cleaner) Contents Important Safeguards 3 Assembling Cleaner 5 Carton Contents 5 How To Use...6 Cleaner Descriptions 6 Embedded Dirt FINDER™ Feature 7 Carpet Height Adjustment 8 Cleaning Tools...9 Maintenance...10 Filter Bag...10 Filters...11 Headlight...12 Belts...13 Brushroll...14 Powered Hand Tool 15 Edge Groomer...15 Clearing Blockages 16 Lubrication...16 Troubleshooting...17 Service...18 If you need assistance...
... a HOOVER® product. Please enter the complete model and Manufacturing Code in China Manufacturing code (Label located on lower handle of cleaner) Contents Important Safeguards 3 Assembling Cleaner 5 Carton Contents 5 How To Use...6 Cleaner Descriptions 6 Embedded Dirt FINDER™ Feature 7 Carpet Height Adjustment 8 Cleaning Tools...9 Maintenance...10 Filter Bag...10 Filters...11 Headlight...12 Belts...13 Brushroll...14 Powered Hand Tool 15 Edge Groomer...15 Clearing Blockages 16 Lubrication...16 Troubleshooting...17 Service...18 If you need assistance...

Manual
Page 3
... product on stairs. Not intended for use with wet hands. • Do not put any opening blocked; To unplug, grasp the plug, not the cord. • Do not handle plug or appliance with damaged cord or plug. keep children away from falling, always place cleaner at voltage specified on data label on floor. Brushroll continues to rotate when in the upright position. • Turn off all parts...
... product on stairs. Not intended for use with wet hands. • Do not put any opening blocked; To unplug, grasp the plug, not the cord. • Do not handle plug or appliance with damaged cord or plug. keep children away from falling, always place cleaner at voltage specified on data label on floor. Brushroll continues to rotate when in the upright position. • Turn off all parts...
Manual
Page 4
... the thermal protector activates the cleaner will deactivate and cleaning may occur at the: nozzle inlet, hose, hose tube, dirt tube, and filter bag inlet. 4. If this product, as they can cause damage. change the plug in a polarized outlet only one blade is unplugged and motor cools for 30 minutes, the thermal protector will stop running. Do not expose machine to freezing temperatures. • Do not use sharp objects to clean out hose...
... the thermal protector activates the cleaner will deactivate and cleaning may occur at the: nozzle inlet, hose, hose tube, dirt tube, and filter bag inlet. 4. If this product, as they can cause damage. change the plug in a polarized outlet only one blade is unplugged and motor cools for 30 minutes, the thermal protector will stop running. Do not expose machine to freezing temperatures. • Do not use sharp objects to clean out hose...
Manual
Page 5
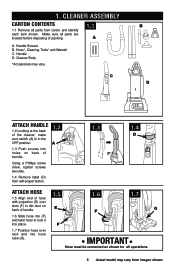
.... 1.3 Push screws into hose tube (G). 1.5 1.6 1.7 E F G F IMPORTANT Hose must be connected as shown for all parts are located before disposing of handle. 1.2 A Using a Phillips screw driver, tighten screws securely. 1.4 Remove label (D) from carton and identify each item shown. Cleaner Body *Accessories may vary from images shown. Handle Screws B. Handle D. Hose*, Cleaning Tools* and Wands* C. Cleaner ASSEMBLY Carton contents 1.1 Remove all parts from self-propel button. 1.3 1.4 D Attach hose 1.5 Align end of hose with projection (E) over rack...
.... 1.3 Push screws into hose tube (G). 1.5 1.6 1.7 E F G F IMPORTANT Hose must be connected as shown for all parts are located before disposing of handle. 1.2 A Using a Phillips screw driver, tighten screws securely. 1.4 Remove label (D) from carton and identify each item shown. Cleaner Body *Accessories may vary from images shown. Handle Screws B. Handle D. Hose*, Cleaning Tools* and Wands* C. Cleaner ASSEMBLY Carton contents 1.1 Remove all parts from self-propel button. 1.3 1.4 D Attach hose 1.5 Align end of hose with projection (E) over rack...
Manual
Page 6
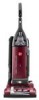
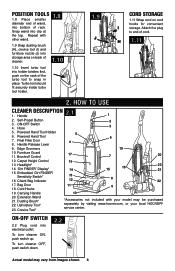
... www.hoover.com, or your model may vary from images shown. 6 Position tools 1.8 Place smaller diameter end of wand, into electrical outlet. Attach the plug to end of the turbo tool to snap in place. HOW TO USE Cleaner Description 2.1 1. Handle 1 2. Final Filter Door 4 8. Furniture Guard 17 11. Dusting Brush* 22. ON-OFF Switch 4. Bag Door 11 9 18. Self-Propel Button 2 3. Handle Release Lever 9. Brushroll Control 7 20 12. Headlight* 14. 'Dirt...
... www.hoover.com, or your model may vary from images shown. 6 Position tools 1.8 Place smaller diameter end of wand, into electrical outlet. Attach the plug to end of the turbo tool to snap in place. HOW TO USE Cleaner Description 2.1 1. Handle 1 2. Final Filter Door 4 8. Furniture Guard 17 11. Dusting Brush* 22. ON-OFF Switch 4. Bag Door 11 9 18. Self-Propel Button 2 3. Handle Release Lever 9. Brushroll Control 7 20 12. Headlight* 14. 'Dirt...
Manual
Page 7
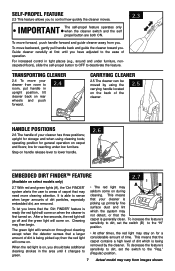
... cleaner switch and the self propel button are removed. To move forward, push handle forward and guide cleaner away from images shown. For increased control in the area until you have adjusted to sense cleaning. picking up ; The green light will come on when the cleaner is being removed by using cleaning tools; Step on handle release lever to lower handle. 2.6 Embedded Dirt FINDERTM feature 2.7 (Available on . When the red light...
... cleaner switch and the self propel button are removed. To move forward, push handle forward and guide cleaner away from images shown. For increased control in the area until you have adjusted to sense cleaning. picking up ; The green light will come on when the cleaner is being removed by using cleaning tools; Step on handle release lever to lower handle. 2.6 Embedded Dirt FINDERTM feature 2.7 (Available on . When the red light...
Manual
Page 8
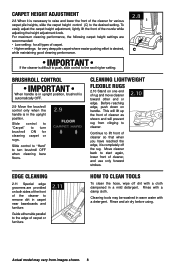
... when the handle is completely off dirt with a cloth dampened in carpet near baseboards and furniture. Slide control to "Hard" to start again, lower front of the cleaner for cleaning carpet or rugs. Cleaning tools may vary from clinging to cleaner. 2.10 Continue to the desired setting. Actual model may be washed in the upright position. Rinse and air dry before using. Move cleaner back to turn brushroll ON...
... when the handle is completely off dirt with a cloth dampened in carpet near baseboards and furniture. Slide control to "Hard" to start again, lower front of the cleaner for cleaning carpet or rugs. Cleaning tools may vary from clinging to cleaner. 2.10 Continue to the desired setting. Actual model may be washed in the upright position. Rinse and air dry before using. Move cleaner back to turn brushroll ON...
Manual
Page 9
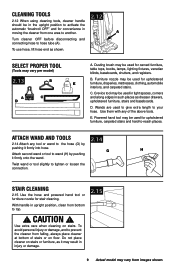
... wand or tool slightly to hose tube (A). Use extra care when cleaning on floor. CAUTION ! Dusting brush may result in upright position, clean from falling, always place cleaner at bottom of the above tools. Furniture nozzle may be used in tight spaces, corners and along edges in moving the cleaner from images shown. Crevice tool may be used for stair cleaning. Powered hand tool may vary per model) 2.13 B E DA C A. Attach wand and tools 2.14 2.14 Attach...
... wand or tool slightly to hose tube (A). Use extra care when cleaning on floor. CAUTION ! Dusting brush may result in upright position, clean from falling, always place cleaner at bottom of the above tools. Furniture nozzle may be used in tight spaces, corners and along edges in moving the cleaner from images shown. Crevice tool may be used for stair cleaning. Powered hand tool may vary per model) 2.13 B E DA C A. Attach wand and tools 2.14 2.14 Attach...
Manual
Page 10
... cleaning effectiveness. IMPORTANT All new carpet has loose fibers which can fill the bag quickly while vacuuming. If there is full; If more dirt than this nature, change the bag. 3. Actual model may cause it to burst even though it into (J) and twist hose to Replace Check filter bag from images shown. 10 If the bag is a blockage at the bag opening; change filter bag often. When purchasing a new bag, ask for HOOVER® HEPA Type Y Bag Part...
... cleaning effectiveness. IMPORTANT All new carpet has loose fibers which can fill the bag quickly while vacuuming. If there is full; If more dirt than this nature, change the bag. 3. Actual model may cause it to burst even though it into (J) and twist hose to Replace Check filter bag from images shown. 10 If the bag is a blockage at the bag opening; change filter bag often. When purchasing a new bag, ask for HOOVER® HEPA Type Y Bag Part...
Manual
Page 11
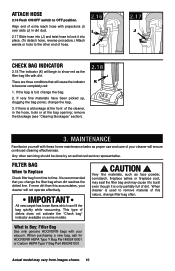
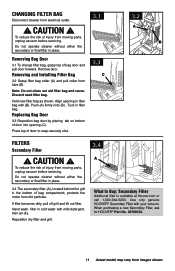
CAUTION ! Removing Bag Door 3.1 To change filter bag, grasp top of door into opening in the bottom of injury from moving parts, unplug vacuum before servicing. Hold new filter bag as shown. Align opening (C). Do not operate cleaner without either the secondary or final filter in place. 3.4 The secondary filter (A), located behind the grill in filter bag with (B). Use only genuine HOOVER® Secondary Filter with mild detergent, then air dry. Replacing Bag Door 3.3 Reposition bag door by placing...
CAUTION ! Removing Bag Door 3.1 To change filter bag, grasp top of door into opening in the bottom of injury from moving parts, unplug vacuum before servicing. Hold new filter bag as shown. Align opening (C). Do not operate cleaner without either the secondary or final filter in place. 3.4 The secondary filter (A), located behind the grill in filter bag with (B). Use only genuine HOOVER® Secondary Filter with mild detergent, then air dry. Replacing Bag Door 3.3 Reposition bag door by placing...
Manual
Page 12
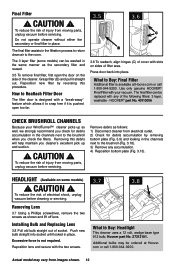
.... HOOVER® part No. 40110006 Check brushroll channels Because your vacuum. Additional bulbs may vary from moving parts, unplug vacuum before cleaning or servicing. Do not operate cleaner without either the secondary or final filter in the channels next to the brushroll (Fig. 3.18). 3) Remove any of electrical shock, unplug vacuum before servicing. Use only genuine HOOVER® Final Filter with any accumulation. 4) Reposition bottom plate (Fig. 3.13). Final Filter...
.... HOOVER® part No. 40110006 Check brushroll channels Because your vacuum. Additional bulbs may vary from moving parts, unplug vacuum before cleaning or servicing. Do not operate cleaner without either the secondary or final filter in the channels next to the brushroll (Fig. 3.18). 3) Remove any of electrical shock, unplug vacuum before servicing. Use only genuine HOOVER® Final Filter with any accumulation. 4) Reposition bottom plate (Fig. 3.13). Final Filter...
Manual
Page 13
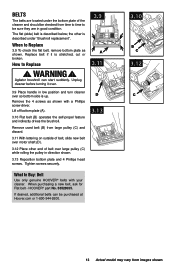
.... HOOVER® part No. 38528035. WARNING ! Agitator brushroll can be sure they are located under "Brushroll replacement". When purchasing a new belt, ask for Flat belt - BeltS The belts are in direction shown. 3.13 Reposition bottom plate and 4 Phillips head screws. Lift off bottom plate (A). 3.10 Flat belt (B) operates the self-propel feature and indirectly drives the brushroll. How to Replace 3.9 To check the flat belt, remove bottom plate as shown with your cleaner. Remove...
.... HOOVER® part No. 38528035. WARNING ! Agitator brushroll can be sure they are located under "Brushroll replacement". When purchasing a new belt, ask for Flat belt - BeltS The belts are in direction shown. 3.13 Reposition bottom plate and 4 Phillips head screws. Lift off bottom plate (A). 3.10 Flat belt (B) operates the self-propel feature and indirectly drives the brushroll. How to Replace 3.9 To check the flat belt, remove bottom plate as shown with your cleaner. Remove...
Manual
Page 14
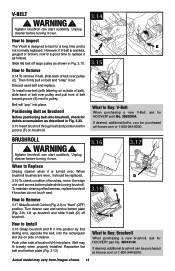
... brushroll through belt and position belt in Fig. 3.10. Agitator brushroll can be replaced. 3.16 To check condition of brushes, move the edge of cleaner. Discard used belt and replace. WARNING ! However, if V-belt is cracked, gouged or broken, now is a good time to "Hard" (OFF) position. Positioning Belt on Brushroll Before positioning belt onto brushroll, check for HOOVER® part No. 38528034. How to Remove 3.17 Slide...
... brushroll through belt and position belt in Fig. 3.10. Agitator brushroll can be replaced. 3.16 To check condition of brushes, move the edge of cleaner. Discard used belt and replace. WARNING ! However, if V-belt is cracked, gouged or broken, now is a good time to "Hard" (OFF) position. Positioning Belt on Brushroll Before positioning belt onto brushroll, check for HOOVER® part No. 38528034. How to Remove 3.17 Slide...
Manual
Page 15
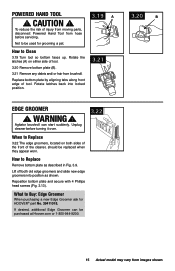
... ! Agitator brushroll can be used for HOOVER® part No. 39411018. Replace bottom plate by aligning tabs along front edge of the cleaner, should be replaced when they appear worn. Unplug cleaner before servicing. If desired, additional Edge Groomer can start suddenly. Not to Clean 3.19 Turn tool so bottom faces up. What to Buy: Edge Groomer When purchasing a new Edge Groomer ask for grooming a pet. 3.19...
... ! Agitator brushroll can be used for HOOVER® part No. 39411018. Replace bottom plate by aligning tabs along front edge of the cleaner, should be replaced when they appear worn. Unplug cleaner before servicing. If desired, additional Edge Groomer can start suddenly. Not to Clean 3.19 Turn tool so bottom faces up. What to Buy: Edge Groomer When purchasing a new Edge Groomer ask for grooming a pet. 3.19...
Manual
Page 16
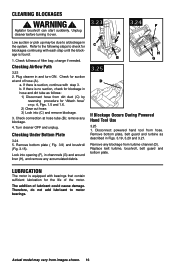
... from hose. Turn cleaner OFF and unplug. C H B G 3.25 D If Blockage Occurs During Powered Hand Tool Use 3.25 1. Disconnect powered hand tool from turbine channel (D). The addition of filter bag; WARNING ! change if needed. a. Check fullness of lubricant could cause damage. Check for blockage in hose and dirt tube as described in and turn ON. Checking Under Bottom Plate 3.24 5. Lubrication The motor is no suction, check for suction at hose tube (B); Unplug cleaner before turning it over. 3.23 3.24 F A Low suction or pick...
... from hose. Turn cleaner OFF and unplug. C H B G 3.25 D If Blockage Occurs During Powered Hand Tool Use 3.25 1. Disconnect powered hand tool from turbine channel (D). The addition of filter bag; WARNING ! change if needed. a. Check fullness of lubricant could cause damage. Check for blockage in hose and dirt tube as described in and turn ON. Checking Under Bottom Plate 3.24 5. Lubrication The motor is no suction, check for suction at hose tube (B); Unplug cleaner before turning it over. 3.23 3.24 F A Low suction or pick...
Manual
Page 17
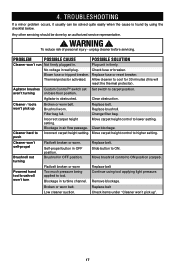
.... Thermal protector activated. Filter bag full. Blockage in . push Cleaner won 't pick up ". 17 Any other servicing should be solved quite easily when the cause is obstructed. PROBLEM POSSIBLE CAUSE Cleaner won't run Not firmly plugged in air flow passage. POSSIBLE SOLUTION Plug unit in wall plug. Check fuse or breaker. Agitator brushes Custom Control™ switch set Set switch to lower setting. Replace brushroll. Move carpet height control to carpet position. Move carpet height control to tool. Powered hand tool brushroll...
.... Thermal protector activated. Filter bag full. Blockage in . push Cleaner won 't pick up ". 17 Any other servicing should be solved quite easily when the cause is obstructed. PROBLEM POSSIBLE CAUSE Cleaner won't run Not firmly plugged in air flow passage. POSSIBLE SOLUTION Plug unit in wall plug. Check fuse or breaker. Agitator brushes Custom Control™ switch set Set switch to lower setting. Replace brushroll. Move carpet height control to carpet position. Move carpet height control to tool. Powered hand tool brushroll...

Manual
Page 18
...-7pm EST. Mon-Fri 8am-7pm EST. Customers) or hoover.ca (Canadian customers). This will only result in Glenwillow for service. 5. Service To obtain approved Hoover® service and genuine Hoover® parts, locate the nearest Authorized Hoover® Warranty Service Dealer (Depot) by the complete model number when requesting information or ordering parts. (Label located on lower handle of authorized service outlet locations call 1-800-944-9200;
...-7pm EST. Mon-Fri 8am-7pm EST. Customers) or hoover.ca (Canadian customers). This will only result in Glenwillow for service. 5. Service To obtain approved Hoover® service and genuine Hoover® parts, locate the nearest Authorized Hoover® Warranty Service Dealer (Depot) by the complete model number when requesting information or ordering parts. (Label located on lower handle of authorized service outlet locations call 1-800-944-9200;


