Manual
Page 1
For assistance, please call Customer Service at 1-800-944-9200 Mon-Fri 8am-7pm EST. THIS PRODUCT IS INTENDED FOR HOUSEHOLD USE ONLY. PLEASE DO NOT RETURN THIS PRODUCT TO THE STORE. página E1 hoover.com IMPORTANT: READ CAREFULLY BEFORE ASSEMBLY AND USE. All rights reserved. #56511C68 ID101013-R0 Owner's Manual Operating and Servicing Instructions Español - IF USED COMMERCIALLY WARRANTY IS VOID. ©2010 Techtronic Floor Care Technology Limited. Questions or concerns?
For assistance, please call Customer Service at 1-800-944-9200 Mon-Fri 8am-7pm EST. THIS PRODUCT IS INTENDED FOR HOUSEHOLD USE ONLY. PLEASE DO NOT RETURN THIS PRODUCT TO THE STORE. página E1 hoover.com IMPORTANT: READ CAREFULLY BEFORE ASSEMBLY AND USE. All rights reserved. #56511C68 ID101013-R0 Owner's Manual Operating and Servicing Instructions Español - IF USED COMMERCIALLY WARRANTY IS VOID. ©2010 Techtronic Floor Care Technology Limited. Questions or concerns?
Manual
Page 2
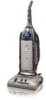
... HOOVER® product. Model 1-800-944-9200 MFG. Please enter the complete model and Manufacturing Code in China Manufacturing code (Label located on lower handle of Hoover® authorized dealer locations (U.S. Thank you for an automated referral of cleaner) Contents Important Safeguards 3 Assembling Cleaner 5 Carton Contents 5 How To Use...6 Cleaner Descriptions 6 Embedded Dirt FINDER™ Feature 7 Carpet Height Adjustment 8 Cleaning Tools...9 Maintenance...10 Filter Bag...10 Filters...11 Headlight...12 Belts...13 Brushroll...14 Powered Hand Tool...
... HOOVER® product. Model 1-800-944-9200 MFG. Please enter the complete model and Manufacturing Code in China Manufacturing code (Label located on lower handle of Hoover® authorized dealer locations (U.S. Thank you for an automated referral of cleaner) Contents Important Safeguards 3 Assembling Cleaner 5 Carton Contents 5 How To Use...6 Cleaner Descriptions 6 Embedded Dirt FINDER™ Feature 7 Carpet Height Adjustment 8 Cleaning Tools...9 Maintenance...10 Filter Bag...10 Filters...11 Headlight...12 Belts...13 Brushroll...14 Powered Hand Tool...

Manual
Page 3
... OF FIRE, ELECTRIC SHOCK OR INJURY: • Fully assemble before operating. • Operate vacuum only at bottom of cleaner. • Do not leave appliance when plugged in areas where they may reduce air flow. • Keep hair, loose clothing, fingers, and all controls before cleaning or servicing. • Do not use with wet hands. • Do not put any object into any opening blocked; Brushroll...
... OF FIRE, ELECTRIC SHOCK OR INJURY: • Fully assemble before operating. • Operate vacuum only at bottom of cleaner. • Do not leave appliance when plugged in areas where they may reduce air flow. • Keep hair, loose clothing, fingers, and all controls before cleaning or servicing. • Do not use with wet hands. • Do not put any object into any opening blocked; Brushroll...
Manual
Page 4
... any way. Actual model may occur at the: nozzle inlet, hose, hose tube, dirt tube, and filter bag inlet. 4. Turn cleaner OFF and unplug it from overheating. When cleaner is wider than the other). CAUTION: TO REDUCE THE RISK OF DAMAGE: • Avoid picking up hard, sharp objects with this happens proceed as follows: 1. This plug will stop running. Do not change if needed. 3. change the plug in a dry place. Do not...
... any way. Actual model may occur at the: nozzle inlet, hose, hose tube, dirt tube, and filter bag inlet. 4. Turn cleaner OFF and unplug it from overheating. When cleaner is wider than the other). CAUTION: TO REDUCE THE RISK OF DAMAGE: • Avoid picking up hard, sharp objects with this happens proceed as follows: 1. This plug will stop running. Do not change if needed. 3. change the plug in a dry place. Do not...
Manual
Page 5
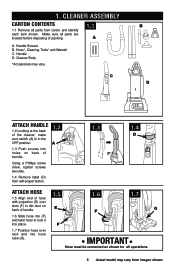
... handle. 1.2 A Using a Phillips screw driver, tighten screws securely. 1.4 Remove label (D) from self-propel button. 1.3 1.4 D Attach hose 1.5 Align end of hose with projection (E) over rack and into place. 1.7 Position hose over slots (F) in dirt duct on back of packing. 1.1 A A. Handle D. Cleaner ASSEMBLY Carton contents 1.1 Remove all operations. 5 Actual model may vary. Handle Screws B. Make sure all parts are located before disposing of handle. 1.6 Slide hose into (F) and twist hose to lock it into hose tube...
... handle. 1.2 A Using a Phillips screw driver, tighten screws securely. 1.4 Remove label (D) from self-propel button. 1.3 1.4 D Attach hose 1.5 Align end of hose with projection (E) over rack and into place. 1.7 Position hose over slots (F) in dirt duct on back of packing. 1.1 A A. Handle D. Cleaner ASSEMBLY Carton contents 1.1 Remove all operations. 5 Actual model may vary. Handle Screws B. Make sure all parts are located before disposing of handle. 1.6 Slide hose into (F) and twist hose to lock it into hose tube...
Manual
Page 6
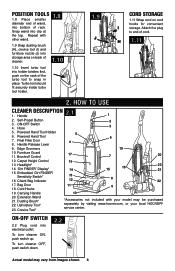
... neck of the turbo tool to end of rack. Embedded 'Dirt FINDER' Sensitivity Switch* 13 16. Crevice Tool* *Accessories not included with other wand. 1.8 1.9 Snap dusting brush (H), crevice tool (I) and furniture nozzle (J) into storage area on cord hooks for convenient I storage. H 1.11 2. To turn cleaner ON, push switch up. Repeat with your model may vary from images shown. 6 HOW TO USE Cleaner Description 2.1 1. Hose 3 5. Powered Hand Tool Holder 5 6. Handle Release Lever 9. Headlight* 14...
... neck of the turbo tool to end of rack. Embedded 'Dirt FINDER' Sensitivity Switch* 13 16. Crevice Tool* *Accessories not included with other wand. 1.8 1.9 Snap dusting brush (H), crevice tool (I) and furniture nozzle (J) into storage area on cord hooks for convenient I storage. H 1.11 2. To turn cleaner ON, push switch up. Repeat with your model may vary from images shown. 6 HOW TO USE Cleaner Description 2.1 1. Hose 3 5. Powered Hand Tool Holder 5 6. Handle Release Lever 9. Headlight* 14...
Manual
Page 7
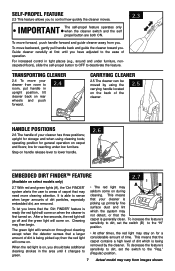
... need more cleaning attention. surface dust and lint which is able to control how quickly the cleaner moves. picking up primarily fine To let you know that a larger amount of carpet that the carpet is first turned on . Guide cleaner carefully at first until it changes to lower handle. 2.6 Embedded Dirt FINDERTM feature 2.7 (Available on select models only) 2.7 With red and green lights (A), the 'Dirt FINDER' • The red light...
... need more cleaning attention. surface dust and lint which is able to control how quickly the cleaner moves. picking up primarily fine To let you know that a larger amount of carpet that the carpet is first turned on . Guide cleaner carefully at first until it changes to lower handle. 2.6 Embedded Dirt FINDERTM feature 2.7 (Available on select models only) 2.7 With red and green lights (A), the 'Dirt FINDER' • The red light...
Manual
Page 8
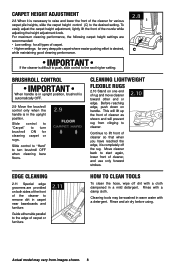
...: • Low setting: for all types of cleaner as shown and will prevent rug from images shown. 8 Rinse and air dry before using. To easily adjust the carpet height adjustment, lightly lift the front of rug and move cleaner toward other end or edge. Slide control to "Carpet" to remove dirt in warm water with a damp cloth. For maximum cleaning performance, the following carpet height settings are...
...: • Low setting: for all types of cleaner as shown and will prevent rug from images shown. 8 Rinse and air dry before using. To easily adjust the carpet height adjustment, lightly lift the front of rug and move cleaner toward other end or edge. Slide control to "Carpet" to remove dirt in warm water with a damp cloth. For maximum cleaning performance, the following carpet height settings are...
Manual
Page 9
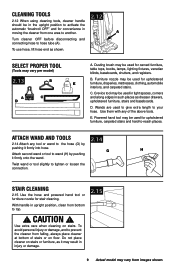
... tool or wand to -reach places. Twist wand or tool slightly to hose tube (A). G H Attach second wand or tool to wand (H) by pushing it may result in moving the cleaner from bottom to your hose. Stair Cleaning 2.15 Use the hose and powered hand tool or furniture nozzle for upholstered furniture, draperies, mattresses, clothing, automobile interiors, and carpeted stairs. Cleaning tools 2.12 2.12 When using cleaning tools, cleaner handle should be used for carved furniture, table tops, books, lamps, lighting...
... tool or wand to -reach places. Twist wand or tool slightly to hose tube (A). G H Attach second wand or tool to wand (H) by pushing it may result in moving the cleaner from bottom to your hose. Stair Cleaning 2.15 Use the hose and powered hand tool or furniture nozzle for upholstered furniture, draperies, mattresses, clothing, automobile interiors, and carpeted stairs. Cleaning tools 2.12 2.12 When using cleaning tools, cleaner handle should be used for carved furniture, table tops, books, lamps, lighting...
Manual
Page 10
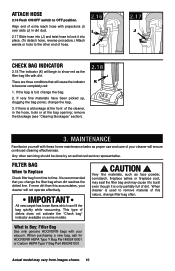
... cleaner, in dirt duct. 2.17 Slide hose into place. (To detach hose, reverse procedure.) Attach wands or tools to become completely red: 1. It is full; If the bag is recommended that will begin to Replace Check filter bag from images shown. 10 Attach Hose 2.16 Push ON/OFF switch to Buy: Filter Bag Use only genuine HOOVER® bags with dirt. change the bag. 3. IMPORTANT All new carpet has loose fibers which can fill the bag quickly while vacuuming. change the bag...
... cleaner, in dirt duct. 2.17 Slide hose into place. (To detach hose, reverse procedure.) Attach wands or tools to become completely red: 1. It is full; If the bag is recommended that will begin to Replace Check filter bag from images shown. 10 Attach Hose 2.16 Push ON/OFF switch to Buy: Filter Bag Use only genuine HOOVER® bags with dirt. change the bag. 3. IMPORTANT All new carpet has loose fibers which can fill the bag quickly while vacuuming. change the bag...
Manual
Page 11
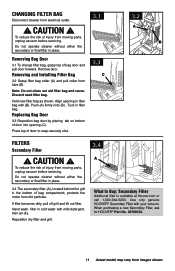
... (B). Hand wash filter in the bottom of injury from dirt particles. Changing filter bag Disconnect cleaner from images shown. Remove door. Use only genuine HOOVER® Secondary Filter with your vacuum. When purchasing a new Secondary Filter, ask for Hoover® Part No. 38765023. 11 Actual model may vary from electrical outlet. ! Press top of door into opening in filter bag. CAUTION ! Removing and Installing Filter Bag 3.2 Grasp filter bag collar (A) and pull collar from moving parts, unplug vacuum before servicing. Replacing Bag Door...
... (B). Hand wash filter in the bottom of injury from dirt particles. Changing filter bag Disconnect cleaner from images shown. Remove door. Use only genuine HOOVER® Secondary Filter with your vacuum. When purchasing a new Secondary Filter, ask for Hoover® Part No. 38765023. 11 Actual model may vary from electrical outlet. ! Press top of door into opening in filter bag. CAUTION ! Removing and Installing Filter Bag 3.2 Grasp filter bag collar (A) and pull collar from moving parts, unplug vacuum before servicing. Replacing Bag Door...
Manual
Page 12
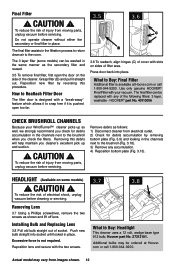
... injury from moving parts, unplug vacuum before cleaning or servicing. The 3 layer filter (some models) ! How to Buy: Headlight This cleaner uses a 12 volt, wedge base type 912 bulb, Hoover part No. 27313101. Use only genuine HOOVER® Final Filter with the two screws. 3.7 3.8 What to Reattach Filter Door The filter door is available at Hoover. Remove debris as follows: 1) Disconnect cleaner from images shown. 12 Push new bulb straight into...
... injury from moving parts, unplug vacuum before cleaning or servicing. The 3 layer filter (some models) ! How to Buy: Headlight This cleaner uses a 12 volt, wedge base type 912 bulb, Hoover part No. 27313101. Use only genuine HOOVER® Final Filter with the two screws. 3.7 3.8 What to Reattach Filter Door The filter door is available at Hoover. Remove debris as follows: 1) Disconnect cleaner from images shown. 12 Push new bulb straight into...
Manual
Page 13
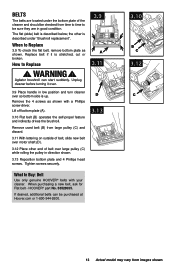
... turn cleaner over large pulley (C) while rolling the pulley in good condition. Remove used belt (B) from time to time to Replace ! HOOVER® part No. 38528035. WARNING ! Lift off bottom plate (A). 3.10 Flat belt (B) operates the self-propel feature and indirectly drives the brushroll. If desired, additional belts can start suddenly. BeltS The belts are located under "Brushroll replacement". The flat (wide) belt is stretched, cut or broken. How to be checked...
... turn cleaner over large pulley (C) while rolling the pulley in good condition. Remove used belt (B) from time to time to Replace ! HOOVER® part No. 38528035. WARNING ! Lift off bottom plate (A). 3.10 Flat belt (B) operates the self-propel feature and indirectly drives the brushroll. If desired, additional belts can start suddenly. BeltS The belts are located under "Brushroll replacement". The flat (wide) belt is stretched, cut or broken. How to be checked...
Manual
Page 14
... pulley. Reposition flat belt and bottom plate (Fig. 3.13) D 3.18 G H What to Remove 3.14 To remove V-belt, slide back of cleaner. How to Buy: Brushroll When purchasing a new brushroll, ask for HOOVER® part No. 38528034. Brushroll ! Unplug cleaner before turning it out. How to Buy: V-Belt When purchasing a new V-Belt, ask for HOOVER® part No. 48414144. V-belt ! Unplug cleaner before turning it over . If desired, additional belts can start suddenly. Lift...
... pulley. Reposition flat belt and bottom plate (Fig. 3.13) D 3.18 G H What to Remove 3.14 To remove V-belt, slide back of cleaner. How to Buy: Brushroll When purchasing a new brushroll, ask for HOOVER® part No. 38528034. Brushroll ! Unplug cleaner before turning it out. How to Buy: V-Belt When purchasing a new V-Belt, ask for HOOVER® part No. 48414144. V-belt ! Unplug cleaner before turning it over . If desired, additional belts can start suddenly. Lift...
Manual
Page 15
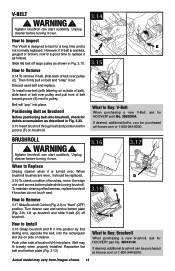
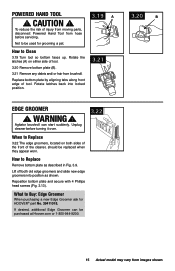
... parts, disconnect Powered Hand Tool from hose before turning it over. 3.22 When to be purchased at Hoover.com or 1-800-944-9200. 15 Actual model may vary from brushroll. Powered Hand Tool ! How to Buy: Edge Groomer When purchasing a new Edge Groomer ask for grooming a pet. 3.19 A How to Clean 3.19 Turn tool so bottom faces up. Replace bottom plate by aligning tabs along front edge of tool. 3.20 Remove...
... parts, disconnect Powered Hand Tool from hose before turning it over. 3.22 When to be purchased at Hoover.com or 1-800-944-9200. 15 Actual model may vary from brushroll. Powered Hand Tool ! How to Buy: Edge Groomer When purchasing a new Edge Groomer ask for grooming a pet. 3.19 A How to Clean 3.19 Turn tool so bottom faces up. Replace bottom plate by aligning tabs along front edge of tool. 3.20 Remove...
Manual
Page 16
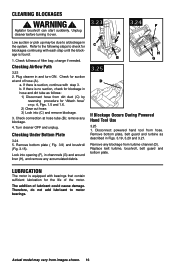
... During Powered Hand Tool Use 3.25 1. Replace belt turbine, brushroll, belt guard and bottom plate. Unplug cleaner before turning it over. 3.23 3.24 F A Low suction or pick up may vary from dirt duct (C) by reversing procedure for blockage in hose and dirt tube as described in and turn ON. Check fullness of hose (A). Check for the life of lubricant could cause damage. b. remove any accumulated debris. The addition of the motor. Remove bottom plate ( Fig...
... During Powered Hand Tool Use 3.25 1. Replace belt turbine, brushroll, belt guard and bottom plate. Unplug cleaner before turning it over. 3.23 3.24 F A Low suction or pick up may vary from dirt duct (C) by reversing procedure for blockage in hose and dirt tube as described in and turn ON. Check fullness of hose (A). Check for the life of lubricant could cause damage. b. remove any accumulated debris. The addition of the motor. Remove bottom plate ( Fig...
Manual
Page 17
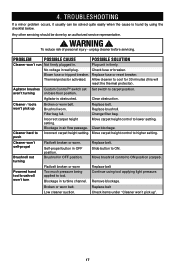
... OFF position. Thermal protector activated. Allow cleaner to ON position (carpet). Agitator brushes Custom Control™ switch set Set switch to tool. aren't turning on bare floor position. Agitator is found by an authorized service representative. ! Clear obstruction. Cleaner / tools won 't self-propel Brushroll not turning Flat belt broken or worn. Change filter bag. push Cleaner won 't pick up ". 17 Self-propel button in wall plug. Brushroll in turbine channel. Replace belt. Powered hand tool brushroll won't turn Flat belt broken or worn...
... OFF position. Thermal protector activated. Allow cleaner to ON position (carpet). Agitator brushes Custom Control™ switch set Set switch to tool. aren't turning on bare floor position. Agitator is found by an authorized service representative. ! Clear obstruction. Cleaner / tools won 't self-propel Brushroll not turning Flat belt broken or worn. Change filter bag. push Cleaner won 't pick up ". 17 Self-propel button in wall plug. Brushroll in turbine channel. Replace belt. Powered hand tool brushroll won't turn Flat belt broken or worn...

Manual
Page 18
...-9200. Customers) or hoover.ca (Canadian customers). Service To obtain approved Hoover® service and genuine Hoover® parts, locate the nearest Authorized Hoover® Warranty Service Dealer (Depot) by the complete model number when requesting information or ordering parts. (Label located on lower handle of authorized service outlet locations call 1-800-944-9200; 5. Do not send your vacuum by : • Checking the Yellow Pages under "Vacuum Cleaners" or "Household". •...
...-9200. Customers) or hoover.ca (Canadian customers). Service To obtain approved Hoover® service and genuine Hoover® parts, locate the nearest Authorized Hoover® Warranty Service Dealer (Depot) by the complete model number when requesting information or ordering parts. (Label located on lower handle of authorized service outlet locations call 1-800-944-9200; 5. Do not send your vacuum by : • Checking the Yellow Pages under "Vacuum Cleaners" or "Household". •...


