Manual
Page 1
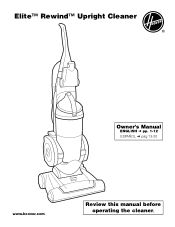
Elite™ Rewind™ Upright Cleaner ® Owner's Manual ENGLISH § pp. 1-12 ESPAÑOL § pág 13-20 www.hoover.com Review this manual before operating the cleaner.
Elite™ Rewind™ Upright Cleaner ® Owner's Manual ENGLISH § pp. 1-12 ESPAÑOL § pág 13-20 www.hoover.com Review this manual before operating the cleaner.

Manual
Page 2
... parts. Never handle plug or appliance with wet hands. • Hold onto the plug while cord is not recommended. • Do not use without dirt cup or filters in China Hecho en China/FaébreinquChine SERIAL NUMBER Contents Assembling Cleaner 3 Carton Contents 3 Cleaner Descriptions 4 How To Use 4-6 Cleaning Tools 6 If You Have a Problem 11 Important Safeguards 2 Lubrication 9 Maintenance 6-11 Authorized Service 11 Cleaning Filters 7-8 Clearing Blockages 12 Emptying Dirt Cup 6-7 Replacing Agitator Brush Roll ........9 Replacing Belt 8-9 Replacing Powered Hand Tool...
... parts. Never handle plug or appliance with wet hands. • Hold onto the plug while cord is not recommended. • Do not use without dirt cup or filters in China Hecho en China/FaébreinquChine SERIAL NUMBER Contents Assembling Cleaner 3 Carton Contents 3 Cleaner Descriptions 4 How To Use 4-6 Cleaning Tools 6 If You Have a Problem 11 Important Safeguards 2 Lubrication 9 Maintenance 6-11 Authorized Service 11 Cleaning Filters 7-8 Clearing Blockages 12 Emptying Dirt Cup 6-7 Replacing Agitator Brush Roll ........9 Replacing Belt 8-9 Replacing Powered Hand Tool...
Manual
Page 3
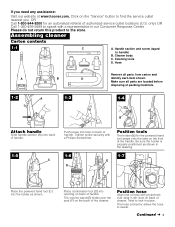
... powered hand tool snaps onto the tabs on the "Service" button to speak with a representative in dirt duct on back of handle. Place combination tool (D) into opening on the back of cleaner. Please do not return this product to handle) B. Handle section and screw (taped to the store. Assembling cleanerDi Carton contents 1-1 C A. Be sure the holder is properly positioned as shown. Cleaning tools D. Make sure all parts...
... powered hand tool snaps onto the tabs on the "Service" button to speak with a representative in dirt duct on back of handle. Place combination tool (D) into opening on the back of cleaner. Please do not return this product to handle) B. Handle section and screw (taped to the store. Assembling cleanerDi Carton contents 1-1 C A. Be sure the holder is properly positioned as shown. Cleaning tools D. Make sure all parts...

Manual
Page 4
... electrical outlet. To turn knob to release cord from marking furniture. 11. Push hose end (J) firmly onto tube I ). J K 2. Carrying handle/Dirt cup handle 5. Cord reel 12. Cord hook 14. ON/OFF pedal 20. Polarized plug To reduce the risk of carpet being cleaned. 10. If it still does not fit, contact a qualified electrician to operating or low positions. To turn cleaner OFF, step on back of plug (A) and pull to use . Dirt cup assembly 7. Hose...
... electrical outlet. To turn knob to release cord from marking furniture. 11. Push hose end (J) firmly onto tube I ). J K 2. Carrying handle/Dirt cup handle 5. Cord reel 12. Cord hook 14. ON/OFF pedal 20. Polarized plug To reduce the risk of carpet being cleaned. 10. If it still does not fit, contact a qualified electrician to operating or low positions. To turn cleaner OFF, step on back of plug (A) and pull to use . Dirt cup assembly 7. Hose...

Manual
Page 5
... operating position. When using cleaning tools, the agitator will prevent rug from bottom to cleaner. low for storage and when using the carrying handle, located on one end of carpet and hard surface flooring. The nozzle will not move cleaner toward other end or edge. Clean from clinging to top. Settings For maximum cleaning performance, the following carpet height settings are recommended: • Lowest setting: for stair cleaning. Stair cleaning Use the hose and power hand tool...
... operating position. When using cleaning tools, the agitator will prevent rug from bottom to cleaner. low for storage and when using the carrying handle, located on one end of carpet and hard surface flooring. The nozzle will not move cleaner toward other end or edge. Clean from clinging to top. Settings For maximum cleaning performance, the following carpet height settings are recommended: • Lowest setting: for stair cleaning. Stair cleaning Use the hose and power hand tool...
Manual
Page 6
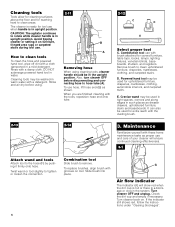
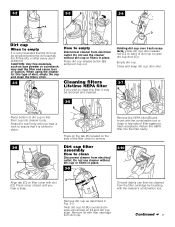
.... Remove brush to clean areas. To replace brushes, align brush with a detergent. Check the dirt cup and empty if necessary. CAUTION: The agitator continues to hose tube (A). Combination tool use with these home maintenance tasks as proper use . Maintenance Familiarize yourself with brush attached for tool use hose, lift hose end (B) as dresser drawers, upholstered furniture, stairs and baseboards. Powered hand tool may be used in tight spaces, corners and along edges in upright position. Slide brush into place. Turn cleaner...
.... Remove brush to clean areas. To replace brushes, align brush with a detergent. Check the dirt cup and empty if necessary. CAUTION: The agitator continues to hose tube (A). Combination tool use with these home maintenance tasks as proper use . Maintenance Familiarize yourself with brush attached for tool use hose, lift hose end (B) as dresser drawers, upholstered furniture, stairs and baseboards. Powered hand tool may be used in tight spaces, corners and along edges in upright position. Slide brush into place. Turn cleaner...
Manual
Page 7
... clean this type of dirt cup to open dirt cup door (D). Do not use if preferred. Press cover closed until arrows on the side of the filter cover to ensure that the dirt cup be emptied before the dirt reaches the fill line (A), or after every use the cleaner without dirt cup or filters in place. 3-9 Remove the HEPA filter (B) and brush with the cleaner's combination tool. Empty dirt cup. Dirt cup filter assembly How to empty Disconnect cleaner from electrical...
... clean this type of dirt cup to open dirt cup door (D). Do not use if preferred. Press cover closed until arrows on the side of the filter cover to ensure that the dirt cup be emptied before the dirt reaches the fill line (A), or after every use the cleaner without dirt cup or filters in place. 3-9 Remove the HEPA filter (B) and brush with the cleaner's combination tool. Empty dirt cup. Dirt cup filter assembly How to empty Disconnect cleaner from electrical...
Manual
Page 8
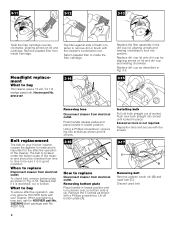
... time to buy To assure effective operation, use only genuine HOOVER belts with the screws. 3-17 C B Removing belt Remove agitator brush roll (B) and used belt. 8 Excessive force is stretched, cut or broken. Removing bottom plate Place handle in lowest position and turn cleaner over so bottom side is in the dirt cup lid, aligning arrows and twisting clockwise to buy This cleaner uses a 13 volt, T-3 114 wedge base bulb, Hoover part No. 27313107. 3-14 Replace the filter assembly in...
... time to buy To assure effective operation, use only genuine HOOVER belts with the screws. 3-17 C B Removing belt Remove agitator brush roll (B) and used belt. 8 Excessive force is stretched, cut or broken. Removing bottom plate Place handle in lowest position and turn cleaner over so bottom side is in the dirt cup lid, aligning arrows and twisting clockwise to buy This cleaner uses a 13 volt, T-3 114 wedge base bulb, Hoover part No. 27313107. 3-14 Replace the filter assembly in...
Manual
Page 9
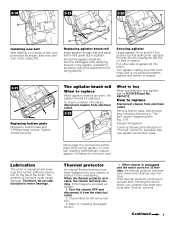
...new belt over motor pulley (D). Remove bottom plate, belt and agitator following directions in "The belt" section to "Clearing blockages" section. 4. Refer to reposition belt, new agitator and bottom plate. Should the agitator shield (F) become dislodged while replacing the belt or the agitator, reposition it from electrical outlet. To check condition of brushes, disconnect cleaner from overheating. Continue following the above steps, your cleaner to motor bearings. Check filters for 30 minutes, the thermal protector automatically resets and cleaning may need servicing...
...new belt over motor pulley (D). Remove bottom plate, belt and agitator following directions in "The belt" section to "Clearing blockages" section. 4. Refer to reposition belt, new agitator and bottom plate. Should the agitator shield (F) become dislodged while replacing the belt or the agitator, reposition it from electrical outlet. To check condition of brushes, disconnect cleaner from overheating. Continue following the above steps, your cleaner to motor bearings. Check filters for 30 minutes, the thermal protector automatically resets and cleaning may need servicing...
Manual
Page 10
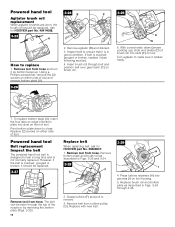
... of brush roll into grooves (I 4. Remove bottom plate and brush roll as described in good condition. Remove tool from hose. Remove agitator (B) and discard. 3. Replace (2) screws on brush roll. 3-25 D E 6. Remove tool from hose and turn it is not normally replaced. Using a Phillips screwdriver, remove the (2) screws on tool. Inspect belt to ensure that it so bottom faces up ), slide end plates (D) of the nozzle or by removing the bottom plate (Figs. 3-23). 10 2. A 7. Replace with new belt. Ask for HOOVER part...
... of brush roll into grooves (I 4. Remove bottom plate and brush roll as described in good condition. Remove tool from hose. Remove agitator (B) and discard. 3. Replace (2) screws on brush roll. 3-25 D E 6. Remove tool from hose and turn it is not normally replaced. Using a Phillips screwdriver, remove the (2) screws on tool. Inspect belt to ensure that it so bottom faces up ), slide end plates (D) of the nozzle or by removing the bottom plate (Figs. 3-23). 10 2. A 7. Replace with new belt. Ask for HOOVER part...
Manual
Page 11
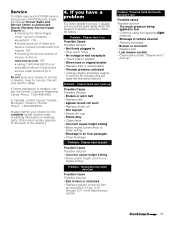
... HOOVER service and genuine HOOVER parts, locate the nearest Hoover Sales and Service Center or Authorized Hoover Warranty Service Dealer (Depot) by: • checking the Yellow Pages under "Cleaner won't pick up Problem: Smoky Possible Cause Possible Solution • Broken or worn belt • Replace belt • Agitator brush roll worn • Replace brush roll • Dirt cup full • Empty dirt cup • Filters dirty • Clean filters • Incorrect carpet height setting • Move nozzle control knob to lower setting • Blockage in air...
... HOOVER service and genuine HOOVER parts, locate the nearest Hoover Sales and Service Center or Authorized Hoover Warranty Service Dealer (Depot) by: • checking the Yellow Pages under "Cleaner won't pick up Problem: Smoky Possible Cause Possible Solution • Broken or worn belt • Replace belt • Agitator brush roll worn • Replace brush roll • Dirt cup full • Empty dirt cup • Filters dirty • Clean filters • Incorrect carpet height setting • Move nozzle control knob to lower setting • Blockage in air...
Manual
Page 12
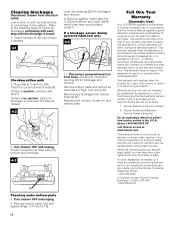
... end of dirt cup; Remove any blockage from electrical outlet. remove any loose debris which may also have accumulated under bottom plate 4. Turn cleaner OFF and unplug. 5. Remove agitator shield (see Fig. 3-18) and remove any blockage. 4-3 D Checking under it is no cost to you, all labor and parts to one way. Disconnect powered hand tool from state to check for blockage and remove. empty if needed , or if...
... end of dirt cup; Remove any blockage from electrical outlet. remove any loose debris which may also have accumulated under bottom plate 4. Turn cleaner OFF and unplug. 5. Remove agitator shield (see Fig. 3-18) and remove any blockage. 4-3 D Checking under it is no cost to you, all labor and parts to one way. Disconnect powered hand tool from state to check for blockage and remove. empty if needed , or if...
Manual
Page 21
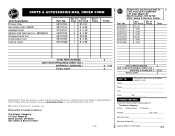
... STATE TAX + SHIPPING & HANDLING + TOTAL COST $ $ 7.50 $ Replacement parts and accessory items may be purchased from your Authorized Hoover Dealer, Leading Retailers, Hoover Sales & Service Centers, on Card Signature (Required Daytime Phone & Area Code ¢ ¢ 21 ¢ PARTS & ACCESSORIES MAIL ORDER FORM ® Item Description Primary filter Secondary filter (HEPA) Headlight bulb Agitator belt (belt part no. 38528040) Powered hand tool Combination tool Crevice wand Part No. 59157055 59157014 27313107...
... STATE TAX + SHIPPING & HANDLING + TOTAL COST $ $ 7.50 $ Replacement parts and accessory items may be purchased from your Authorized Hoover Dealer, Leading Retailers, Hoover Sales & Service Centers, on Card Signature (Required Daytime Phone & Area Code ¢ ¢ 21 ¢ PARTS & ACCESSORIES MAIL ORDER FORM ® Item Description Primary filter Secondary filter (HEPA) Headlight bulb Agitator belt (belt part no. 38528040) Powered hand tool Combination tool Crevice wand Part No. 59157055 59157014 27313107...

Manual
Page 24
1-06 U5507-/09-900 HOOVER y ®son marcas registradas HOOVER and ® are registered trademarks Printed in China 59157088
1-06 U5507-/09-900 HOOVER y ®son marcas registradas HOOVER and ® are registered trademarks Printed in China 59157088


