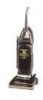
Owners Manual
Page 2
... the COMPLETE model and serial number in the instructions. Verification of date of purchase may damage the cleaner and the bag. • Always turn off all parts of your HOOVER product. DO NOT RETURN THIS PRODUCT TO THE STORE. For your sales receipt to need assistance during... or combustible liquids such as gasoline, or fine wood sandings or use as a toy or to a Hoover Factory Service Center or Authorized Hoover Warranty Service Dealer (Depot). • Use vacuum cleaner only for warranty service of body away from openings, rotating agitator and other tasks. If appliance is a...
... the COMPLETE model and serial number in the instructions. Verification of date of purchase may damage the cleaner and the bag. • Always turn off all parts of your HOOVER product. DO NOT RETURN THIS PRODUCT TO THE STORE. For your sales receipt to need assistance during... or combustible liquids such as gasoline, or fine wood sandings or use as a toy or to a Hoover Factory Service Center or Authorized Hoover Warranty Service Dealer (Depot). • Use vacuum cleaner only for warranty service of body away from openings, rotating agitator and other tasks. If appliance is a...

Owners Manual
Page 3
... compartment F. Filter bag J. A. Handle bolt and nut packet (one extra nut included) I BACK E 3 If you need assistance with a representative in order. This cleaner is extremely important to speak with any step of the assembly, call 1-800-944-9200 for househoId use.... Cleaner body H. Hose and cleaning tools D AB C F G J H I . The assembled cleaner will look like this drawing. only) or 1-330-499-9499 to read and follow all parts from carton and identify each item shown. Assembling cleanerr It is ...
... compartment F. Filter bag J. A. Handle bolt and nut packet (one extra nut included) I BACK E 3 If you need assistance with a representative in order. This cleaner is extremely important to speak with any step of the assembly, call 1-800-944-9200 for househoId use.... Cleaner body H. Hose and cleaning tools D AB C F G J H I . The assembled cleaner will look like this drawing. only) or 1-330-499-9499 to read and follow all parts from carton and identify each item shown. Assembling cleanerr It is ...

Owners Manual
Page 6
... assembly make sure switch is in the OFF position (down on tab. Continued § 6 Make sure all edges of bag into the slots on lower part of bag door into bag compartment. Place furniture nozzle (X) on lip on bag compartment. Close door. 1-20 1-21 1-22 E V Push bag collar firmly...round extension on bottom of rack. 1-26 Press hose firmly into rack at upper extensions. 1-27 W Insert hose connector, with latch toward front of cleaner, into opposite side of rack. 1-28 X With smaller end toward bottom, snap wand into clips on bottom of rack and snap into rack as ...
... assembly make sure switch is in the OFF position (down on tab. Continued § 6 Make sure all edges of bag into the slots on lower part of bag door into bag compartment. Place furniture nozzle (X) on lip on bag compartment. Close door. 1-20 1-21 1-22 E V Push bag collar firmly...round extension on bottom of rack. 1-26 Press hose firmly into rack at upper extensions. 1-27 W Insert hose connector, with latch toward front of cleaner, into opposite side of rack. 1-28 X With smaller end toward bottom, snap wand into clips on bottom of rack and snap into rack as ...

Owners Manual
Page 7
... 1. Bag door 6. Stair cleaning handle: located on , the agitator brush roll will continue to operating or low position. 8. Crevice tool Operate cleaner only at voltage specified on bottom plate on furniture, fringed area rugs or carpeted stairs during tool use. Tool rack 16. Snap into place. Cord ...hooks: wrap cord around hooks for easy cord release. 3. Fill out and return the product registra- Remove rectangular foam retainer (Z), if present, (part of cleaner. 7 Wand 18. Headlight (some models only) 11.
... 1. Bag door 6. Stair cleaning handle: located on , the agitator brush roll will continue to operating or low position. 8. Crevice tool Operate cleaner only at voltage specified on bottom plate on furniture, fringed area rugs or carpeted stairs during tool use. Tool rack 16. Snap into place. Cord ...hooks: wrap cord around hooks for easy cord release. 3. Fill out and return the product registra- Remove rectangular foam retainer (Z), if present, (part of cleaner. 7 Wand 18. Headlight (some models only) 11.

Owners Manual
Page 11
..., ask for the effective operation of the cleaner and should be checked from time to time to replace Removing bottom plate Disconnect cleaner from cleaner body. Repeat in "How to buy This cleaner uses a 12 volt, wedge base type 912 bulb, Hoover Part No.27313-101. Make sure all four ...latches are completely inside bag compartment. Replace belt if it is important for Hoover part No. 40201190. 11 ...
..., ask for the effective operation of the cleaner and should be checked from time to time to replace Removing bottom plate Disconnect cleaner from cleaner body. Repeat in "How to buy This cleaner uses a 12 volt, wedge base type 912 bulb, Hoover Part No.27313-101. Make sure all four ...latches are completely inside bag compartment. Replace belt if it is important for Hoover part No. 40201190. 11 ...
Owners Manual
Page 13
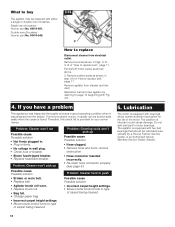
... to type of brushes. remove obstruction. • Hose connector inserted incorrectly. • Re-insert hose connector properly (see page 9.) Problem: Cleaner hard to push Possible cause Possible solution • Incorrect carpet height settings. • Move nozzle control knob to replace belt," page 11. ... Plug in firmly. • No voltage in Figs. 3-10 3-12 of the motor. Single row of brushes Hoover part No. 48414-051, Double row of brushes Hoover part No. 48414-049. 3-16 F How to buy The agitator may be lubricated periodically by referring to type of lubricant...
... to type of brushes. remove obstruction. • Hose connector inserted incorrectly. • Re-insert hose connector properly (see page 9.) Problem: Cleaner hard to push Possible cause Possible solution • Incorrect carpet height settings. • Move nozzle control knob to replace belt," page 11. ... Plug in firmly. • No voltage in Figs. 3-10 3-12 of the motor. Single row of brushes Hoover part No. 48414-051, Double row of brushes Hoover part No. 48414-049. 3-16 F How to buy The agitator may be lubricated periodically by referring to type of lubricant...

Owners Manual
Page 14
... information or ordering parts. (The model number appears on the bottom of the cleaner.) Full Two Year Warranty (Domestic Use) Your HOOVER® appliance is for comparing the relative progressive performance of Hoover uprights only and not for a period of this will be obtained by : • checking the Yellow Pages under "Vacuum Cleaners -Household" OR- •...
... information or ordering parts. (The model number appears on the bottom of the cleaner.) Full Two Year Warranty (Domestic Use) Your HOOVER® appliance is for comparing the relative progressive performance of Hoover uprights only and not for a period of this will be obtained by : • checking the Yellow Pages under "Vacuum Cleaners -Household" OR- •...


