
Manual
Page 2
...Do not run unattended at any opening blocked; others may reduce air flow. • Do not pull or carry by The Hoover Company; Save these instructions! Verification of date of purchase may damage the cleaner. • Always turn off all parts of ... 11 Cleaning Filters 7-8 Emptying Dirt Cup 7 Lubrication 10 Replacing Agitator Brush Roll ......10 Replacing Belt 9-10 Replacing Headlight 8 Thermal Protector 10 Warranty 12 © 2004 The Hoover Company www.hoover.com 2 Important Safeguards When using an electrical appliance, always follow basic precautions, including the following...
...Do not run unattended at any opening blocked; others may reduce air flow. • Do not pull or carry by The Hoover Company; Save these instructions! Verification of date of purchase may damage the cleaner. • Always turn off all parts of ... 11 Cleaning Filters 7-8 Emptying Dirt Cup 7 Lubrication 10 Replacing Agitator Brush Roll ......10 Replacing Belt 9-10 Replacing Headlight 8 Thermal Protector 10 Warranty 12 © 2004 The Hoover Company www.hoover.com 2 Important Safeguards When using an electrical appliance, always follow basic precautions, including the following...
Manual
Page 9
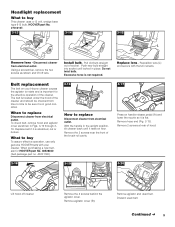
... wedge base type 912 bulb, HOOVER part No. 27313107. 3-13 3-14 3-15 L Remove lens - Do not twist bulb. Remove the 2 screws near the front of the cleaner. Remove agitator cover (B). Remove agitator and used belt. Belt replacement The belt on your cleaner. Disconnect cleaner ...from electrical outlet. Replace lens - The belt is located under the hood of the cleaner and should be sure it is important for HOOVER part No. 38528040 (belt package part no. 40201190)....
... wedge base type 912 bulb, HOOVER part No. 27313107. 3-13 3-14 3-15 L Remove lens - Do not twist bulb. Remove the 2 screws near the front of the cleaner. Remove agitator cover (B). Remove agitator and used belt. Belt replacement The belt on your cleaner. Disconnect cleaner ...from electrical outlet. Replace lens - The belt is located under the hood of the cleaner and should be sure it is important for HOOVER part No. 38528040 (belt package part no. 40201190)....
Manual
Page 10
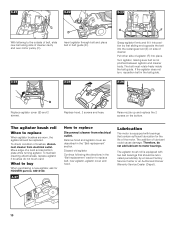
... rectangular slot (E) on the bottom. Continue following the directions in belt guide (D). 3-24 3-25 E F Grasp agitator firmly and fit it into position by a Hoover Factory Service Center or an Authorized Hoover Warranty Service Dealer (Depot). 10 Lubrication The motor is not pinched... between agitator and cleaner body. Insert agitator through belt and place belt in the "Belt replacement" section to replace Disconnect cleaner...
... rectangular slot (E) on the bottom. Continue following the directions in belt guide (D). 3-24 3-25 E F Grasp agitator firmly and fit it into position by a Hoover Factory Service Center or an Authorized Hoover Warranty Service Dealer (Depot). 10 Lubrication The motor is not pinched... between agitator and cleaner body. Insert agitator through belt and place belt in the "Belt replacement" section to replace Disconnect cleaner...
Manual
Page 11
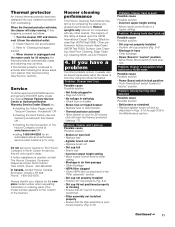
...Yellow Pages under "Vacuum Cleaners - Service To obtain approved HOOVER service and genuine HOOVER parts, locate the nearest Hoover Factory Service Center or Authorized Hoover Warranty Service Dealer (Depot) by using the check list ...below. The majority of authorized service outlet locations (U.S. tion. Problem: Smoky/burning smell detected Possible cause Possible solution • Belt broken or stretched • Replace agitator brush roll belt...
...Yellow Pages under "Vacuum Cleaners - Service To obtain approved HOOVER service and genuine HOOVER parts, locate the nearest Hoover Factory Service Center or Authorized Hoover Warranty Service Dealer (Depot) by using the check list ...below. The majority of authorized service outlet locations (U.S. tion. Problem: Smoky/burning smell detected Possible cause Possible solution • Belt broken or stretched • Replace agitator brush roll belt...

