
Manual
Page 1
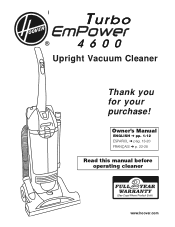
® Upright Vacuum Cleaner Thank you for your purchase! Owner's Manual ENGLISH § pp. 1-12 ESPAÑOL § pág. 13-20 FRANÇAIS § p. 22-28 Read this manual before operating cleaner www.hoover.com
® Upright Vacuum Cleaner Thank you for your purchase! Owner's Manual ENGLISH § pp. 1-12 ESPAÑOL § pág. 13-20 FRANÇAIS § p. 22-28 Read this manual before operating cleaner www.hoover.com
Manual
Page 2
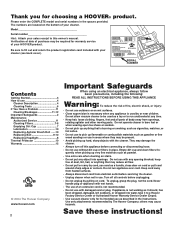
...servicing the cleaner. • Unplug cleaner when not in use with the cleaner. SERIAL NUMBER Contents Getting Started 3 How to run appliance over cord. They may be required for warranty service of fire, electric shock, or injury: • Do not use 4 Cleaner Description 4 Cleaning Tools 6 If You Have a Problem 11 Clearing Blockages 11-12 Important Safeguards 2 Maintenance Authorized Service 11 Cleaning Filters 7-8 Emptying Dirt Cup 7 Lubrication 10 Replacing Agitator Brush Roll ......10 Replacing Belt 9-10 Replacing Headlight 8 Thermal Protector 10 Warranty...
...servicing the cleaner. • Unplug cleaner when not in use with the cleaner. SERIAL NUMBER Contents Getting Started 3 How to run appliance over cord. They may be required for warranty service of fire, electric shock, or injury: • Do not use 4 Cleaner Description 4 Cleaning Tools 6 If You Have a Problem 11 Clearing Blockages 11-12 Important Safeguards 2 Maintenance Authorized Service 11 Cleaning Filters 7-8 Emptying Dirt Cup 7 Lubrication 10 Replacing Agitator Brush Roll ......10 Replacing Belt 9-10 Replacing Headlight 8 Thermal Protector 10 Warranty...
Manual
Page 3
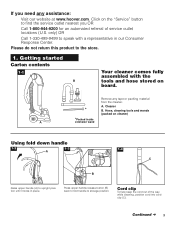
... referral of the way while cleaning, position cord into cord clip (C). Hose, cleaning tools and wands (packed on the "Service" button to upright position until it locks in our Consumer Response Center. Please do not return this product to storage position. Click on cleaner) *Packed inside A extension wand Using fold down handle 1-2 1-3 A 1-4 C B Raise upper handle (A) to find the service outlet nearest you need any tape or packing material...
... referral of the way while cleaning, position cord into cord clip (C). Hose, cleaning tools and wands (packed on the "Service" button to upright position until it locks in our Consumer Response Center. Please do not return this product to storage position. Click on cleaner) *Packed inside A extension wand Using fold down handle 1-2 1-3 A 1-4 C B Raise upper handle (A) to find the service outlet nearest you need any tape or packing material...
Manual
Page 4
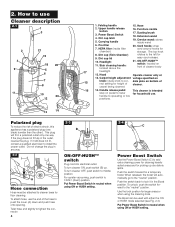
... plug will automatically go to add extra cleaning power for cleaning heavily soiled areas and for floor cleaning. Push the switch forward for 9. The Boost can be attached to lower for chamber) storage. 2. Crevice wand: stores inside filter cord around hooks for household use. Dirt cup lid easy cord release. 10. Twist hose end slightly to the "neutral" position. To turn cleaner ON, push switch (B) up dry debris spills. Upper handle release button 3. data plate...
... plug will automatically go to add extra cleaning power for cleaning heavily soiled areas and for floor cleaning. Push the switch forward for 9. The Boost can be attached to lower for chamber) storage. 2. Crevice wand: stores inside filter cord around hooks for household use. Dirt cup lid easy cord release. 10. Twist hose end slightly to the "neutral" position. To turn cleaner ON, push switch (B) up dry debris spills. Upper handle release button 3. data plate...

Manual
Page 5
upright when using cleaning tools; Carrying handle Use the carrying handle to start again, lower nozzle, and use only forward strokes. For both types, the following carpet height settings are recommended. • Low setting: for reaching under low furniture. Note: If the cleaner is difficult to push, rotate knob to the next higher setting. • Medium and Higher settings: for deeper pile carpet where easier pushing effort is completely off the...
upright when using cleaning tools; Carrying handle Use the carrying handle to start again, lower nozzle, and use only forward strokes. For both types, the following carpet height settings are recommended. • Low setting: for reaching under low furniture. Note: If the cleaner is difficult to push, rotate knob to the next higher setting. • Medium and Higher settings: for deeper pile carpet where easier pushing effort is completely off the...
Manual
Page 6
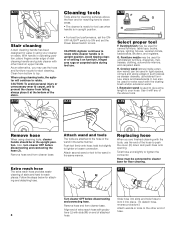
... set the Power Boost Switch to lock. I Select proper tool F. Follow the steps below for tool use . 2-14 2-12 F G H I . twist tool slightly to tighten the connector. Attach second wand or tool to the wand in the same manner. 2-16 L M Replacing hose When you may use the end of the stairs. 2-13 J Cleaning tools Tools allow for cleaning surfaces above tools. 2-15 K Remove hose When using cleaning tools, cleaner handle should be connected to cleaner base for floor cleaning. 2-17 Turn cleaner...
... set the Power Boost Switch to lock. I Select proper tool F. Follow the steps below for tool use . 2-14 2-12 F G H I . twist tool slightly to tighten the connector. Attach second wand or tool to the wand in the same manner. 2-16 L M Replacing hose When you may use the end of the stairs. 2-13 J Cleaning tools Tools allow for cleaning surfaces above tools. 2-15 K Remove hose When using cleaning tools, cleaner handle should be connected to cleaner base for floor cleaning. 2-17 Turn cleaner...

Manual
Page 7
... dust particles fall from electrical outlet. Note: It is in place. Tap side of your cleaner will ensure continued cleaning effectiveness. How to clean tools To clean the hose, wipe off and allow motor to empty the dirt cup. When using . 3. Press dirt cup latch (F) and remove dirt cup. 3-3 3-4 Remove lid. G Replace dirt cup lid. Rinse and air dry before the dirt reaches the dirt inlet opening (E) While the cleaner is not necessary to remove the HEPA cartridge filter to stop...
... dust particles fall from electrical outlet. Note: It is in place. Tap side of your cleaner will ensure continued cleaning effectiveness. How to clean tools To clean the hose, wipe off and allow motor to empty the dirt cup. When using . 3. Press dirt cup latch (F) and remove dirt cup. 3-3 3-4 Remove lid. G Replace dirt cup lid. Rinse and air dry before the dirt reaches the dirt inlet opening (E) While the cleaner is not necessary to remove the HEPA cartridge filter to stop...
Manual
Page 8
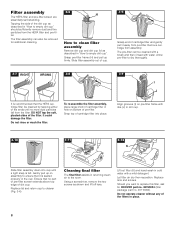
...-filter. Lift out filter (K) and hand wash in cold water with ribs (J) in hole on pre-filter frame with a mild detergent. Replace lens and screws. Slide filter assembly out of cup. 3-6 Grasp end of cartridge filter and gently pull it is recommended that no . 40110004). Let filter air dry then reposition. Should you want to empty dirt cup". The filter assembly can be removed for HOOVER part no. 38765024 (filter package part no part...
...-filter. Lift out filter (K) and hand wash in cold water with ribs (J) in hole on pre-filter frame with a mild detergent. Replace lens and screws. Slide filter assembly out of cup. 3-6 Grasp end of cartridge filter and gently pull it is recommended that no . 40110004). Let filter air dry then reposition. Should you want to empty dirt cup". The filter assembly can be removed for HOOVER part no. 38765024 (filter package part no part...
Manual
Page 9
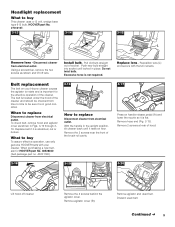
..., cut or broken. When to replace Disconnect cleaner from electrical outlet. To check belt, remove hood and agitator cover as shown and lift off cleaner. B Remove the 2 screws behind the agitator cover. Continued § 9 Using a screwdriver, remove the two screws as shown in Figs. 3-16 through 319. What to buy This cleaner uses a 12 volt, wedge base type 912 bulb, HOOVER part No. 27313107. 3-13 3-14 3-15 L Remove lens - Remove the...
..., cut or broken. When to replace Disconnect cleaner from electrical outlet. To check belt, remove hood and agitator cover as shown and lift off cleaner. B Remove the 2 screws behind the agitator cover. Continued § 9 Using a screwdriver, remove the two screws as shown in Figs. 3-16 through 319. What to buy This cleaner uses a 12 volt, wedge base type 912 bulb, HOOVER part No. 27313107. 3-13 3-14 3-15 L Remove lens - Remove the...
Manual
Page 10
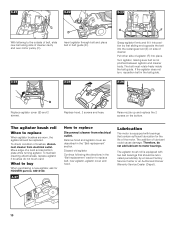
... nozzle up and replace the 2 screws on side of the motor. Move edge of lubricant could cause damage. Continue following the directions in belt guide (D). 3-24 3-25 E F Grasp agitator firmly and fit it into position by a Hoover Factory Service Center or an Authorized Hoover Warranty Service Dealer (Depot). 10 What to buy When purchasing a new agitator, ask for the life of cleaner. To maintain cleaning effectiveness, replace agitator if brushes...
... nozzle up and replace the 2 screws on side of the motor. Move edge of lubricant could cause damage. Continue following the directions in belt guide (D). 3-24 3-25 E F Grasp agitator firmly and fit it into position by a Hoover Factory Service Center or an Authorized Hoover Warranty Service Dealer (Depot). 10 What to buy When purchasing a new agitator, ask for the life of cleaner. To maintain cleaning effectiveness, replace agitator if brushes...
Manual
Page 11
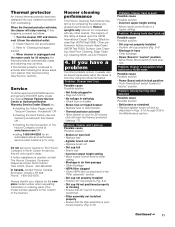
...; Agitator brush roll worn • Replace brush roll • Dirt cup full • Empty cup • Incorrect carpet height setting • Move nozzle control knob to lower setting • Blockage in air flow passage • Clear blockage • HEPA filter clogged • Clean HEPA filter as described in "neutral" position • Move Power Boost switch to "Clearing blockages" section. 4. Continued § 11 Other performance factors include Hose Power (ASTM Test F558), Surface Litter Cleaning, Hard Floor Cleaning...
...; Agitator brush roll worn • Replace brush roll • Dirt cup full • Empty cup • Incorrect carpet height setting • Move nozzle control knob to lower setting • Blockage in air flow passage • Clear blockage • HEPA filter clogged • Clean HEPA filter as described in "neutral" position • Move Power Boost switch to "Clearing blockages" section. 4. Continued § 11 Other performance factors include Hose Power (ASTM Test F558), Surface Litter Cleaning, Hard Floor Cleaning...
Manual
Page 12
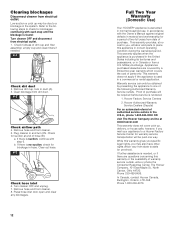
... The Hoover Company on-line at www.hoover.com This warranty does not cover pick up may also have other rights which covers the cost of authorized service outlets in correct operating condition during the warranted period. Clearing blockages Disconnect cleaner from cleaner. 8. This warranty provides, at end of dirt cup and filter assembly; a. Low suction or pick up , delivery, or house calls; Remove dirt cup, look in and turn...
... The Hoover Company on-line at www.hoover.com This warranty does not cover pick up may also have other rights which covers the cost of authorized service outlets in correct operating condition during the warranted period. Clearing blockages Disconnect cleaner from cleaner. 8. This warranty provides, at end of dirt cup and filter assembly; a. Low suction or pick up , delivery, or house calls; Remove dirt cup, look in and turn...


