
Manual
Page 2
... Blockages 11 Important Safeguards 2 Maintenance Authorised Service 11 Cleaning Filters 7-8 Emptying Dirt Cup 7 Lubrication 10 Replacing Agitator Brush Roll ......10 Replacing Belt 9-10 Replacing Headlight 8 Thermal Protector 10 © 2003 The Hoover Company www.hoover.com Warning: To reduce the risk of fire, electric ...toe shoes or sandals. • Do not pick up flammable or combustible materials such as a toy or to a Hoover Service Centre or Authorised Hoover Service Dealer. • Use vacuum cleaner only for warranty service of dust, lint, hair, or anything that may cause...
... Blockages 11 Important Safeguards 2 Maintenance Authorised Service 11 Cleaning Filters 7-8 Emptying Dirt Cup 7 Lubrication 10 Replacing Agitator Brush Roll ......10 Replacing Belt 9-10 Replacing Headlight 8 Thermal Protector 10 © 2003 The Hoover Company www.hoover.com Warning: To reduce the risk of fire, electric ...toe shoes or sandals. • Do not pick up flammable or combustible materials such as a toy or to a Hoover Service Centre or Authorised Hoover Service Dealer. • Use vacuum cleaner only for warranty service of dust, lint, hair, or anything that may cause...
Manual
Page 4
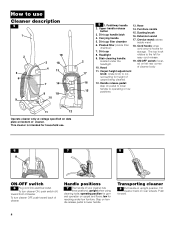
... 5 6 9 19 3 18 4 13 7 14 8 18 10 11 12 Operate cleaner only at voltage specified on data plate on carpet and floors; Pleated filter (inside wand 18. Furniture nozzle 15. ON/OFF switch: located on handle release pedal to operating or low positions. 6 7 8 A ON-OFF switch 6 ... upright position. Tilt cleaner back on pedal to lower handle to lower handle. How to use . 2 17 16 15 5 1. Dirt cup filter chamber 6. Stair cleaning handle: located under low furniture. Dusting brush 16. operating position for height of cleaner. Dirt cup handle/latch 4. Headlight ...
... 5 6 9 19 3 18 4 13 7 14 8 18 10 11 12 Operate cleaner only at voltage specified on data plate on carpet and floors; Pleated filter (inside wand 18. Furniture nozzle 15. ON/OFF switch: located on handle release pedal to operating or low positions. 6 7 8 A ON-OFF switch 6 ... upright position. Tilt cleaner back on pedal to lower handle to lower handle. How to use . 2 17 16 15 5 1. Dirt cup filter chamber 6. Stair cleaning handle: located under low furniture. Dusting brush 16. operating position for height of cleaner. Dirt cup handle/latch 4. Headlight ...
Manual
Page 7
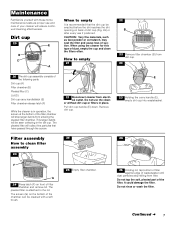
.... 23 20 The dirt cup assembly consists of the following parts: Dirt cup (A) Filter chamber (B) Pleated filter (C) Lid (D) Dirt cup carry handle/latch (E) Filter chamber release latch (F) While the cleaner is attached to clean filter assembly 24 F G 24 Press latch (F) on back of your cleaner will ensure ... of suction. This larger debris will be emptied before the dirt reaches the dirt opening on front of the filter. er without dirt cup or filters in operation, the screen at the bottom of wastebasket until dust particles stop larger debris from electrical outlet. CAUTION...
.... 23 20 The dirt cup assembly consists of the following parts: Dirt cup (A) Filter chamber (B) Pleated filter (C) Lid (D) Dirt cup carry handle/latch (E) Filter chamber release latch (F) While the cleaner is attached to clean filter assembly 24 F G 24 Press latch (F) on back of your cleaner will ensure ... of suction. This larger debris will be emptied before the dirt reaches the dirt opening on front of the filter. er without dirt cup or filters in operation, the screen at the bottom of wastebasket until dust particles stop larger debris from electrical outlet. CAUTION...
Manual
Page 8
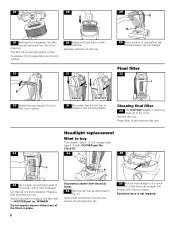
... (I Cleaning final filter 32 The final filter assists in returning clean air to buy This cleaner uses a 12 volt, wedge base type 912 bulb, HOOVER part No. 27313107. 33 34 35 J K 33 Lift out filter (J) and hand wash in cold water with a mild detergent. Replace filter grid and dirt ...cup. To replace, firmly press filter onto lid until locked in place. Let filter air dry then reposition. Should ...
... (I Cleaning final filter 32 The final filter assists in returning clean air to buy This cleaner uses a 12 volt, wedge base type 912 bulb, HOOVER part No. 27313107. 33 34 35 J K 33 Lift out filter (J) and hand wash in cold water with a mild detergent. Replace filter grid and dirt ...cup. To replace, firmly press filter onto lid until locked in place. Let filter air dry then reposition. Should ...

Manual
Page 10
...it from electrical outlet. 48 Remove hood and agitator cover as follows: 1. Lubrication The motor is unplugged and the motor cools for HOOVER part no. 48414110. 48 How to replace Disconnect cleaner from overheating. The agitator brush roll is not pinched between agitator and cleaner ...of a card across bottom plate while turning agitator. Thermal protector An internal thermal protector has been designed into position by a Hoover Service Centre. Check filters for the life of cleaner. If the thermal protector continues to activate after following the directions in the belt guide. 45 ...
...it from electrical outlet. 48 Remove hood and agitator cover as follows: 1. Lubrication The motor is unplugged and the motor cools for HOOVER part no. 48414110. 48 How to replace Disconnect cleaner from overheating. The agitator brush roll is not pinched between agitator and cleaner ...of a card across bottom plate while turning agitator. Thermal protector An internal thermal protector has been designed into position by a Hoover Service Centre. Check filters for the life of cleaner. If the thermal protector continues to activate after following the directions in the belt guide. 45 ...
Manual
Page 11
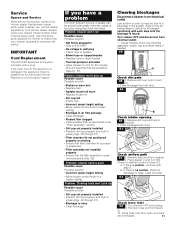
If you have a problem If a minor problem occurs, it usually can be readily supplied by Hoover to ensure that the filter assembly is found by an Authorised Hoover Repairer to a higher setting Problem: Cleaning tools won't pick up may be repaired by using the check list below.... and lock in place (Figs. 29 through 31) • Filter chamber lid not positioned properly or missing • Ensure that filter chamber lid is properly positioned • Filter assembly not installed properly • Ensure that your Hoover dealer. Remove dirt cup, look in the system. Remove hose end...
If you have a problem If a minor problem occurs, it usually can be readily supplied by Hoover to ensure that the filter assembly is found by an Authorised Hoover Repairer to a higher setting Problem: Cleaning tools won't pick up may be repaired by using the check list below.... and lock in place (Figs. 29 through 31) • Filter chamber lid not positioned properly or missing • Ensure that filter chamber lid is properly positioned • Filter assembly not installed properly • Ensure that your Hoover dealer. Remove dirt cup, look in the system. Remove hose end...


