
Manual
Page 2
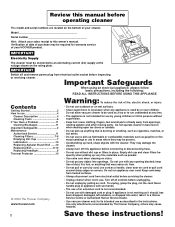
...Cleaning Filters 7-8 Emptying Dirt Cup 7 Lubrication 10 Replacing Agitator Brush Roll ......10 Replacing Belt 9-10 Replacing Headlight 8 Thermal Protector 10 © 2003 The Hoover Company www.hoover.com Warning: To reduce the risk of your cleaner. Important Safeguards When using an ...follow basic precautions, including the following: READ ALL INSTRUCTIONS BEFORE USING THIS APPLIANCE Contents Getting Started 3 How to a Hoover Service Centre or Authorised Hoover Service Dealer. • Use vacuum cleaner only for warranty service of fire, electric shock, or injury: •...
...Cleaning Filters 7-8 Emptying Dirt Cup 7 Lubrication 10 Replacing Agitator Brush Roll ......10 Replacing Belt 9-10 Replacing Headlight 8 Thermal Protector 10 © 2003 The Hoover Company www.hoover.com Warning: To reduce the risk of your cleaner. Important Safeguards When using an ...follow basic precautions, including the following: READ ALL INSTRUCTIONS BEFORE USING THIS APPLIANCE Contents Getting Started 3 How to a Hoover Service Centre or Authorised Hoover Service Dealer. • Use vacuum cleaner only for warranty service of fire, electric shock, or injury: •...
Manual
Page 9
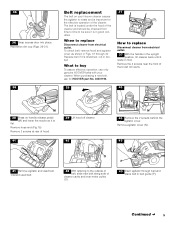
...at rear of cleaner cavity and over motor pulley (O). Discard used belt. P 43 Insert agitator through belt and place belt in Figs. 37 through 40. To check belt, remove hood and agitator cover as shown in belt guide (P). Replace belt if it is important for HOOVER part No. 40201190. 37 How to rotate and is in ... floor. 36 36 Snap access door into place. What to buy To assure effective operation, use only genuine HOOVER belts with your Hoover cleaner causes the agitator to replace Disconnect cleaner from time to time to be sure it is flat. Remove the 2 screws near the front ...
...at rear of cleaner cavity and over motor pulley (O). Discard used belt. P 43 Insert agitator through belt and place belt in Figs. 37 through 40. To check belt, remove hood and agitator cover as shown in belt guide (P). Replace belt if it is important for HOOVER part No. 40201190. 37 How to rotate and is in ... floor. 36 36 Snap access door into place. What to buy To assure effective operation, use only genuine HOOVER belts with your Hoover cleaner causes the agitator to replace Disconnect cleaner from time to time to be sure it is flat. Remove the 2 screws near the front ...

Manual
Page 10
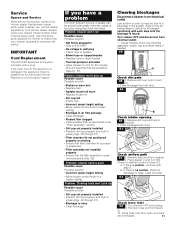
... rotate freely inside the belt guide. When the thermal protector activates, the cleaner will stop running. 44 45 46 Q R N 44 Grasp agitator firmly and fit it into position by a Hoover Service Centre. Discard old agitator. The addition of a card across bottom plate while ...the thermal protector continues to "Clearing blockages" section. 4. When cleaner is equipped with two ball bearings that contain sufficient lubrication for HOOVER part no. 48414110. 48 How to protect it from electrical outlet. To check condition of cleaner. Lubrication The motor is unplugged and...
... rotate freely inside the belt guide. When the thermal protector activates, the cleaner will stop running. 44 45 46 Q R N 44 Grasp agitator firmly and fit it into position by a Hoover Service Centre. Discard old agitator. The addition of a card across bottom plate while ...the thermal protector continues to "Clearing blockages" section. 4. When cleaner is equipped with two ball bearings that contain sufficient lubrication for HOOVER part no. 48414110. 48 How to protect it from electrical outlet. To check condition of cleaner. Lubrication The motor is unplugged and...
Manual
Page 11
...If the main cord of dirt cup and filter assembly; Low suction or pick up Possible cause Possible solution • Broken or worn belt • Replace belt • Agitator brush roll worn • Replace brush roll • Dirt cup full • Empty cup • Incorrect carpet ... 29 through 31) • Blockage in hose • Clear blockage Clearing blockages Disconnect cleaner from electrical outlet. 1. IMPORTANT Cord Replacement This HOOVER appliance is supplied complete with step 8. empty cup and clean filters if needed. 49 A Check dirt path 49 2. Press hose inlet door ...
...If the main cord of dirt cup and filter assembly; Low suction or pick up Possible cause Possible solution • Broken or worn belt • Replace belt • Agitator brush roll worn • Replace brush roll • Dirt cup full • Empty cup • Incorrect carpet ... 29 through 31) • Blockage in hose • Clear blockage Clearing blockages Disconnect cleaner from electrical outlet. 1. IMPORTANT Cord Replacement This HOOVER appliance is supplied complete with step 8. empty cup and clean filters if needed. 49 A Check dirt path 49 2. Press hose inlet door ...


