Manual
Page 1
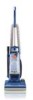
Thank You for choosing HOOVER ! ® © 2006 The Hoover Company Nano-Lite™ Vacuum Cleaner Contents Important safeguards 3 Cleaner assembly Carton contents 4 Attach hose 4 Attach handle 4 How to use 5-7 Cleaner description 5 Transporting 6 Cleaning rugs 7 Using tools 7 Cleaning stairs 7 Maintenance 8-10 Emptying dirt cup 8 Filters 9 Lubrication 11 Clearing blockages 12-13 Agitator brush roll 11 Agitator brush roll belt . . . . 9-10 Service 12 If you have a problem 12 Warranty 13 Parts & accessories mail reorder form 27 Owner's Manual ENGLISH § pp. 1-13 ...
Thank You for choosing HOOVER ! ® © 2006 The Hoover Company Nano-Lite™ Vacuum Cleaner Contents Important safeguards 3 Cleaner assembly Carton contents 4 Attach hose 4 Attach handle 4 How to use 5-7 Cleaner description 5 Transporting 6 Cleaning rugs 7 Using tools 7 Cleaning stairs 7 Maintenance 8-10 Emptying dirt cup 8 Filters 9 Lubrication 11 Clearing blockages 12-13 Agitator brush roll 11 Agitator brush roll belt . . . . 9-10 Service 12 If you have a problem 12 Warranty 13 Parts & accessories mail reorder form 27 Owner's Manual ENGLISH § pp. 1-13 ...
Manual
Page 3
... be present. • Always turn off all parts of body away from openings, rotating agitator and other moving parts. • Do not pick up anything that may reduce air flow. • Always disconnect cord from electrical outlet before connecting or disconnecting hose. • Do not use to be used by or near children. Model Serial number Hint: Attach your cleaner (see back cover). SERIAL NUMBER IMPORTANT SAFEGUARDS! others may...
... be present. • Always turn off all parts of body away from openings, rotating agitator and other moving parts. • Do not pick up anything that may reduce air flow. • Always disconnect cord from electrical outlet before connecting or disconnecting hose. • Do not use to be used by or near children. Model Serial number Hint: Attach your cleaner (see back cover). SERIAL NUMBER IMPORTANT SAFEGUARDS! others may...
Manual
Page 4
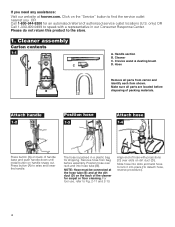
... tool use, refer to the store. 1. Click on handle snaps out. Please do not return this product to Fig. 2-11 and 2-13. Cleaner C. Crevice wand & dusting brush D. Make sure all parts from bag before B disposing of packing materials. NOTE: Hose must be connected at the hose tube (B) and at hoover.com. Attach handle 1-2 A Position hose 1-3 B Attach hose 1-4 C D Press button (A) on back of handle base and push handle down until metal button on the "Service" button...
... tool use, refer to the store. 1. Click on handle snaps out. Please do not return this product to Fig. 2-11 and 2-13. Cleaner C. Crevice wand & dusting brush D. Make sure all parts from bag before B disposing of packing materials. NOTE: Hose must be connected at the hose tube (B) and at hoover.com. Attach handle 1-2 A Position hose 1-3 B Attach hose 1-4 C D Press button (A) on back of handle base and push handle down until metal button on the "Service" button...
Manual
Page 5
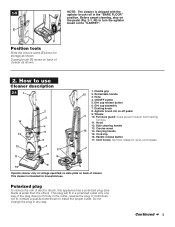
... plug. Continued § 5 1-5 E F Position tools Slide the crevice wand (E) down for storage as shown. Dusting brush (F) stores on -off pedal 9. Retractable handle 3. ON/OFF switch 5. Dirt cup release button 6. Dirt cup assembly 7. Dusting brush 8. Agitator brush roll on back of electric shock, this appliance has a polarized plug (one way. Stair cleaning handle 13. Carrying handle 15. Cord clip 16. This cleaner is wider than the other). If it still does not fit, contact a qualified electrician to use...
... plug. Continued § 5 1-5 E F Position tools Slide the crevice wand (E) down for storage as shown. Dusting brush (F) stores on -off pedal 9. Retractable handle 3. ON/OFF switch 5. Dirt cup release button 6. Dirt cup assembly 7. Dusting brush 8. Agitator brush roll on back of electric shock, this appliance has a polarized plug (one way. Stair cleaning handle 13. Carrying handle 15. Cord clip 16. This cleaner is wider than the other). If it still does not fit, contact a qualified electrician to use...
Manual
Page 6
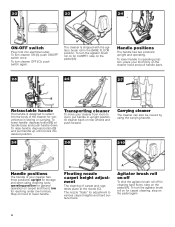
... cleaner back on the pedal (A). To turn the agitator brush roll on for CARPET, step on rear wheels and push forward. Handle positions The handle has two positions: upright and operating. The nozzle "floats" for general operation on hood to operating position, place your cleaner has three positions; Step on carpet and floors; To lower handle to lower handle. Carrying cleaner The cleaner can also be moved by using cleaning tools; To turn cleaner OFF (O), push switch...
... cleaner back on the pedal (A). To turn the agitator brush roll on for CARPET, step on rear wheels and push forward. Handle positions The handle has two positions: upright and operating. The nozzle "floats" for general operation on hood to operating position, place your cleaner has three positions; Step on carpet and floors; To lower handle to lower handle. Carrying cleaner The cleaner can also be moved by using cleaning tools; To turn cleaner OFF (O), push switch...
Manual
Page 7
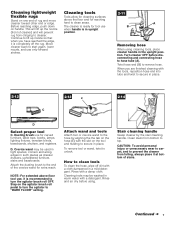
... proper tool C. Dusting brush use when handle is recommended to hose tube (A). NOTE: For extended above the floor and for reaching hard to secure in the upright position. D. Cleaning tools may be washed in a mild detergent. This will lift up nozzle so that when you are finished cleaning with a detergent. Twist hose end (B) to cleaner. Clean stairs from clinging to remove hose. To remove tool or wand, twist to top. Rinse and air dry...
... proper tool C. Dusting brush use when handle is recommended to hose tube (A). NOTE: For extended above the floor and for reaching hard to secure in the upright position. D. Cleaning tools may be washed in a mild detergent. This will lift up nozzle so that when you are finished cleaning with a detergent. Twist hose end (B) to cleaner. Clean stairs from clinging to remove hose. To remove tool or wand, twist to top. Rinse and air dry...
Manual
Page 8
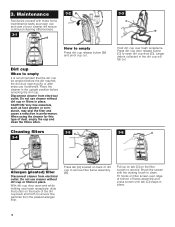
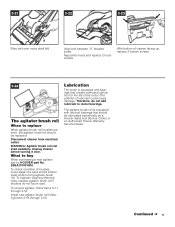
... dirt cup door open dirt cup door (D). Fit hooks on filter screen over trash receptacle. Do not use and care of the dirt cup back and forth to remove fine particles from electrical outlet. Maintenance Familiarize yourself with the dusting brush to empty It is recommended that the dirt cup be emptied before removing the dirt cup. Dirt cup When to clean. When using the cleaner for this type of dirt cup to empty Press dirt cup release button (B) and pivot cup...
... dirt cup door open dirt cup door (D). Fit hooks on filter screen over trash receptacle. Do not use and care of the dirt cup back and forth to remove fine particles from electrical outlet. Maintenance Familiarize yourself with the dusting brush to empty It is recommended that the dirt cup be emptied before removing the dirt cup. Dirt cup When to clean. When using the cleaner for this type of dirt cup to empty Press dirt cup release button (B) and pivot cup...
Manual
Page 9
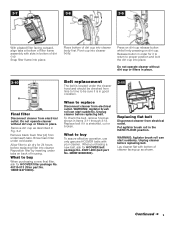
... buy When purchasing a new final filter, ask for HOOVER belt package No. 40201-280 (belt part No. 2BEB120800300). WARNING: Agitator brush roll can start suddenly. Do not operate cleaner without dirt cup or filters in place. Remove dirt cup as shown in Items 3-11 through 3-13. Allow filter to air dry for it to return to buy To assure effective operation, use only genuine HOOVER belts with bottom of dirt cup into cleaner. Snap filter frame into place. What to replace Disconnect cleaner...
... buy When purchasing a new final filter, ask for HOOVER belt package No. 40201-280 (belt part No. 2BEB120800300). WARNING: Agitator brush roll can start suddenly. Do not operate cleaner without dirt cup or filters in place. Remove dirt cup as shown in Items 3-11 through 3-13. Allow filter to air dry for it to return to buy To assure effective operation, use only genuine HOOVER belts with bottom of dirt cup into cleaner. Snap filter frame into place. What to replace Disconnect cleaner...
Manual
Page 10
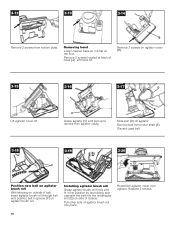
... off agitator. Remove 2 screws on agitator brush roll. Remove belt from bottom plate. Replace 2 screws. 10 Reposition agitator cover over agitator. E Slide belt (D) off . Discard used belt. 3-18 3-19 G F 3-20 Position new belt on agitator brush roll With lettering on outside of cleaner. Remove 2 screws located at back of agitator brush roll into the rectangular slot (G) on the floor. Pull other side of hood (A). Installing agitator brush roll Grasp agitator brush roll firmly and fit it is flat on side of belt, insert agitator brush roll through belt...
... off agitator. Remove 2 screws on agitator brush roll. Remove belt from bottom plate. Replace 2 screws. 10 Reposition agitator cover over agitator. E Slide belt (D) off . Discard used belt. 3-18 3-19 G F 3-20 Position new belt on agitator brush roll With lettering on outside of cleaner. Remove 2 screws located at back of agitator brush roll into the rectangular slot (G) on the floor. Pull other side of hood (A). Installing agitator brush roll Grasp agitator brush roll firmly and fit it is flat on side of belt, insert agitator brush roll through belt...
Manual
Page 11
... bottom plate while turning agitator brush roll. WARNING: Agitator brush roll can start suddenly. To maintain cleaning effectiveness, replace agitator brush roll if brushes do not add lubricant to motor bearings. The agitator brush roll is equipped with two ball bearings that contain sufficient lubrication for HOOVER part No. 2BEA131001900. Disconnect cleaner from electrical outlet. To remove agitator, follow Items 3-11 through 3-23. Install new agitator brush roll following Items 3-19 through 3-16. Reposition hood and replace 2 hood screws. Align belt between...
... bottom plate while turning agitator brush roll. WARNING: Agitator brush roll can start suddenly. To maintain cleaning effectiveness, replace agitator brush roll if brushes do not add lubricant to motor bearings. The agitator brush roll is equipped with two ball bearings that contain sufficient lubrication for HOOVER part No. 2BEA131001900. Disconnect cleaner from electrical outlet. To remove agitator, follow Items 3-11 through 3-23. Install new agitator brush roll following Items 3-19 through 3-16. Reposition hood and replace 2 hood screws. Align belt between...
Manual
Page 12
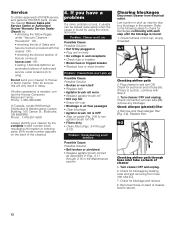
... hose tube (B); Low suction or pick up Problem: Smoky Possible Cause Possible Solution • Broken or worn belt • Replace belt • Agitator brush roll worn • Replace agitator brush roll • Dirt cup full • Empty dirt cup • Blockage in air flow passages • Clear blockage • Agitator brush roll is found : 1. Plug cleaner in North Canton, Ohio for blockages continuing with each step until the blockage is found by using the checklist below. Remove and clean allergen filter...
... hose tube (B); Low suction or pick up Problem: Smoky Possible Cause Possible Solution • Broken or worn belt • Replace belt • Agitator brush roll worn • Replace agitator brush roll • Dirt cup full • Empty dirt cup • Blockage in air flow passages • Clear blockage • Agitator brush roll is found : 1. Plug cleaner in North Canton, Ohio for blockages continuing with each step until the blockage is found by using the checklist below. Remove and clean allergen filter...
Manual
Page 13
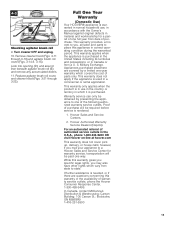
...'s Distribution & Warehousing; Replace agitator brush roll cover, and cleaner hood (Figs. 3-21 through 3-13) and agitator brush roll cover (Figs. 3-14 & 3-15). While this warranty or the availability of the following authorized warranty service outlets. Etobicoke, ON M8W3R9 1-416-251-5800 13 Turn cleaner OFF and unplug. 10. Hoover Authorized Warranty Service Dealers (Depots). 4-3 E D Checking agitator brush roll 9. Proof of parts only. Look into opening (D), and around liner beneath agitator brush roll (E) and remove any accumulated...
...'s Distribution & Warehousing; Replace agitator brush roll cover, and cleaner hood (Figs. 3-21 through 3-13) and agitator brush roll cover (Figs. 3-14 & 3-15). While this warranty or the availability of the following authorized warranty service outlets. Etobicoke, ON M8W3R9 1-416-251-5800 13 Turn cleaner OFF and unplug. 10. Hoover Authorized Warranty Service Dealers (Depots). 4-3 E D Checking agitator brush roll 9. Proof of parts only. Look into opening (D), and around liner beneath agitator brush roll (E) and remove any accumulated...


