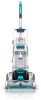
Product Manual
Page 3
Table of Contents Safety Instructions...4 Carton Contents...6 Product Guide...7 Tools and Accessories...8 Before You Begin Cleaning...9 Getting Started...10 How to Assemble Your SmartWash™ Carpet Cleaner 10 Using your SmartWash™ Carpet Cleaner 11 Maintenance...13 Hoover® Professional Series Solution Guide 20 Troubleshooting...21 Warranty ...23 French...25 Spanish...49 3
Table of Contents Safety Instructions...4 Carton Contents...6 Product Guide...7 Tools and Accessories...8 Before You Begin Cleaning...9 Getting Started...10 How to Assemble Your SmartWash™ Carpet Cleaner 10 Using your SmartWash™ Carpet Cleaner 11 Maintenance...13 Hoover® Professional Series Solution Guide 20 Troubleshooting...21 Warranty ...23 French...25 Spanish...49 3
Product Manual
Page 4
..., or use with wet hands. • Do not put any opening blocked; Use only manufacturer's recommended attachments and products. • Do not use in injury or damage. • Do not use to pick up anything that is not working as a handle, close a door on cord, or pull cord around sharp edges or corners. Do not place cleaner on cord. See Grounding Instructions. • Do not pick up flammable...
..., or use with wet hands. • Do not put any opening blocked; Use only manufacturer's recommended attachments and products. • Do not use in injury or damage. • Do not use to pick up anything that is not working as a handle, close a door on cord, or pull cord around sharp edges or corners. Do not place cleaner on cord. See Grounding Instructions. • Do not pick up flammable...

Product Manual
Page 5
... the floor can result in accordance with the appliance - If it must be installed by the Canadian Electrical Code. 2 D D G E F CAUTION: TO REDUCE THE RISK OF DAMAGE: • Avoid picking up drips. 5 Keep children and pets away from the adapter must be certain the area is well ventilated when using detergents and other cleaners with this machine. • To help prevent...
... the floor can result in accordance with the appliance - If it must be installed by the Canadian Electrical Code. 2 D D G E F CAUTION: TO REDUCE THE RISK OF DAMAGE: • Avoid picking up drips. 5 Keep children and pets away from the adapter must be certain the area is well ventilated when using detergents and other cleaners with this machine. • To help prevent...

Product Manual
Page 6
What's in -1 Antimicrobial Tool* Mesh Tool Storage Bag Sample Bottle of Cleaning Solution Accessories not included with your model may be purchased separately by visiting Hoover.com 6 FlexForce™ PowerBrushes 2-in the Box? Carpet Cleaner Solution Tank Water Tank Upper Handle Accessory Hose *Tools and Accessories vary per model.
What's in -1 Antimicrobial Tool* Mesh Tool Storage Bag Sample Bottle of Cleaning Solution Accessories not included with your model may be purchased separately by visiting Hoover.com 6 FlexForce™ PowerBrushes 2-in the Box? Carpet Cleaner Solution Tank Water Tank Upper Handle Accessory Hose *Tools and Accessories vary per model.

Product Manual
Page 7
Triggerless Handle Design 1 2. Clean Water Tank 3. Removable Recovery Nozzle 2 7. Automatic Wash/ Dry LED Display 8. Hose Connection 6. Carry Handle 11. Dirty Water/Recovery Tank 5. On/Off Pedal 6 7 8 9 10 11 12 13 7 Filter 4. Removable FlexDuo™ PowerBrushes 3 9. Handle release Pedal 5 13. Solution Tank 4 10. Getting to Know Your Hoover® SmartWash™ 1. Cord Wrap 12.
Triggerless Handle Design 1 2. Clean Water Tank 3. Removable Recovery Nozzle 2 7. Automatic Wash/ Dry LED Display 8. Hose Connection 6. Carry Handle 11. Dirty Water/Recovery Tank 5. On/Off Pedal 6 7 8 9 10 11 12 13 7 Filter 4. Removable FlexDuo™ PowerBrushes 3 9. Handle release Pedal 5 13. Solution Tank 4 10. Getting to Know Your Hoover® SmartWash™ 1. Cord Wrap 12.

Product Manual
Page 9
... carpet. This removes residual carpet cleaning solution. Move furniture out of the product after use . Pin up drips. ! See the "Cleaning Solutions" section. *Available at the same time. 9 Avoid saturating carpet. Use your Hoover carpet cleaner only if upholstery fabric is visible passing through the nozzle. Water will also see "Automatic shut-off suction at additional cost if not included with a "W" (for "wet" clean) or "S/W" (for colorfastness in suction...
... carpet. This removes residual carpet cleaning solution. Move furniture out of the product after use . Pin up drips. ! See the "Cleaning Solutions" section. *Available at the same time. 9 Avoid saturating carpet. Use your Hoover carpet cleaner only if upholstery fabric is visible passing through the nozzle. Water will also see "Automatic shut-off suction at additional cost if not included with a "W" (for "wet" clean) or "S/W" (for colorfastness in suction...
Product Manual
Page 10
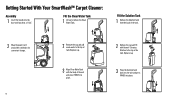
... hear a "click". Getting Started With Your SmartWash™ Carpet Cleaner: Assembly 1 Insert the handle into place. Fill the Clean Water Tank 1 Lift up to the top of the tank. Replace cap. 3 Align Clean Water Tank with the body of tank. Fill the Solution Tank 1 Remove the Solution Tank from the back of the unit. 2 Wrap the power cord around the cord hooks for convenient storage...
... hear a "click". Getting Started With Your SmartWash™ Carpet Cleaner: Assembly 1 Insert the handle into place. Fill the Clean Water Tank 1 Lift up to the top of the tank. Replace cap. 3 Align Clean Water Tank with the body of tank. Fill the Solution Tank 1 Remove the Solution Tank from the back of the unit. 2 Wrap the power cord around the cord hooks for convenient storage...

Product Manual
Page 11
Using Your SmartWash™ Carpet Cleaner 1 Unwrap the power cord and plug unit in an electrical outlet. 3 Step on the Power Pedal to turn ON. 2 Step on the Handle Release Pedal to recline the unit for cleaning position. 11
Using Your SmartWash™ Carpet Cleaner 1 Unwrap the power cord and plug unit in an electrical outlet. 3 Step on the Power Pedal to turn ON. 2 Step on the Handle Release Pedal to recline the unit for cleaning position. 11

Product Manual
Page 12
... the Dry Only button. This will extract remaining water from your cleaning is visibly passing through 6. 12 Using Your SmartWash™ Carpet Cleaner 4 Slowly move forward. The unit will automatically dispense the optimal amount of water and cleaning solution. 6 When your carpets. The Dry Only mode will remove residual carpet cleaning solution from your carpets by extracting the water. 7 For best results, Hoover recommends rinsing the carpet with clean water only, remove the...
... the Dry Only button. This will extract remaining water from your cleaning is visibly passing through 6. 12 Using Your SmartWash™ Carpet Cleaner 4 Slowly move forward. The unit will automatically dispense the optimal amount of water and cleaning solution. 6 When your carpets. The Dry Only mode will remove residual carpet cleaning solution from your carpets by extracting the water. 7 For best results, Hoover recommends rinsing the carpet with clean water only, remove the...

Product Manual
Page 13
... within your dirty water tank. Maintenance How to Empty 1 Turn the cleaner off and unplug from carpet cleaner base at an angle. 3 Place on a flat surface and unlatch Dirty Water Tank lid to remove top of tank. 4 Empty tank, rinse, wipe filter clean and allow to release. Remove Tank from electrical outlet. 2 Grab the Dirty Water Tank handle and pull up to air dry. When the dirty...
... within your dirty water tank. Maintenance How to Empty 1 Turn the cleaner off and unplug from carpet cleaner base at an angle. 3 Place on a flat surface and unlatch Dirty Water Tank lid to remove top of tank. 4 Empty tank, rinse, wipe filter clean and allow to release. Remove Tank from electrical outlet. 2 Grab the Dirty Water Tank handle and pull up to air dry. When the dirty...
Product Manual
Page 14
... a towel) to no suction will also see "Automatic shut-off suction at the same time. ! This removes residual carpet cleaning solution. NOTE: Empty Dirty Water Tank when the motor sound becomes higher pitched and there is visible passing through the nozzle. CAUTION ! Do not clean over floor electrical outlets. You will result. ! Regarding the Dirty Water Tank: For full suction it is important that...
... a towel) to no suction will also see "Automatic shut-off suction at the same time. ! This removes residual carpet cleaning solution. NOTE: Empty Dirty Water Tank when the motor sound becomes higher pitched and there is visible passing through the nozzle. CAUTION ! Do not clean over floor electrical outlets. You will result. ! Regarding the Dirty Water Tank: For full suction it is important that...

Product Manual
Page 15
... the top of injury from carpet cleaner. BE CAREFUL not to instantly pull nozzle straight up on the Nozzle release then pull Nozzle forward to remove from moving parts, unplug before servicing. ! Maintenance How to Remove and Clean Nozzle 1 To prevent possible leaking, remove and empty Clean Water Tank, Dirty Water Tank and Solution Tank. 2 With handle in the proper position for the unit to have proper suction. 15
... the top of injury from carpet cleaner. BE CAREFUL not to instantly pull nozzle straight up on the Nozzle release then pull Nozzle forward to remove from moving parts, unplug before servicing. ! Maintenance How to Remove and Clean Nozzle 1 To prevent possible leaking, remove and empty Clean Water Tank, Dirty Water Tank and Solution Tank. 2 With handle in the proper position for the unit to have proper suction. 15

Product Manual
Page 16
..., do not add lubricant to air dry thoroughly before servicing. The addition of injury from moving parts, unplug before storing carpet cleaner on the brush to remove. Empty Dirty Water Tank, rinse tank and lid thoroughly with bearings that contain sufficient lubrication for the life of carpet cleaner to motor bearings or brushrolls. Repeat on cleaner. Replace on the A other brush. 4 The brushes can be cleaned under running water.
..., do not add lubricant to air dry thoroughly before servicing. The addition of injury from moving parts, unplug before storing carpet cleaner on the brush to remove. Empty Dirty Water Tank, rinse tank and lid thoroughly with bearings that contain sufficient lubrication for the life of carpet cleaner to motor bearings or brushrolls. Repeat on cleaner. Replace on the A other brush. 4 The brushes can be cleaned under running water.

Product Manual
Page 17
... cleaning code on your cleaner only on upholstery marked "W" or "W/S". HOW TO REMOVE HOSE 1 Press trigger on end of injury from moving parts, unplug before servicing. 17 Make sure to close door to ensure all fluid has discharged from unit. 2 Close the Hose Port Door back into Hose Solution Port Read "Before You Begin Cleaning" instructions. Press button on tool to ensure proper suction...
... cleaning code on your cleaner only on upholstery marked "W" or "W/S". HOW TO REMOVE HOSE 1 Press trigger on end of injury from moving parts, unplug before servicing. 17 Make sure to close door to ensure all fluid has discharged from unit. 2 Close the Hose Port Door back into Hose Solution Port Read "Before You Begin Cleaning" instructions. Press button on tool to ensure proper suction...
Product Manual
Page 18
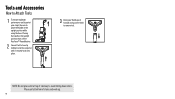
Tools and Accessories How to Attach Tools 1 To ensure maximum performance and to protect your thumb, push forward and up . 18 Place unit at top of stairs and work up on the latch to remove tool. NOTE: Do not place unit at bottom of stairway to place the handle in the upright position while using the hose. Placing the handle in the upright position shuts off the FlexForce™ PowerBrushes. 2 Connect tool to hose by sliding it onto the connector until it securely locks into place. 3 Using your carpet, be sure to avoid falling down stairs.
Tools and Accessories How to Attach Tools 1 To ensure maximum performance and to protect your thumb, push forward and up . 18 Place unit at top of stairs and work up on the latch to remove tool. NOTE: Do not place unit at bottom of stairway to place the handle in the upright position while using the hose. Placing the handle in the upright position shuts off the FlexForce™ PowerBrushes. 2 Connect tool to hose by sliding it onto the connector until it securely locks into place. 3 Using your carpet, be sure to avoid falling down stairs.

Product Manual
Page 19
... of hose. 7 Dry hands and plug cleaner into area cleaning. Always end with Hoover® solution according to instructions. 12 Overlap strokes by holding the tool about one area. When finished cleanin, follow "after Cleaning" and "After Using Tool" instructions. 8 Turn cleaner ON. Tools and Accessories Cleaning Carpeted Stairs and Upholstery 1 Read "Before you Begin Cleaning" instruction on page 9. 2 Attached hose as instructed (page 18). 9 Pre-spray the area by ½ inch to help...
... of hose. 7 Dry hands and plug cleaner into area cleaning. Always end with Hoover® solution according to instructions. 12 Overlap strokes by holding the tool about one area. When finished cleanin, follow "after Cleaning" and "After Using Tool" instructions. 8 Turn cleaner ON. Tools and Accessories Cleaning Carpeted Stairs and Upholstery 1 Read "Before you Begin Cleaning" instruction on page 9. 2 Attached hose as instructed (page 18). 9 Pre-spray the area by ½ inch to help...

Product Manual
Page 20
... dirt, allergens, chocolate and wine. EXPERT PET™ CARPET WASHER DETERGENT Powerful, professional strength enzymes break down biological stains, dirt and odor for our deepest, extreme clean. EXPERT CARPET SOLUTIONS: PROFESSIONAL GRADE EXPERT CLEAN™ CARPET WASHER DETERGENT Powerful, professional strength cleaner lifts dirt and removes allergens for a truly deep clean. Hoover® Cleaning Solution Guide Use only Hoover cleaning solutions to prevent potential harm to complement your Hoover carpet cleaner and the specific...
... dirt, allergens, chocolate and wine. EXPERT PET™ CARPET WASHER DETERGENT Powerful, professional strength enzymes break down biological stains, dirt and odor for our deepest, extreme clean. EXPERT CARPET SOLUTIONS: PROFESSIONAL GRADE EXPERT CLEAN™ CARPET WASHER DETERGENT Powerful, professional strength cleaner lifts dirt and removes allergens for a truly deep clean. Hoover® Cleaning Solution Guide Use only Hoover cleaning solutions to prevent potential harm to complement your Hoover carpet cleaner and the specific...

Product Manual
Page 22
... product needs servicing within the warranty period, please contact Customer Service at 1-800-944-9200 for model number. If appliance is located on the data plate). WARNING To reduce risk of product for further instruction before cleaning or servicing. See back of fire and electric shock due to internal component damage, use only Hoover cleaning products intended for use . Please do not return this cleaner to store. QUESTIONS OR CONCERNS? Need Help? USE TROUBLESHOOTING GUIDE...
... product needs servicing within the warranty period, please contact Customer Service at 1-800-944-9200 for model number. If appliance is located on the data plate). WARNING To reduce risk of product for further instruction before cleaning or servicing. See back of fire and electric shock due to internal component damage, use only Hoover cleaning products intended for use . Please do not return this cleaner to store. QUESTIONS OR CONCERNS? Need Help? USE TROUBLESHOOTING GUIDE...

Product Manual
Page 23
... use Accessory Tool will not rotate in nozzle 5. Press pedal. 1. Remove and replace Recovery Nozzle. Turn the unit off and back on correctly 3. Dirty Water Lid not on , then inspect and clean for up to service center. 5. Turn off engaged 1. Check for service: 1-800-944-9200. 2. Check fuse or breaker in wall plug 2. Blockage in home. 4. Check connection. 1. Replace fuse or reset breaker in tool on end of Cleaner. 1. Turn on foot of hose 2. Air...
... use Accessory Tool will not rotate in nozzle 5. Press pedal. 1. Remove and replace Recovery Nozzle. Turn the unit off and back on correctly 3. Dirty Water Lid not on , then inspect and clean for up to service center. 5. Turn off engaged 1. Check for service: 1-800-944-9200. 2. Check fuse or breaker in wall plug 2. Blockage in home. 4. Check connection. 1. Replace fuse or reset breaker in tool on end of Cleaner. 1. Turn on foot of hose 2. Air...

Product Manual
Page 24
... WARRANTY IS THE EXCLUSIVE WARRANTY AND REMEDY PROVIDED BY HOOVER®. This warranty gives you may not apply to misuse, acts of God, nature, vandalism or other acts beyond the control of Hoover®, owner's acts or omissions, use and in a commercial operation (such as maid, janitorial and equipment rental services), filter, brushroll and belt, improper maintenance of purchase (the "Warranty Period"). you specific rights...
... WARRANTY IS THE EXCLUSIVE WARRANTY AND REMEDY PROVIDED BY HOOVER®. This warranty gives you may not apply to misuse, acts of God, nature, vandalism or other acts beyond the control of Hoover®, owner's acts or omissions, use and in a commercial operation (such as maid, janitorial and equipment rental services), filter, brushroll and belt, improper maintenance of purchase (the "Warranty Period"). you specific rights...


