
Manual
Page 2
... 6 Maintenance...8 Dirt Cup...8 Cyclone Separator 9 Filters...9 Power Nozzle Belt Replacement 11 Agitator Brushroll Replacement 11 Headlight Replacement 12 Clearing Blockages 12 Troubleshooting...13 Service...14 Warranty...15 If you need assistance: Visit our website at Hoover.com or call 1-800-944-9200 for choosing a HOOVER® product. Fri 8am- 7pm EST. only) or...
... 6 Maintenance...8 Dirt Cup...8 Cyclone Separator 9 Filters...9 Power Nozzle Belt Replacement 11 Agitator Brushroll Replacement 11 Headlight Replacement 12 Clearing Blockages 12 Troubleshooting...13 Service...14 Warranty...15 If you need assistance: Visit our website at Hoover.com or call 1-800-944-9200 for choosing a HOOVER® product. Fri 8am- 7pm EST. only) or...

Manual
Page 11
...before servicing. It has been designed specifically for use in this cleaner and is important for HOOVER® part no . 562673001 when a belt replacement is in Fig. 3.18. Such belts do not touch card. 1. To maintain cleaning effectiveness, replace brushroll if brushes do not operate...the agitator. Turn agitator, making sure it off the motor pulley (D). Power Nozzle belt replacement 3.14 3.15 The belt in your power nozzle. 3.16 D 3.17 Use only a genuine HOOVER® Belt part no . 59135316. Lower Quick Disconnect by depressing down the handle release pedal and...
...before servicing. It has been designed specifically for use in this cleaner and is important for HOOVER® part no . 562673001 when a belt replacement is in Fig. 3.18. Such belts do not touch card. 1. To maintain cleaning effectiveness, replace brushroll if brushes do not operate...the agitator. Turn agitator, making sure it off the motor pulley (D). Power Nozzle belt replacement 3.14 3.15 The belt in your power nozzle. 3.16 D 3.17 Use only a genuine HOOVER® Belt part no . 59135316. Lower Quick Disconnect by depressing down the handle release pedal and...
Manual
Page 13
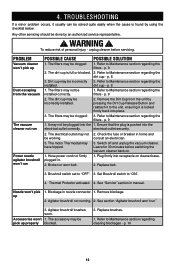
... 8 1. The dirt cup may be done by using the checklist below. Switch off and unplug the vacuum cleaner. Replace belt. 3. Agitator brushroll brushes worn. The accessory may be incorrectly 3. Refer to Maintenance section regarding clearing blockages - Any other.... 1. p. 10 13 WARNING ! p. 9 1. Ensure that the plug is locked firmly back into the electrical outlet correctly. Broken or worn belt. 2. Thermal Protector activated. 4. Refer to Maintenance section regarding the filters - p. 8 3. It may be clogged: 3. electrical outlet securely. ...
... 8 1. The dirt cup may be done by using the checklist below. Switch off and unplug the vacuum cleaner. Replace belt. 3. Agitator brushroll brushes worn. The accessory may be incorrectly 3. Refer to Maintenance section regarding clearing blockages - Any other.... 1. p. 10 13 WARNING ! p. 9 1. Ensure that the plug is locked firmly back into the electrical outlet correctly. Broken or worn belt. 2. Thermal Protector activated. 4. Refer to Maintenance section regarding the filters - p. 8 3. It may be clogged: 3. electrical outlet securely. ...

