
Manual
Page 2
... to the store. 2 Manufacturing code (Label located on bottom of Hoover® authorized dealer locations (U.S. only) or to find the Hoover® authorized dealer nearest you need assistance: Visit our website at hoover.com. Model MFG. Fri 8am- 7pm EST. CODE Hint: Attach your sales ...receipt to this product to register your HOOVER® product. Follow the authorized dealer locator link to speak with a customer service representative; Please enter the complete model and Manufacturing Code in the spaces provided. Please do not return this owner...
... to the store. 2 Manufacturing code (Label located on bottom of Hoover® authorized dealer locations (U.S. only) or to find the Hoover® authorized dealer nearest you need assistance: Visit our website at hoover.com. Model MFG. Fri 8am- 7pm EST. CODE Hint: Attach your sales ...receipt to this product to register your HOOVER® product. Follow the authorized dealer locator link to speak with a customer service representative; Please enter the complete model and Manufacturing Code in the spaces provided. Please do not return this owner...
Manual
Page 5
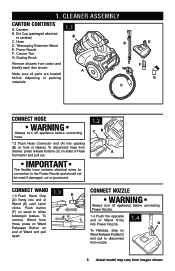
... electrical wires for connection to canister) B C. Telescoping Extension Wand E. A Make sure all parts from images shown. Push button (F) on wand to disconnect from nozzle. 5 Actual model may vary from carton and identify each item shown.
... electrical wires for connection to canister) B C. Telescoping Extension Wand E. A Make sure all parts from images shown. Push button (F) on wand to disconnect from nozzle. 5 Actual model may vary from carton and identify each item shown.

Manual
Page 6
... 11 13 DIRT Cup ON-OFF switch 2.2 Insert the plug into the electrical outlet. Do not exceed the cord length beyond the red mark. 2.4 Actual model may vary from whipping which could cause damage or injury. Press the on/off pedal (A) on back of canister, to switch the cleaner on and...
... 11 13 DIRT Cup ON-OFF switch 2.2 Insert the plug into the electrical outlet. Do not exceed the cord length beyond the red mark. 2.4 Actual model may vary from whipping which could cause damage or injury. Press the on/off pedal (A) on back of canister, to switch the cleaner on and...
Manual
Page 7
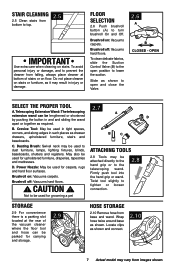
..., stairs and baseboards. Brushroll off : Vacuums hard floors. Firmly push tool into the hand grip or wand. Locate clips as shown and connect. 2.10 7 Actual model may result in and and sliding the wand apart or together as shown to open position to dust furniture, lamps, lighting fixtures, blinds, baseboards, shutters...
..., stairs and baseboards. Brushroll off : Vacuums hard floors. Firmly push tool into the hand grip or wand. Locate clips as shown and connect. 2.10 7 Actual model may result in and and sliding the wand apart or together as shown to open position to dust furniture, lamps, lighting fixtures, blinds, baseboards, shutters...

Manual
Page 8
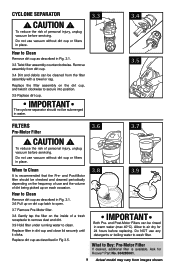
... not use and care of each cleaning session and before servicing. When all the dirt has fallen, close the dirt cup door and replace. 3.1 3.2 Actual model may continue. NOTICE ! If this type of personal injury, unplug vacuum before the dirt reaches the fill line. ! This blockage may seal the filter and...
... not use and care of each cleaning session and before servicing. When all the dirt has fallen, close the dirt cup door and replace. 3.1 3.2 Actual model may continue. NOTICE ! If this type of personal injury, unplug vacuum before the dirt reaches the fill line. ! This blockage may seal the filter and...
Manual
Page 9
...;C). and Post-Motor Filters can be rinsed in dirt cup and close lid securely until it clockwise to wash filter. What to air dry for Hoover® Part No. 304285001. 9 Actual model may vary from the filter assembly with a towel or rag. Ask for 24 hours before replacing.
...;C). and Post-Motor Filters can be rinsed in dirt cup and close lid securely until it clockwise to wash filter. What to air dry for Hoover® Part No. 304285001. 9 Actual model may vary from the filter assembly with a towel or rag. Ask for 24 hours before replacing.
Manual
Page 10
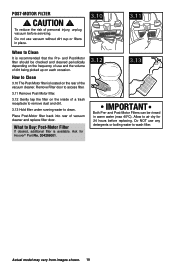
... of the vacuum cleaner. and Post-Motor filter should be rinsed in place. 3.10 3.11 When to air dry for Hoover® Part No. 304286001. 3.12 3.13 IMPORTANT Both Pre- Actual model may vary from images shown. 10 and Post-Motor Filters can be checked and cleaned periodically depending on each occasion...
... of the vacuum cleaner. and Post-Motor filter should be rinsed in place. 3.10 3.11 When to air dry for Hoover® Part No. 304286001. 3.12 3.13 IMPORTANT Both Pre- Actual model may vary from images shown. 10 and Post-Motor Filters can be checked and cleaned periodically depending on each occasion...

Manual
Page 11
...not operate the agitator correctly and may vary from time to time to motor pulley. 3.17 Hold opposite end of nozzle base. Actual model may create stress which could damage your power nozzle drives the agitator. Such belts do not touch card. 1. Lower Quick Disconnect by ... the hood (see following section). E How to Buy: Brushroll When purchasing a new agitator brushroll, ask for HOOVER® part no . 562673001 when a belt replacement is important for the HOOVER® power nozzle. Replace new brushroll and belt as shown in this cleaner and is necessary. CAUTION To reduce...
...not operate the agitator correctly and may vary from time to time to motor pulley. 3.17 Hold opposite end of nozzle base. Actual model may create stress which could damage your power nozzle drives the agitator. Such belts do not touch card. 1. Lower Quick Disconnect by ... the hood (see following section). E How to Buy: Brushroll When purchasing a new agitator brushroll, ask for HOOVER® part no . 562673001 when a belt replacement is important for the HOOVER® power nozzle. Replace new brushroll and belt as shown in this cleaner and is necessary. CAUTION To reduce...
Manual
Page 12
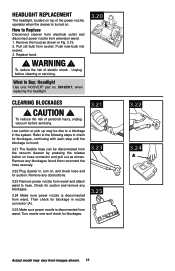
...blockage in the system. Then check for suction and remove any obstructions. 3.23 Remove power nozzle from wand. How to Buy: Headlight Use only HOOVER® part no. 59135317, when replacing the headlight 3.20 Clearing blockages ! CAUTION ! To reduce the risk of electric shock - Remove any ...blockages. 3.24 Make sure power nozzle is turned on , and check hose end for blockages. 3.21 3.23 3.25 3.22 3.24 A Actual model may be disconnected from images shown. 12 Pull old bulb from extension wand. 1. To reduce the risk of personal injury, unplug vacuum before cleaning ...
...blockage in the system. Then check for suction and remove any obstructions. 3.23 Remove power nozzle from wand. How to Buy: Headlight Use only HOOVER® part no. 59135317, when replacing the headlight 3.20 Clearing blockages ! CAUTION ! To reduce the risk of electric shock - Remove any ...blockages. 3.24 Make sure power nozzle is turned on , and check hose end for blockages. 3.21 3.23 3.25 3.22 3.24 A Actual model may be disconnected from images shown. 12 Pull old bulb from extension wand. 1. To reduce the risk of personal injury, unplug vacuum before cleaning ...
Manual
Page 14
...: • Checking the Yellow Pages under "Vacuum Cleaners" or "Household". • Visit our website at hoover.com (U.S. Mon-Fri 8am-7pm EST. Customers) or hoover.ca (Canadian customers). Always identify your vacuum to find the service outlet nearest you need further assistance: To ...THE STORE. 14 Service To obtain approved Hoover® service and genuine Hoover® parts, locate the nearest Authorized Hoover® Warranty Service Dealer (Depot) by the complete model number when requesting information or ordering parts. (The model number appears on the bottom of authorized service...
...: • Checking the Yellow Pages under "Vacuum Cleaners" or "Household". • Visit our website at hoover.com (U.S. Mon-Fri 8am-7pm EST. Customers) or hoover.ca (Canadian customers). Always identify your vacuum to find the service outlet nearest you need further assistance: To ...THE STORE. 14 Service To obtain approved Hoover® service and genuine Hoover® parts, locate the nearest Authorized Hoover® Warranty Service Dealer (Depot) by the complete model number when requesting information or ordering parts. (The model number appears on the bottom of authorized service...

