

Manual
Page 6
...cord, press the cord rewind button located at the rear of the dirt cup) 4. Do not exceed the cord length beyond the red mark. 2.4 Actual model may vary from whipping which could cause damage or injury. Auto Cord Rewind Button 8. Dirt Cup Release Button 7. 2. Dirt Cup 3. Dirt Cup /Carry ... shown. 6 Post-Motor Filter Cover 10. Fully unwind the power cord. A yellow mark on the top of the dirt bin to move the vacuum cleaner from room to turn the cleaner off. 2.2 Carry Handle 2.3 Use the carry handle located on the power cord indicates the recommended cord length....
...cord, press the cord rewind button located at the rear of the dirt cup) 4. Do not exceed the cord length beyond the red mark. 2.4 Actual model may vary from whipping which could cause damage or injury. Auto Cord Rewind Button 8. Dirt Cup Release Button 7. 2. Dirt Cup 3. Dirt Cup /Carry ... shown. 6 Post-Motor Filter Cover 10. Fully unwind the power cord. A yellow mark on the top of the dirt bin to move the vacuum cleaner from room to turn the cleaner off. 2.2 Carry Handle 2.3 Use the carry handle located on the power cord indicates the recommended cord length....
Manual
Page 7
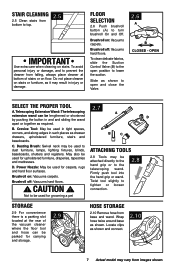
...To clean delicate fabrics, slide the Suction Control Valve (B) to the open and close the Valve. 2.6 A B CLOSED - Brushroll on : Vacuums carpets. Attaching Tools 2.8 Tools may vary from falling, always place cleaner at the rear of stairs or on stairs. OPEN Select the Proper Tool... 2.7 A. Crevice Tool: May be parked for upholstered furniture, draperies, tapestries and mattresses. Slide as shown and connect. 2.10 7 Actual model may be used for carrying and storage. 2.9 hose Storage 2.10 Remove hose from bottom to the telescoping wand. B C C. May also...
...To clean delicate fabrics, slide the Suction Control Valve (B) to the open and close the Valve. 2.6 A B CLOSED - Brushroll on : Vacuums carpets. Attaching Tools 2.8 Tools may vary from falling, always place cleaner at the rear of stairs or on stairs. OPEN Select the Proper Tool... 2.7 A. Crevice Tool: May be parked for upholstered furniture, draperies, tapestries and mattresses. Slide as shown and connect. 2.10 7 Actual model may be used for carrying and storage. 2.9 hose Storage 2.10 Remove hose from bottom to the telescoping wand. B C C. May also...

Manual
Page 8
... done by an authorized service representative. ! When the thermal protector activates the cleaner will deactivate and cleaning may vary from images shown. 8 When using the vacuum for 30 minutes, the thermal protector will stop running. A Thermal Protector has been designed into your cleaner needs servicing. NOTICE ! How to Empty 3.1 Press... of dust, empty the cup and clean the filters often. When all the dirt has fallen, close the dirt cup door and replace. 3.1 3.2 Actual model may continue. CAUTION ! 3. If this type of each cleaning session and before servicing.
... done by an authorized service representative. ! When the thermal protector activates the cleaner will deactivate and cleaning may vary from images shown. 8 When using the vacuum for 30 minutes, the thermal protector will stop running. A Thermal Protector has been designed into your cleaner needs servicing. NOTICE ! How to Empty 3.1 Press... of dust, empty the cup and clean the filters often. When all the dirt has fallen, close the dirt cup door and replace. 3.1 3.2 Actual model may continue. CAUTION ! 3. If this type of each cleaning session and before servicing.
Manual
Page 9
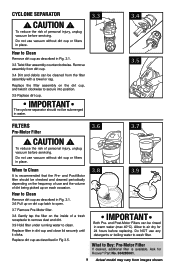
...the filter on the dirt cup, and twist it clicks. Allow to air dry for Hoover® Part No. 304285001. 9 Actual model may vary from the filter assembly with a towel or rag. Do NOT use vacuum without dirt cup or filters in warm water (max 40°C). Ask for 24 ... Clean Remove dirt cup as described in place. Replace filter in Fig 3.5. Cyclone Separator ! CAUTION ! To reduce the risk of personal injury, unplug vacuum before replacing. Replace the filter assembly on the inside of a trash receptacle to remove dust and dirt. 3.9 Hold filter under running water to secure...
...the filter on the dirt cup, and twist it clicks. Allow to air dry for Hoover® Part No. 304285001. 9 Actual model may vary from the filter assembly with a towel or rag. Do NOT use vacuum without dirt cup or filters in warm water (max 40°C). Ask for 24 ... Clean Remove dirt cup as described in place. Replace filter in Fig 3.5. Cyclone Separator ! CAUTION ! To reduce the risk of personal injury, unplug vacuum before replacing. Replace the filter assembly on the inside of a trash receptacle to remove dust and dirt. 3.9 Hold filter under running water to secure...
Manual
Page 10
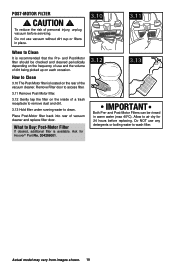
...What to Buy: Post-Motor Filter If desired, additional filter is located on the rear of the vacuum cleaner. and Post-Motor Filters can be checked and cleaned periodically depending on each occasion. Actual model may vary from images shown. 10 Ask for 24 hours before servicing. Do NOT use any ... inside of dirt being picked up on the frequency of use vacuum without dirt cup or filters in warm water (max 40°C). To reduce the risk of vacuum cleaner and replace filter door. Remove Filter door to air dry for Hoover® Part No. 304286001. 3.12 3.13 IMPORTANT Both Pre-...
...What to Buy: Post-Motor Filter If desired, additional filter is located on the rear of the vacuum cleaner. and Post-Motor Filters can be checked and cleaned periodically depending on each occasion. Actual model may vary from images shown. 10 Ask for 24 hours before servicing. Do NOT use any ... inside of dirt being picked up on the frequency of use vacuum without dirt cup or filters in warm water (max 40°C). To reduce the risk of vacuum cleaner and replace filter door. Remove Filter door to air dry for Hoover® Part No. 304286001. 3.12 3.13 IMPORTANT Both Pre-...

Manual
Page 11
... brushroll, ask for effective operation. Discard old brushroll. 3. Actual model may create stress which could damage your power nozzle drives the agitator. Lift up end of agitator brushroll in good condition. parts, unplug vacuum before servicing. It has been designed specifically for the HOOVER® power nozzle. To check, remove the hood (see...
... brushroll, ask for effective operation. Discard old brushroll. 3. Actual model may create stress which could damage your power nozzle drives the agitator. Lift up end of agitator brushroll in good condition. parts, unplug vacuum before servicing. It has been designed specifically for the HOOVER® power nozzle. To check, remove the hood (see...
Manual
Page 12
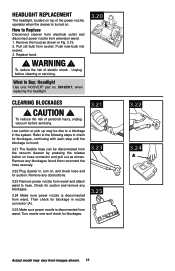
...or pick up may vary from wand and attach wand to Buy: Headlight Use only HOOVER® part no. 59135317, when replacing the headlight 3.20 Clearing blockages ! To reduce the risk of personal injury, unplug vacuum before cleaning or servicing. To reduce the risk of electric shock - Remove any ... pull out as shown in , turn on, and check hose end for blockages. 3.21 3.23 3.25 3.22 3.24 A Actual model may be disconnected from the vacuum cleaner by pressing the release button on . Check for blockage in nozzle connector (A). 3.25 Make sure power nozzle is found then reconnect...
...or pick up may vary from wand and attach wand to Buy: Headlight Use only HOOVER® part no. 59135317, when replacing the headlight 3.20 Clearing blockages ! To reduce the risk of personal injury, unplug vacuum before cleaning or servicing. To reduce the risk of electric shock - Remove any ... pull out as shown in , turn on, and check hose end for blockages. 3.21 3.23 3.25 3.22 3.24 A Actual model may be disconnected from the vacuum cleaner by pressing the release button on . Check for blockage in nozzle connector (A). 3.25 Make sure power nozzle is found then reconnect...

Manual
Page 14
... an automated referral of the vacuum.) PLEASE DO NOT RETURN THIS PRODUCT TO THE STORE. 14 Service To obtain approved Hoover® service and genuine Hoover® parts, locate the nearest Authorized Hoover® Warranty Service Dealer (Depot) by the complete model number when requesting information or ordering parts. (The model number appears on the bottom...
... an automated referral of the vacuum.) PLEASE DO NOT RETURN THIS PRODUCT TO THE STORE. 14 Service To obtain approved Hoover® service and genuine Hoover® parts, locate the nearest Authorized Hoover® Warranty Service Dealer (Depot) by the complete model number when requesting information or ordering parts. (The model number appears on the bottom...


