Manual
Page 13
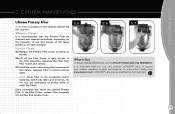
...trademark- 13 To order Filters please visit www.hoover.com. How to 24 hours. Once completely dry, return the Lifetime Primary Filter to the Filter Frame, replace Filter Assembly into canister and replace cover. 5.5 5.6 5.7 What to Buy To assure cleaning effectiveness, use any detergents .... NOTE: Allow Filter to assure your cleaner operates at peak performance. It is recommended that you use and volume of use only genuine HOOVER® parts to dry completely before replacing, which may take up on the canister behind the Dirt Cup bin. GENERAL MAINTENANCE...
...trademark- 13 To order Filters please visit www.hoover.com. How to 24 hours. Once completely dry, return the Lifetime Primary Filter to the Filter Frame, replace Filter Assembly into canister and replace cover. 5.5 5.6 5.7 What to Buy To assure cleaning effectiveness, use any detergents .... NOTE: Allow Filter to assure your cleaner operates at peak performance. It is recommended that you use and volume of use only genuine HOOVER® parts to dry completely before replacing, which may take up on the canister behind the Dirt Cup bin. GENERAL MAINTENANCE...
Manual
Page 14
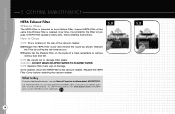
... is located on the inside of a trash receptacle to the vacuum cleaner. Inspect HEPA Filter at peak performance. NOTE: Be careful not to be identified by pulling the tab towards you use only genuine HOOVER® parts to Buy To assure cleaning effectiveness, use only Hoover® service or aftermarket, #303017001. Over time, it is...
... is located on the inside of a trash receptacle to the vacuum cleaner. Inspect HEPA Filter at peak performance. NOTE: Be careful not to be identified by pulling the tab towards you use only genuine HOOVER® parts to Buy To assure cleaning effectiveness, use only Hoover® service or aftermarket, #303017001. Over time, it is...
Manual
Page 15
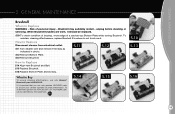
What to Buy To assure cleaning effectiveness, use only Hoover® Brushroll part #59143012. 5.14 5.15 It is important that you use only genuine HOOVER® parts to Replace 5.14 Align new Brushroll and Belt. 5.15 Replace Brushroll. 5.16 Replace Bottom Plate and Screws. Risk... remove 9 Screws as indicated in photo. 5.12 Remove Bottom Plate. 5.13 Remove Brushroll. 5.11 5.12 How to assure your cleaner operates at peak performance. HOOVER® parts can be replaced. 5.10 To check condition of brushes, move edge of personal injury - To maintain cleaning effectiveness, ...
What to Buy To assure cleaning effectiveness, use only Hoover® Brushroll part #59143012. 5.14 5.15 It is important that you use only genuine HOOVER® parts to Replace 5.14 Align new Brushroll and Belt. 5.15 Replace Brushroll. 5.16 Replace Bottom Plate and Screws. Risk... remove 9 Screws as indicated in photo. 5.12 Remove Bottom Plate. 5.13 Remove Brushroll. 5.11 5.12 How to assure your cleaner operates at peak performance. HOOVER® parts can be replaced. 5.10 To check condition of brushes, move edge of personal injury - To maintain cleaning effectiveness, ...

Manual
Page 16
...outlet. With curved ends down and snap closed. 16 5.18 B 5.21 F 5.19 D C E What to Buy To assure cleaning effectiveness, use only genuine HOOVER® parts to assure your cleaner operates at peak performance. It is cracked, gouged or broken, replace it rotates freely. Press the Latches on Tool. ... Insert Brushroll through Belt and position Belt over Gear Teeth (D) on front of Tool. Turn Brushroll, making sure not to Replace Brushroll Disconnect cleaner from Hose and turn it is in Guard. Pivot Bottom Plate down , slide End Plates (C) of Tool and remove Bottom Plate (A). ...
...outlet. With curved ends down and snap closed. 16 5.18 B 5.21 F 5.19 D C E What to Buy To assure cleaning effectiveness, use only genuine HOOVER® parts to assure your cleaner operates at peak performance. It is cracked, gouged or broken, replace it rotates freely. Press the Latches on Tool. ... Insert Brushroll through Belt and position Belt over Gear Teeth (D) on front of Tool. Turn Brushroll, making sure not to Replace Brushroll Disconnect cleaner from Hose and turn it is in Guard. Pivot Bottom Plate down , slide End Plates (C) of Tool and remove Bottom Plate (A). ...

Manual
Page 17
... and turn it so bottom faces up. Grasp Turbine (E) and pull firmly to Buy To assure cleaning effectiveness, use only genuine HOOVER® parts to last a long time and is designed to assure your cleaner operates at peak performance. Replace Brushroll, Belt Guard, and Bottom Plate as described ...in Figs. 5.19 through 5.19. HOOVER® parts can be replaced. 5.22 Remove Tool from Turbine Pulley. Replacing Belt 5.23 ...
... and turn it so bottom faces up. Grasp Turbine (E) and pull firmly to Buy To assure cleaning effectiveness, use only genuine HOOVER® parts to last a long time and is designed to assure your cleaner operates at peak performance. Replace Brushroll, Belt Guard, and Bottom Plate as described ...in Figs. 5.19 through 5.19. HOOVER® parts can be replaced. 5.22 Remove Tool from Turbine Pulley. Replacing Belt 5.23 ...


