
Manual
Page 2
CARTON CONTENTS 6 3. GENERAL MAINTENANCE ..... 12 Dirt Cup 12 Umbrella Tube 12. Primary Filter 13 HEPA Filter 14 Brushroll 15 Turbine Hand Tool 16 6. Small parts can present a choking hazard. 2 TROUBLESHOOTING 18 7. WA R R A N T Y 2 0 OWNER'S... may include small parts. HOW TO ASSEMBLE 7 Connect Hose 7 Connect Wand 7 Connect Nozzle 7 4. HOW TO OPERATE 8 Carrying Handle 8 Cord Release/Rewind 8 Vacuum Controls 9 Carpet Cleaning 10 Hard Floor Cleaning 10 Edge Cleaning 10 Stair Cleaning 10 Select Proper Cleaning Tools 11 Attaching Tools 11 5. S E R V I C...
CARTON CONTENTS 6 3. GENERAL MAINTENANCE ..... 12 Dirt Cup 12 Umbrella Tube 12. Primary Filter 13 HEPA Filter 14 Brushroll 15 Turbine Hand Tool 16 6. Small parts can present a choking hazard. 2 TROUBLESHOOTING 18 7. WA R R A N T Y 2 0 OWNER'S... may include small parts. HOW TO ASSEMBLE 7 Connect Hose 7 Connect Wand 7 Connect Nozzle 7 4. HOW TO OPERATE 8 Carrying Handle 8 Cord Release/Rewind 8 Vacuum Controls 9 Carpet Cleaning 10 Hard Floor Cleaning 10 Edge Cleaning 10 Stair Cleaning 10 Select Proper Cleaning Tools 11 Attaching Tools 11 5. S E R V I C...
Manual
Page 4
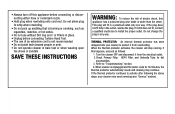
...is unplugged and the motor cools for dirt accumulation. 3. Turn the cleaner OFF and disconnect it still does not fit, contact a qualified electrician to install the proper outlet. Check Primary Filter, HEPA Filter, and Umbrella Tube for 30 minutes, the thermal protector automatically resets ... nozzle. • Hold plug when rewinding onto cord reel. Do not allow plug to activate after following the above steps, your cleaner to "Troubleshooting" section. 4. SAVE THESE INSTRUCTIONS WARNING: To reduce the risk of an extension cord is burning or smoking, such as...
...is unplugged and the motor cools for dirt accumulation. 3. Turn the cleaner OFF and disconnect it still does not fit, contact a qualified electrician to install the proper outlet. Check Primary Filter, HEPA Filter, and Umbrella Tube for 30 minutes, the thermal protector automatically resets ... nozzle. • Hold plug when rewinding onto cord reel. Do not allow plug to activate after following the above steps, your cleaner to "Troubleshooting" section. 4. SAVE THESE INSTRUCTIONS WARNING: To reduce the risk of an extension cord is burning or smoking, such as...
Manual
Page 5
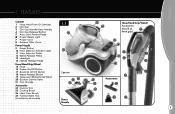
FEATURES 1. FEATURES Canister 1 Hose Inlet (Front Of Canister) 2 Dirt Cup 3 Dirt Cup Handle/Carry Handle 4 Dirt Cup Release Button 5 Auto Cord Rewind Pedal 6 Power Ready Light 7 Power Cord 8 Exhaust Filter Cover Power Nozzle 9 Reset Button 10 Floor Selector Indicator Light 11 Floor Selector Pedal 12 Wand Release...Control Valve 21 Tool Storage Accessories 22 Crevice Tool 23 Dusting Brush 24 Hard Floor Brush 25 Turbine Hand Tool (Included in all models) 1.1 2 1 Canister 10 11 9 Power Nozzle 3 4 Hose/Hand Grip/Wand/ Accessories (stored on 15 hand grip) 5 6 16 7 17 8 18 12 Accessories...
FEATURES 1. FEATURES Canister 1 Hose Inlet (Front Of Canister) 2 Dirt Cup 3 Dirt Cup Handle/Carry Handle 4 Dirt Cup Release Button 5 Auto Cord Rewind Pedal 6 Power Ready Light 7 Power Cord 8 Exhaust Filter Cover Power Nozzle 9 Reset Button 10 Floor Selector Indicator Light 11 Floor Selector Pedal 12 Wand Release...Control Valve 21 Tool Storage Accessories 22 Crevice Tool 23 Dusting Brush 24 Hard Floor Brush 25 Turbine Hand Tool (Included in all models) 1.1 2 1 Canister 10 11 9 Power Nozzle 3 4 Hose/Hand Grip/Wand/ Accessories (stored on 15 hand grip) 5 6 16 7 17 8 18 12 Accessories...

Manual
Page 12
the electrical outlet before the dirt reaches the fill line. 5.1 p Always unplug the vacuum cleaner from How to Clean Disconnect cleaner from electrical outlet. Umbrella Tube When to Clean Check Umbrella Tube on the Dirt Cup Lid and pull Dirt Cup Out. 5.2 Holding Dirt Cup over ... is emptied for this 5.4 Twist Umbrella Tube left and remove from electrical outlet. Check more frequently if cleaning up pet hair or you clean the Filters every time the Dirt Cup is wrapped with long hair. When all the dirt has Umbrella Tube or fallen, close the Dirt Cup Door and...
the electrical outlet before the dirt reaches the fill line. 5.1 p Always unplug the vacuum cleaner from How to Clean Disconnect cleaner from electrical outlet. Umbrella Tube When to Clean Check Umbrella Tube on the Dirt Cup Lid and pull Dirt Cup Out. 5.2 Holding Dirt Cup over ... is emptied for this 5.4 Twist Umbrella Tube left and remove from electrical outlet. Check more frequently if cleaning up pet hair or you clean the Filters every time the Dirt Cup is wrapped with long hair. When all the dirt has Umbrella Tube or fallen, close the Dirt Cup Door and...
Manual
Page 13
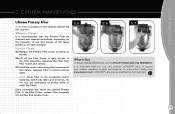
... Lifetime Primary Filter to the Filter Frame, replace Filter Assembly into canister and replace cover. 5.5 5.6 5.7 What to wash the Filters. It is located on each cleaning. To order Filters please visit www.hoover.com. GENERAL MAINTENANCE 5. GENERAL MAINTENANCE Lifetime Primary Filter NOTE: This is important that the Primary Filter be identified by lifting up to assure your cleaner operates at...
... Lifetime Primary Filter to the Filter Frame, replace Filter Assembly into canister and replace cover. 5.5 5.6 5.7 What to wash the Filters. It is located on each cleaning. To order Filters please visit www.hoover.com. GENERAL MAINTENANCE 5. GENERAL MAINTENANCE Lifetime Primary Filter NOTE: This is important that the Primary Filter be identified by lifting up to assure your cleaner operates at...
Manual
Page 14
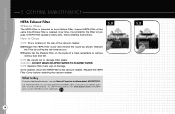
... visibly dirty, follow cleaning instructions. Replace the HEPA Filter Cover before restarting the vacuum cleaner. HOOVER® parts can be a lifetime Filter. Remove the Filter by the trademark- 5.8 14 5.9 It is important that you . 5.9 Gently tap the Pleated Filter on the rear of the vacuum cleaner. 5.8 Release the HEPA Filter Cover and remove the Cover as shown. GENERAL MAINTENANCE 5. Over...
... visibly dirty, follow cleaning instructions. Replace the HEPA Filter Cover before restarting the vacuum cleaner. HOOVER® parts can be a lifetime Filter. Remove the Filter by the trademark- 5.8 14 5.9 It is important that you . 5.9 Gently tap the Pleated Filter on the rear of the vacuum cleaner. 5.8 Release the HEPA Filter Cover and remove the Cover as shown. GENERAL MAINTENANCE 5. Over...
Manual
Page 15
...Brushroll. 5.16 Replace Bottom Plate and Screws. To order Filters please visit www.hoover.com. To maintain cleaning effectiveness, replace Brushroll if brushes do not touch card. How to Remove Disconnect cleaner from electrical outlet. 5.11 Turn cleaner over and remove 9 Screws as indicated in photo. 5.12... suddenly restart - What to Buy To assure cleaning effectiveness, use only Hoover® Brushroll part #59143012. 5.14 5.15 It is important that you use only genuine HOOVER® parts to assure your cleaner operates at peak performance. Risk of a card across Bottom Plate while ...
...Brushroll. 5.16 Replace Bottom Plate and Screws. To order Filters please visit www.hoover.com. To maintain cleaning effectiveness, replace Brushroll if brushes do not touch card. How to Remove Disconnect cleaner from electrical outlet. 5.11 Turn cleaner over and remove 9 Screws as indicated in photo. 5.12... suddenly restart - What to Buy To assure cleaning effectiveness, use only Hoover® Brushroll part #59143012. 5.14 5.15 It is important that you use only genuine HOOVER® parts to assure your cleaner operates at peak performance. Risk of a card across Bottom Plate while ...

Manual
Page 16
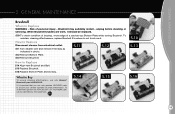
...Buy To assure cleaning effectiveness, use only genuine HOOVER® parts to Replace Brushroll Disconnect cleaner from Hose and turn it rotates freely. To order Filters please visit www.hoover.com. HOOVER® parts can be replaced. 5.17 How to assure your cleaner operates at peak performance. A 5.17 Remove... through Belt and position Belt over Gear Teeth (D) on Brushroll. Turn Brushroll, making sure not to ensure that you use only Hoover® Turbine Tool Brushroll part #48414088. Pivot Bottom Plate down , slide End Plates (C) of Brushroll into slots on either side...
...Buy To assure cleaning effectiveness, use only genuine HOOVER® parts to Replace Brushroll Disconnect cleaner from Hose and turn it rotates freely. To order Filters please visit www.hoover.com. HOOVER® parts can be replaced. 5.17 How to assure your cleaner operates at peak performance. A 5.17 Remove... through Belt and position Belt over Gear Teeth (D) on Brushroll. Turn Brushroll, making sure not to ensure that you use only Hoover® Turbine Tool Brushroll part #48414088. Pivot Bottom Plate down , slide End Plates (C) of Brushroll into slots on either side...

Manual
Page 17
... Plate (A). Grasp Turbine (E) and pull firmly to last a long time and is important that you use only Hoover® Belt #38528037. It is not normally replaced. HOOVER® parts can be replaced. 5.22 Remove Tool from Turbine Pulley. Replacing Belt 5.23 Remove Bottom Plate,...to Buy To assure cleaning effectiveness, use only genuine HOOVER® parts to assure your cleaner operates at peak performance. Replace Brushroll, Belt Guard, and Bottom Plate as described in Figs. 5.19 through 5.19. 5. To order Filters please visit www.hoover.com. Replace with new Belt. 5.24 With ...
... Plate (A). Grasp Turbine (E) and pull firmly to last a long time and is important that you use only Hoover® Belt #38528037. It is not normally replaced. HOOVER® parts can be replaced. 5.22 Remove Tool from Turbine Pulley. Replacing Belt 5.23 Remove Bottom Plate,...to Buy To assure cleaning effectiveness, use only genuine HOOVER® parts to assure your cleaner operates at peak performance. Replace Brushroll, Belt Guard, and Bottom Plate as described in Figs. 5.19 through 5.19. 5. To order Filters please visit www.hoover.com. Replace with new Belt. 5.24 With ...

Manual
Page 18
... shut off and unplug the vacuum cleaner. Remove blockage. See Brushroll ...Filters. See "Service" section in firmly. UNPLUG CLEANER BEFORE SERVICING PROBLEM Cleaner won 't run . Plug Power Cord in manual. Dirt Cup not installed properly. See "Low suction" section above . Replace Brushroll. Exclusive Hoover Platinum... Collection™ Member Services Line 1.877.MYPLTNM (1.877.697.5866) In the event that further assistance is required, see your cleaner by the owner. The service parts used in the upright storage position. Low suction: Canister...
... shut off and unplug the vacuum cleaner. Remove blockage. See Brushroll ...Filters. See "Service" section in firmly. UNPLUG CLEANER BEFORE SERVICING PROBLEM Cleaner won 't run . Plug Power Cord in manual. Dirt Cup not installed properly. See "Low suction" section above . Replace Brushroll. Exclusive Hoover Platinum... Collection™ Member Services Line 1.877.MYPLTNM (1.877.697.5866) In the event that further assistance is required, see your cleaner by the owner. The service parts used in the upright storage position. Low suction: Canister...
Manual
Page 20
... you , to a Hoover® Authorized Warranty Service Dealer along with the Owner's Manual, your Hoover Platinum Collection™ Bagless Cyclonic Canister is not an authorized ...Filter, HEPA Filter, use , and in which the product was initially purchased and resale of warranty service outlets, phone The Exclusive Hoover Platinum Collection™ Member Services Line, Phone 1.877.697.5866, Mon-Fri 8am-5pm EST. HOW TO MAKE A WARRANTY CLAIM If this warranty. WARRANTY Limited SIX Year Wa r r a n t y f o r H o o v e r P l a t i n u m C o l l e c t i o n ™ Bagless Cyclonic Canister...
... you , to a Hoover® Authorized Warranty Service Dealer along with the Owner's Manual, your Hoover Platinum Collection™ Bagless Cyclonic Canister is not an authorized ...Filter, HEPA Filter, use , and in which the product was initially purchased and resale of warranty service outlets, phone The Exclusive Hoover Platinum Collection™ Member Services Line, Phone 1.877.697.5866, Mon-Fri 8am-5pm EST. HOW TO MAKE A WARRANTY CLAIM If this warranty. WARRANTY Limited SIX Year Wa r r a n t y f o r H o o v e r P l a t i n u m C o l l e c t i o n ™ Bagless Cyclonic Canister...


