Manual
Page 2
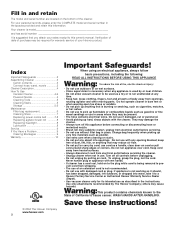
...! Index Important Safeguards 2 Assembling Cleaner 3 Carton contents 3 Connect hose, wand, nozzle 3 Cleaner Description 4 How To Use Canister Cleaner 4-6 Powered Nozzle 4 Cleaning Tools 5 Cleaning Stairs 5 Storage 5,6 Maintenance Filter bag replacement 6 Cleaning filters 7 Replacing power nozzle belt ..........7-8 Replacing agitator brush roll 8 Replacing headlight 8 Lubrication 8 Service 9 If You Have a Problem 9 Clearing Blockages 9 Warranty 10 © 2004 The Hoover Company www.hoover.com 2 Important Safeguards...
...! Index Important Safeguards 2 Assembling Cleaner 3 Carton contents 3 Connect hose, wand, nozzle 3 Cleaner Description 4 How To Use Canister Cleaner 4-6 Powered Nozzle 4 Cleaning Tools 5 Cleaning Stairs 5 Storage 5,6 Maintenance Filter bag replacement 6 Cleaning filters 7 Replacing power nozzle belt ..........7-8 Replacing agitator brush roll 8 Replacing headlight 8 Lubrication 8 Service 9 If You Have a Problem 9 Clearing Blockages 9 Warranty 10 © 2004 The Hoover Company www.hoover.com 2 Important Safeguards...
Manual
Page 3
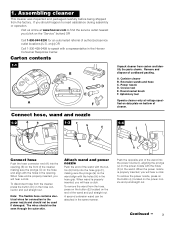
1. only) OR Call 1-330-499-9499 to the power nozzle and should not be seen through the outer skin. Canister cleaner B. Attach wand and power nozzle Push the end of the wand and pull straight out. To remove the ...power nozzle with a representative in the same manner. Note: The flexible hose contains electrical wires for an automated referral of the wand into the hose grip (F), making sure the prongs (C) on the power nozzle and pull straight out. When the power nozzle is properly inserted, you will hear a click. Power nozzle D. The wires should not be attached in the Hoover...
1. only) OR Call 1-330-499-9499 to the power nozzle and should not be seen through the outer skin. Canister cleaner B. Attach wand and power nozzle Push the end of the wand and pull straight out. To remove the ...power nozzle with a representative in the same manner. Note: The flexible hose contains electrical wires for an automated referral of the wand into the hose grip (F), making sure the prongs (C) on the power nozzle and pull straight out. When the power nozzle is properly inserted, you will hear a click. Power nozzle D. The wires should not be attached in the Hoover...

Manual
Page 5
... pedal placing the indicator in the "FLOOR" position. To set the power nozzle for carpet and rug cleaning, step on extension wand) may be attached to top. Twist tool slightly to the nozzle. The cleaning tools have many uses. Cleaning tools The cleaning tools are... used in tight spaces, corners, and along edges in hard-to store cleaner The cleaning tools are conveniently stored on end. 2-5 2-6 2-7 A Power nozzle ON/OFF switch The power nozzle ON/OFF switch (A) provides power to tighten or loosen the connection. This setting provides the suction and agitator...
... pedal placing the indicator in the "FLOOR" position. To set the power nozzle for carpet and rug cleaning, step on extension wand) may be attached to top. Twist tool slightly to the nozzle. The cleaning tools have many uses. Cleaning tools The cleaning tools are... used in tight spaces, corners, and along edges in hard-to store cleaner The cleaning tools are conveniently stored on end. 2-5 2-6 2-7 A Power nozzle ON/OFF switch The power nozzle ON/OFF switch (A) provides power to tighten or loosen the connection. This setting provides the suction and agitator...
Manual
Page 7
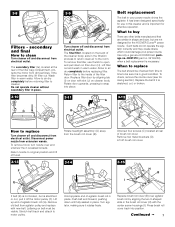
.... What to open and pull down until fully seated in warm water. Return nozzle to replace The belt should be checked from electrical outlet. Stretch belt back and attach to air dry completely before returning filter to the room. Allow to motor pulley...not operate the agitator correctly and may create stress which could damage your power nozzle drives the agitator. Do not operate cleaner without secondary filter in shape and size, but is important for the HOOVER Duros™ power nozzle. Replace the belt if it is necessary. Continued ª 7 Rotate...
.... What to open and pull down until fully seated in warm water. Return nozzle to replace The belt should be checked from electrical outlet. Stretch belt back and attach to air dry completely before returning filter to the room. Allow to motor pulley...not operate the agitator correctly and may create stress which could damage your power nozzle drives the agitator. Do not operate cleaner without secondary filter in shape and size, but is important for the HOOVER Duros™ power nozzle. Replace the belt if it is necessary. Continued ª 7 Rotate...
Manual
Page 9
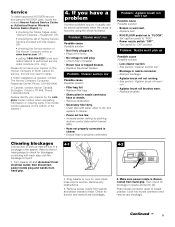
... with water, allow to dry and replace in cleaner. • Power set to "FLOOR". • Set rug/floor pedal to "RUG". • Power nozzle switch "OFF". • Turn switch to a blockage in delay. only). If further assistance is disconnected from wands and attach wands to lowest position. Problem: Cleaner suction low Possible cause Possible solution •...
... with water, allow to dry and replace in cleaner. • Power set to "FLOOR". • Set rug/floor pedal to "RUG". • Power nozzle switch "OFF". • Turn switch to a blockage in delay. only). If further assistance is disconnected from wands and attach wands to lowest position. Problem: Cleaner suction low Possible cause Possible solution •...

