
Product Manual
Page 5
...Available on select models only. Cleaner B. Upper Handle C. SpinScrub® Brush Assembly Remove all parts are located before disposing of packing materials. Hose/Tool Caddy* G Hose H Stair/Upholstery Nozzle I B E A A. NOTE: Phillips screwdriver needed for assembly. 1. Attach handle 1.2 Remove tank. 1.3 Position cord ...nuts. Handle Bolts and Nuts (Three nuts may be purchased separately by visiting hoover.com. F. Make sure all parts from images shown. Hose/Cord Hook E. Accessories not included with hose) D. Bolts and nuts located in bag but only two or need for ...
...Available on select models only. Cleaner B. Upper Handle C. SpinScrub® Brush Assembly Remove all parts are located before disposing of packing materials. Hose/Tool Caddy* G Hose H Stair/Upholstery Nozzle I B E A A. NOTE: Phillips screwdriver needed for assembly. 1. Attach handle 1.2 Remove tank. 1.3 Position cord ...nuts. Handle Bolts and Nuts (Three nuts may be purchased separately by visiting hoover.com. F. Make sure all parts from images shown. Hose/Cord Hook E. Accessories not included with hose) D. Bolts and nuts located in bag but only two or need for ...
Product Manual
Page 6
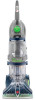
... cleaner. 1.6 1.7 Push top of tank and tank handle while supporting back of cleaner as shown. 1.15 IMPORTANT Tool caddy is secure. Use clips (D) to secure hose and solution tube (E and inset). 1.12 1.13 1.14 D E E D Actual model may vary from images shown. 6 1.11 C B Store tools 1.15 Store Tools on.... 1.8 Push up on select models only) 1.10 Insert tabs. 1.11 Slide caddy down. Notch (B) rests on wall or in closet. 1.10 Store hose 1.12 Start. 1.13 Wrap. 1.14 Finish. Check tank to make sure it to latch it is removable for storage on cleaner) (Available on handle ...
... cleaner. 1.6 1.7 Push top of tank and tank handle while supporting back of cleaner as shown. 1.15 IMPORTANT Tool caddy is secure. Use clips (D) to secure hose and solution tube (E and inset). 1.12 1.13 1.14 D E E D Actual model may vary from images shown. 6 1.11 C B Store tools 1.15 Store Tools on.... 1.8 Push up on select models only) 1.10 Insert tabs. 1.11 Slide caddy down. Notch (B) rests on wall or in closet. 1.10 Store hose 1.12 Start. 1.13 Wrap. 1.14 Finish. Check tank to make sure it to latch it is removable for storage on cleaner) (Available on handle ...
Product Manual
Page 7
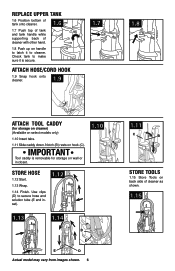
... switch up. 2.2 Rinse ON OFF WASH AUTO RINSE Handle release pedal Step on bottom 19. ON/OFF Switch 4. Dirty Water Tank Handle 8 11. Hose Connection Port 16 24 23 15 18. Cord Hook: rotates for household use. 22. CAUTION ! 24. Clean Water Tank Handle 8. Cord... *Accessories not included with your UNLESS YOU HAVE THE PROPER HARD FLOOR model may be lifted by visiting www.hoover.com, or your cleaner from images shown. Rinse Setting Switch 5. Hose* of nozzle to room, put handle in upright and locked position, tilt cleaner back on both sides of cleaner...
... switch up. 2.2 Rinse ON OFF WASH AUTO RINSE Handle release pedal Step on bottom 19. ON/OFF Switch 4. Dirty Water Tank Handle 8 11. Hose Connection Port 16 24 23 15 18. Cord Hook: rotates for household use. 22. CAUTION ! 24. Clean Water Tank Handle 8. Cord... *Accessories not included with your UNLESS YOU HAVE THE PROPER HARD FLOOR model may be lifted by visiting www.hoover.com, or your cleaner from images shown. Rinse Setting Switch 5. Hose* of nozzle to room, put handle in upright and locked position, tilt cleaner back on both sides of cleaner...

Product Manual
Page 13
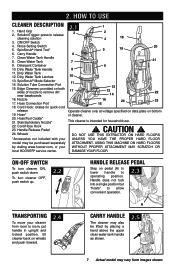
... A How to snap free if it is designed with holes on select models only) B. Push hose into port and lock in connection port. Remove hose from solution connection port. Insert short hose end, matching tabs on small carpet areas, carpeted A stairs and upholstery. How to Remove 4.2 ...and bottom of cover with a break-away feature which allows it to Attach 4.1 Open hose connection port (A). 4. To reposition the tool, reverse this procedure. To reattach, align hinges of hose. CAUTION ! SpinScrub® Hand Tool (Available on select models only) has rotating brushes ...
... A How to snap free if it is designed with holes on select models only) B. Push hose into port and lock in connection port. Remove hose from solution connection port. Insert short hose end, matching tabs on small carpet areas, carpeted A stairs and upholstery. How to Remove 4.2 ...and bottom of cover with a break-away feature which allows it to Attach 4.1 Open hose connection port (A). 4. To reposition the tool, reverse this procedure. To reattach, align hinges of hose. CAUTION ! SpinScrub® Hand Tool (Available on select models only) has rotating brushes ...
Product Manual
Page 14
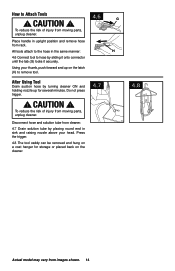
... turning cleaner ON and holding nozzle up on the latch (H) to remove tool. Do not press trigger. ! Disconnect hose and solution tube from cleaner. 4.7 Drain solution tube by sliding it onto connector until the tab (G) locks it securely. CAUTION ! To reduce the risk of ...injury from moving parts, unplug cleaner. How to hose by placing round end in upright position and remove hose from rack. Place handle in sink and raising nozzle above your thumb, push forward and up for storage or placed back...
... turning cleaner ON and holding nozzle up on the latch (H) to remove tool. Do not press trigger. ! Disconnect hose and solution tube from cleaner. 4.7 Drain solution tube by sliding it onto connector until the tab (G) locks it securely. CAUTION ! To reduce the risk of ...injury from moving parts, unplug cleaner. How to hose by placing round end in upright position and remove hose from rack. Place handle in sink and raising nozzle above your thumb, push forward and up for storage or placed back...

Product Manual
Page 15
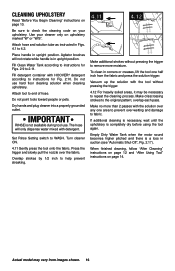
...the trigger (equals one area. Place handle in Figs. 4.1 and 4.2. Agitator brushes will not rotate while handle is a loss in upright position. Hose length may vary from falling, use more dry strokes to help prevent streaking. WARNING ! Turn cleaner ON. 4.9 Pre-spray the carpeted stair by ...when the motor sound becomes higher pitched and there is in suction (see "Automatic Shut-Off", Fig. 2.17). Fill detergent container with HOOVER® detergent according to alternate wet and dry strokes as instructed in upright position. Attach tool to clean lower half. ! To prevent ...
...the trigger (equals one area. Place handle in Figs. 4.1 and 4.2. Agitator brushes will not rotate while handle is a loss in upright position. Hose length may vary from falling, use more dry strokes to help prevent streaking. WARNING ! Turn cleaner ON. 4.9 Pre-spray the carpeted stair by ...when the motor sound becomes higher pitched and there is in suction (see "Automatic Shut-Off", Fig. 2.17). Fill detergent container with HOOVER® detergent according to alternate wet and dry strokes as instructed in upright position. Attach tool to clean lower half. ! To prevent ...
Product Manual
Page 16
... solution tube as instructed in Figs. 4.1 to end of hose. Attach tool to 4.2. The hose will not rotate while handle is a loss in upright position. Set Rinse Setting switch to the original pattern; Make no more moisture. Place ...to 2.11. Dry hands and plug cleaner into a properly grounded outlet. Vacuum up the solution with detergent. Be sure to remove more than 2 passes with HOOVER® detergent according to instructions for Figs. 2.9 to repeat the cleaning process. Do not use . When finished cleaning, follow "After Cleaning" instructions on page...
... solution tube as instructed in Figs. 4.1 to end of hose. Attach tool to 4.2. The hose will not rotate while handle is a loss in upright position. Set Rinse Setting switch to the original pattern; Make no more moisture. Place ...to 2.11. Dry hands and plug cleaner into a properly grounded outlet. Vacuum up the solution with detergent. Be sure to remove more than 2 passes with HOOVER® detergent according to instructions for Figs. 2.9 to repeat the cleaning process. Do not use . When finished cleaning, follow "After Cleaning" instructions on page...
Product Manual
Page 19
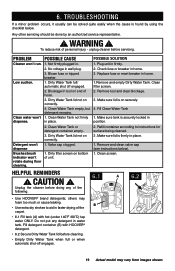
...Make sure lid is securely locked in place. POSSIBLE SOLUTION 1. Plug unit in faster drying of the carpet. • 6.1 Fill tank (A) with HOOVER® detergent. • 6.2 Secure Dirty Water Tank lid before cleaning. • Empty Dirty Water Tank when full or when automatic shut-off engaged... filter screen on end of the following. Do not put any of hose. 3. To reduce risk of unit. 1. unplug cleaner before doing any detergent in wall plug. 3. No voltage in water tank. A 6.2 • Use HOOVER® brand detergents; WARNING ! Blockage In tool on bottom of personal...
...Make sure lid is securely locked in place. POSSIBLE SOLUTION 1. Plug unit in faster drying of the carpet. • 6.1 Fill tank (A) with HOOVER® detergent. • 6.2 Secure Dirty Water Tank lid before cleaning. • Empty Dirty Water Tank when full or when automatic shut-off engaged... filter screen on end of the following. Do not put any of hose. 3. To reduce risk of unit. 1. unplug cleaner before doing any detergent in wall plug. 3. No voltage in water tank. A 6.2 • Use HOOVER® brand detergents; WARNING ! Blockage In tool on bottom of personal...


