Product Manual
Page 3
Table of Contents Safety Instructions...4 Carton Contents...6 Product Guide...7 Tools and Accessories...8 Before You Begin Cleaning...9 Getting Started...10 How to Assemble Your SmartWash™ Carpet Cleaner 10 Using your SmartWash™ Carpet Cleaner 11 Maintenance...13 Hoover® Professional Series Solution Guide 20 Troubleshooting...21 Warranty ...23 French...25 Spanish...49 3
Table of Contents Safety Instructions...4 Carton Contents...6 Product Guide...7 Tools and Accessories...8 Before You Begin Cleaning...9 Getting Started...10 How to Assemble Your SmartWash™ Carpet Cleaner 10 Using your SmartWash™ Carpet Cleaner 11 Maintenance...13 Hoover® Professional Series Solution Guide 20 Troubleshooting...21 Warranty ...23 French...25 Spanish...49 3

Product Manual
Page 7
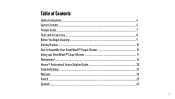
Filter 4. Automatic Wash/ Dry LED Display 8. Cord Wrap 12. On/Off Pedal 6 7 8 9 10 11 12 13 7 Getting to Know Your Hoover® SmartWash™ 1. Solution Tank 4 10. Clean Water Tank 3. Hose Connection 6. Removable FlexDuo™ PowerBrushes 3 9. Carry Handle 11. Dirty Water/Recovery Tank 5. Triggerless Handle Design 1 2. Handle release Pedal 5 13. Removable Recovery Nozzle 2 7.
Filter 4. Automatic Wash/ Dry LED Display 8. Cord Wrap 12. On/Off Pedal 6 7 8 9 10 11 12 13 7 Getting to Know Your Hoover® SmartWash™ 1. Solution Tank 4 10. Clean Water Tank 3. Hose Connection 6. Removable FlexDuo™ PowerBrushes 3 9. Carry Handle 11. Dirty Water/Recovery Tank 5. Triggerless Handle Design 1 2. Handle release Pedal 5 13. Removable Recovery Nozzle 2 7.
Product Manual
Page 10
... tank. Replace cap. 3 Place the Solution Tank back into the unit and press FIRMLY into the base until you hear a "click". Getting Started With Your SmartWash™ Carpet Cleaner: Assembly 1 Insert the handle into place. Replace cap. 3 Align Clean Water Tank with the body of the unit and press FIRMLY into...
... tank. Replace cap. 3 Place the Solution Tank back into the unit and press FIRMLY into the base until you hear a "click". Getting Started With Your SmartWash™ Carpet Cleaner: Assembly 1 Insert the handle into place. Replace cap. 3 Align Clean Water Tank with the body of the unit and press FIRMLY into...

Product Manual
Page 11
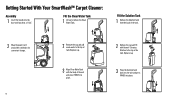
Using Your SmartWash™ Carpet Cleaner 1 Unwrap the power cord and plug unit in an electrical outlet. 3 Step on the Power Pedal to turn ON. 2 Step on the Handle Release Pedal to recline the unit for cleaning position. 11
Using Your SmartWash™ Carpet Cleaner 1 Unwrap the power cord and plug unit in an electrical outlet. 3 Step on the Power Pedal to turn ON. 2 Step on the Handle Release Pedal to recline the unit for cleaning position. 11

Product Manual
Page 12
Using Your SmartWash™ Carpet Cleaner 4 Slowly move forward. The unit will remove residual carpet cleaning solution from your cleaning is visibly passing through 6. 12 To Rinse with ... amount of water and cleaning solution. 6 When your carpet. The unit will extract remaining water from your carpets by extracting the water. 7 For best results, Hoover recommends rinsing the carpet with clean water only, remove the Solution Tank and then repeat steps 4 through the nozzle. 5 Slowly pull backward. Continue in this...
Using Your SmartWash™ Carpet Cleaner 4 Slowly move forward. The unit will remove residual carpet cleaning solution from your cleaning is visibly passing through 6. 12 To Rinse with ... amount of water and cleaning solution. 6 When your carpet. The unit will extract remaining water from your carpets by extracting the water. 7 For best results, Hoover recommends rinsing the carpet with clean water only, remove the Solution Tank and then repeat steps 4 through the nozzle. 5 Slowly pull backward. Continue in this...


