
Product Manual
Page 5
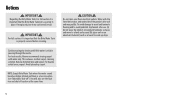
... use sharp objects to clean out hose as they are in Fig. 1. Using this machine. • To help prevent matting and resoiling, avoid contact with solution in tanks. • With brushes and brush roll on, do not leave the product on wood and laminate surfaces and remove to a hard surface and (b) place...
... use sharp objects to clean out hose as they are in Fig. 1. Using this machine. • To help prevent matting and resoiling, avoid contact with solution in tanks. • With brushes and brush roll on, do not leave the product on wood and laminate surfaces and remove to a hard surface and (b) place...

Product Manual
Page 6
What's in -1 Antimicrobial Tool* Mesh Tool Storage Bag Sample Bottle of Cleaning Solution Accessories not included with your model may be purchased separately by visiting Hoover.com 6 FlexForce™ PowerBrushes 2-in the Box? Carpet Cleaner Solution Tank Water Tank Upper Handle Accessory Hose *Tools and Accessories vary per model.
What's in -1 Antimicrobial Tool* Mesh Tool Storage Bag Sample Bottle of Cleaning Solution Accessories not included with your model may be purchased separately by visiting Hoover.com 6 FlexForce™ PowerBrushes 2-in the Box? Carpet Cleaner Solution Tank Water Tank Upper Handle Accessory Hose *Tools and Accessories vary per model.

Product Manual
Page 7
Getting to Know Your Hoover® SmartWash™ 1. Dirty Water/Recovery Tank 5. Automatic Wash/ Dry LED Display 8. Removable FlexDuo™ PowerBrushes 3 9. On/Off Pedal 6 7 8 9 10 11 12 13 7 Filter 4. Carry Handle 11. Handle release Pedal 5 13. Clean Water Tank 3. Removable Recovery Nozzle 2 7. Cord Wrap 12. Solution Tank 4 10. Hose Connection 6. Triggerless Handle Design 1 2.
Getting to Know Your Hoover® SmartWash™ 1. Dirty Water/Recovery Tank 5. Automatic Wash/ Dry LED Display 8. Removable FlexDuo™ PowerBrushes 3 9. On/Off Pedal 6 7 8 9 10 11 12 13 7 Filter 4. Carry Handle 11. Handle release Pedal 5 13. Clean Water Tank 3. Removable Recovery Nozzle 2 7. Cord Wrap 12. Solution Tank 4 10. Hose Connection 6. Triggerless Handle Design 1 2.

Product Manual
Page 9
... as a traditonal vacuum cleaner. See the "Cleaning Solutions" section. *Available at the same time. 9 Water will also see Hoover Cleaning Solution Guide, pg. 18) to soak up furniture skirts and draperies. NOTE: Empty Dirty Water Tank when the motor sound becomes higher pitched and there ...is visible passing through the nozzle. Gently rub surface with a Hoover® Cleaning Solution*. Wait ten minutes and check for colorfastness in suction (see "...
... as a traditonal vacuum cleaner. See the "Cleaning Solutions" section. *Available at the same time. 9 Water will also see Hoover Cleaning Solution Guide, pg. 18) to soak up furniture skirts and draperies. NOTE: Empty Dirty Water Tank when the motor sound becomes higher pitched and there ...is visible passing through the nozzle. Gently rub surface with a Hoover® Cleaning Solution*. Wait ten minutes and check for colorfastness in suction (see "...
Product Manual
Page 10
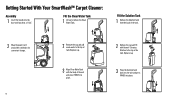
... power cord around the cord hooks for convenient storage. 10 2 Remove the cap and add warm water to remove the Clean Water Tank. Replace cap. 3 Place the Solution Tank back into the unit and press FIRMLY into the base until you hear a "click". Getting Started With Your SmartWash™ Carpet ...Cleaner: Assembly 1 Insert the handle into place. Fill the Clean Water Tank 1 Lift up to the top of the tank. Replace cap. 3 Align Clean Water Tank with the body of the unit and press FIRMLY into place. 2 Remove the cap and fill with Hoover® Cleaning Solution to the top of...
... power cord around the cord hooks for convenient storage. 10 2 Remove the cap and add warm water to remove the Clean Water Tank. Replace cap. 3 Place the Solution Tank back into the unit and press FIRMLY into the base until you hear a "click". Getting Started With Your SmartWash™ Carpet ...Cleaner: Assembly 1 Insert the handle into place. Fill the Clean Water Tank 1 Lift up to the top of the tank. Replace cap. 3 Align Clean Water Tank with the body of the unit and press FIRMLY into place. 2 Remove the cap and fill with Hoover® Cleaning Solution to the top of...

Product Manual
Page 12
... your carpets by extracting the water. 7 For best results, Hoover recommends rinsing the carpet with clean water only, remove the Solution Tank and then repeat steps 4 through the nozzle. 5 Slowly pull backward. The unit will remove residual carpet cleaning solution from your carpets. The Dry Only mode will automatically dry your cleaning is visibly...
... your carpets by extracting the water. 7 For best results, Hoover recommends rinsing the carpet with clean water only, remove the Solution Tank and then repeat steps 4 through the nozzle. 5 Slowly pull backward. The unit will remove residual carpet cleaning solution from your carpets. The Dry Only mode will automatically dry your cleaning is visibly...
Product Manual
Page 14
... is visible passing through the nozzle. You will drip from the brushes and underside of the product after use and may puddle. Remove Solution Tank and repeat. CAUTION ! To avoid damage to wood and laminate flooring and to avoid potential slip hazard, after use (a) do not leave the product on ... dry strokes until little water is securely in suction (see the float rise and shut off "). For heavily soiled areas, repeat. Notices ! For best results, Hoover recommends rinsing carpet with water only.
... is visible passing through the nozzle. You will drip from the brushes and underside of the product after use and may puddle. Remove Solution Tank and repeat. CAUTION ! To avoid damage to wood and laminate flooring and to avoid potential slip hazard, after use (a) do not leave the product on ... dry strokes until little water is securely in suction (see the float rise and shut off "). For heavily soiled areas, repeat. Notices ! For best results, Hoover recommends rinsing carpet with water only.

Product Manual
Page 15
... forward to remove from moving parts, unplug before servicing. ! Maintenance How to Remove and Clean Nozzle 1 To prevent possible leaking, remove and empty Clean Water Tank, Dirty Water Tank and Solution Tank. 2 With handle in the proper position for the unit to have proper suction. 15
... forward to remove from moving parts, unplug before servicing. ! Maintenance How to Remove and Clean Nozzle 1 To prevent possible leaking, remove and empty Clean Water Tank, Dirty Water Tank and Solution Tank. 2 With handle in the proper position for the unit to have proper suction. 15

Product Manual
Page 16
...can be cleaned under running water. CAUTION To reduce the risk of carpet cleaner to air dry thoroughly before servicing. Empty Dirty Water Tank, rinse tank and lid thoroughly with clean water. 16 Allow brushes and underside of injury from moving parts, unplug before storing carpet cleaner on ...for the life of lubricant could cause damage. HOW TO REPLACE 1 At an angle, align side B on a carpeted or wood surface. Empty Solution Tank, rinse tank with clean water and let air dry. Maintenance How to Change and Clean Brushes HOW TO REMOVE 1 To prevent possible leaking, remove Clean Water...
...can be cleaned under running water. CAUTION To reduce the risk of carpet cleaner to air dry thoroughly before servicing. Empty Dirty Water Tank, rinse tank and lid thoroughly with clean water. 16 Allow brushes and underside of injury from moving parts, unplug before storing carpet cleaner on ...for the life of lubricant could cause damage. HOW TO REPLACE 1 At an angle, align side B on a carpeted or wood surface. Empty Solution Tank, rinse tank with clean water and let air dry. Maintenance How to Change and Clean Brushes HOW TO REMOVE 1 To prevent possible leaking, remove Clean Water...

Product Manual
Page 19
...avoid saturating carpet, do not use more than 4 wet strokes over carpet 11 without pressing trigger. 5 Fill Solution Tank with dry strokes. Empty Dirty Water Tank when the motor sound beccomes higher pitched and there is in upright position. Do not place cleaner on stairs or...by ½ inch to help prevent streaking. 6 Attach tool to end of stroke. 4 Fill Clean Water Tank according to instructions. 11 Lift tool, and position it against Nozzle. Always end with Hoover® solution according to instructions. 12 Overlap strokes by holding the tool about one area.
...avoid saturating carpet, do not use more than 4 wet strokes over carpet 11 without pressing trigger. 5 Fill Solution Tank with dry strokes. Empty Dirty Water Tank when the motor sound beccomes higher pitched and there is in upright position. Do not place cleaner on stairs or...by ½ inch to help prevent streaking. 6 Attach tool to end of stroke. 4 Fill Clean Water Tank according to instructions. 11 Lift tool, and position it against Nozzle. Always end with Hoover® solution according to instructions. 12 Overlap strokes by holding the tool about one area.

Product Manual
Page 23
... Brushroll stall protection activated 1. Brushes will not spray after filling the Clean Water Tank or Solution Tank Hose willl not spray after priming pump Clean water won't dispense Solution won't dispense Brushes won 't run Low suction Hose Nozzle stops spraying liquid during... hold the trigger for secure connection to cleaning instructions. 1. Not connected properly 2. Check connection. 1. Clean Water Tank or Solution Tank empty 2. Refill container according to solution port on , then inspect and clean for service: 1-800-944-9200. 2. Ensure unit is secure. Turn...
... Brushroll stall protection activated 1. Brushes will not spray after filling the Clean Water Tank or Solution Tank Hose willl not spray after priming pump Clean water won't dispense Solution won't dispense Brushes won 't run Low suction Hose Nozzle stops spraying liquid during... hold the trigger for secure connection to cleaning instructions. 1. Not connected properly 2. Check connection. 1. Clean Water Tank or Solution Tank empty 2. Refill container according to solution port on , then inspect and clean for service: 1-800-944-9200. 2. Ensure unit is secure. Turn...


