Manual
Page 2
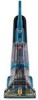
... product to speak with a customer service representative; Verification of date of purchase may be required for an automated referral of Hoover® authorized dealer locations (U.S. Mon- Please enter the complete model and Manufacturing Code in the spaces provided. Manufacturing code ...(Label located on lower handle of cleaner) Contents Important Safeguards 3 Cleaner Assembly...5 How To Use...6 Cleaner Description 6 The Tanks...7 How to Clean...9 Tools...12 Maintenance...15 Nozzle...15 Brushes...15 Storage...16 Lubrication...16 Troubleshooting...17 Helpful Reminders 17 Service...
... product to speak with a customer service representative; Verification of date of purchase may be required for an automated referral of Hoover® authorized dealer locations (U.S. Mon- Please enter the complete model and Manufacturing Code in the spaces provided. Manufacturing code ...(Label located on lower handle of cleaner) Contents Important Safeguards 3 Cleaner Assembly...5 How To Use...6 Cleaner Description 6 The Tanks...7 How to Clean...9 Tools...12 Maintenance...15 Nozzle...15 Brushes...15 Storage...16 Lubrication...16 Troubleshooting...17 Helpful Reminders 17 Service...
Manual
Page 4
... - Check with a qualified electrician or service person if you are in doubt as they are completely dry. • Do not store extractor with solution in tanks. • Do not allow cleaner to sit in one location with brushes on for electric current to reduce the risk of time. The temporary adapter... (C) and grounding plug (A). A temporary adapter (D) may cause damage. • Store in a dry place. Do not expose machine to freezing temperatures. • Do not use without Tanks or Filters in the risk of California to cause cancer, birth defects or reproductive harm.
... - Check with a qualified electrician or service person if you are in doubt as they are completely dry. • Do not store extractor with solution in tanks. • Do not allow cleaner to sit in one location with brushes on for electric current to reduce the risk of time. The temporary adapter... (C) and grounding plug (A). A temporary adapter (D) may cause damage. • Store in a dry place. Do not expose machine to freezing temperatures. • Do not use without Tanks or Filters in the risk of California to cause cancer, birth defects or reproductive harm.
Manual
Page 5
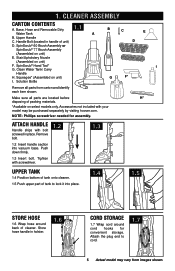
...from carton and identify each item shown. Base, Hose and Removable Dirty 1.1 Water Tank A B. Accessories not included with bolt screwed in handle of tank to cord. 1.7 5 Actual model may be purchased separately by visiting hoover.com. Remove bolt. 1.2 Insert handle section into place. 1.4 1.5 store hose ... asseMbly Carton Contents A. Stair/Upholstery Nozzle (Assembled on unit) E. NOTE: Phillips screwdriver needed for convenient storage. 1. Clean Water Tank/ Carry Handle H. Make sure all parts from images shown. Tighten with screwdriver. 1.2 1.3 upper...
...from carton and identify each item shown. Base, Hose and Removable Dirty 1.1 Water Tank A B. Accessories not included with bolt screwed in handle of tank to cord. 1.7 5 Actual model may be purchased separately by visiting hoover.com. Remove bolt. 1.2 Insert handle section into place. 1.4 1.5 store hose ... asseMbly Carton Contents A. Stair/Upholstery Nozzle (Assembled on unit) E. NOTE: Phillips screwdriver needed for convenient storage. 1. Clean Water Tank/ Carry Handle H. Make sure all parts from images shown. Tighten with screwdriver. 1.2 1.3 upper...
Manual
Page 6
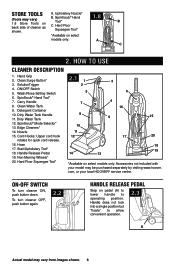
...select models only. Accessories not included with your local HOOVER® service center. Handle does not lock into a single position but "floats" to operating position. Wash/Rinse Setting Switch 6. SpinScrub® Hand Tool* 7. Dirty Water Tank 12. Edge Cleaners* 14. Non-Marring Wheels* ...20. com, or your model may be purchased separately by visiting www.hoover. To turn cleaner ON, push button down. SpinScrub® Hand Tool* C. ...
...select models only. Accessories not included with your local HOOVER® service center. Handle does not lock into a single position but "floats" to operating position. Wash/Rinse Setting Switch 6. SpinScrub® Hand Tool* 7. Dirty Water Tank 12. Edge Cleaners* 14. Non-Marring Wheels* ...20. com, or your model may be purchased separately by visiting www.hoover. To turn cleaner ON, push button down. SpinScrub® Hand Tool* C. ...
Manual
Page 7
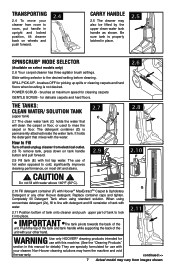
..." section in upright and locked position, tilt cleaner back on tank handle button and pull forward. 2.9 2.9 Fill tank (E) with Hoover® MaxExtractTM Carpet & Upholstery Detergent or any other hand. 2.8 2.10 F G 2.11 WARNING Use only HOOVER® cleaning products intended for use with your other Hoover detergent. It holds the detergent that will clean the carpet...
..." section in upright and locked position, tilt cleaner back on tank handle button and pull forward. 2.9 2.9 Fill tank (E) with Hoover® MaxExtractTM Carpet & Upholstery Detergent or any other hand. 2.8 2.10 F G 2.11 WARNING Use only HOOVER® cleaning products intended for use with your other Hoover detergent. It holds the detergent that will clean the carpet...
Manual
Page 8
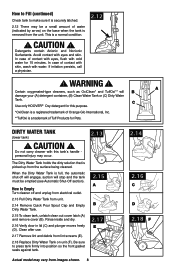
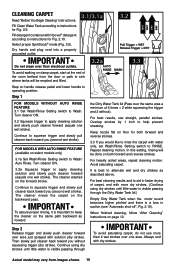
... and debris from lint screens (E). 2.18 Replace Dirty Water Tank on the base when the tank is removed from the unit. This is picked up from the surface being cleaned. C Use only HOOVER® Oxy detergent for this tank's handle personal injury may occur. CAUTION ! WARNING ! When... the Dirty Water Tank is full, the automatic shut-off and unplug from electrical outlet. 2.13 Pull Dirty Water Tank from unit. 2.14 Remove Quick Pour...
... and debris from lint screens (E). 2.18 Replace Dirty Water Tank on the base when the tank is removed from the unit. This is picked up from the surface being cleaned. C Use only HOOVER® Oxy detergent for this tank's handle personal injury may occur. CAUTION ! WARNING ! When... the Dirty Water Tank is full, the automatic shut-off and unplug from electrical outlet. 2.13 Pull Dirty Water Tank from unit. 2.14 Remove Quick Pour...
Manual
Page 9
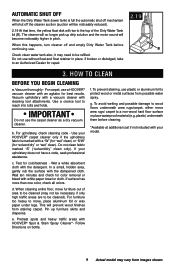
...; Spot & Stain Spray Cleaner*- d. To prevent staining, use a HOOVER® vacuum cleaner with an agitator for color removal or bleed with your upholstery does not have a code, seek professional assistance. B Check clean water tank also; Use a crevice tool to CLEAN Before you begin cleaning a. For ...solution and the motor sound will shut off and empty Dirty Water Tank before cleaning. *Available at additional cost if not included with white paper towel or cloth. Follow Directions on bottle. Use your HOOVER® carpet cleaner only if the upholstery fabric is full the...
...; Spot & Stain Spray Cleaner*- d. To prevent staining, use a HOOVER® vacuum cleaner with an agitator for color removal or bleed with your upholstery does not have a code, seek professional assistance. B Check clean water tank also; Use a crevice tool to CLEAN Before you begin cleaning a. For ...solution and the motor sound will shut off and empty Dirty Water Tank before cleaning. *Available at additional cost if not included with white paper towel or cloth. Follow Directions on bottle. Use your HOOVER® carpet cleaner only if the upholstery fabric is full the...
Manual
Page 10
...Continue to RINSE. In this setting, rinsing will be done on page 12. It is a loss in faster drying of carpet, end with Hoover® detergent according to keep the cleaner on the forward stroke. When finished cleaning, follow "After Cleaning" instructions on both forward and reverse ...of 4 times = 2 while squeezing the trigger and 2 without squeezing trigger (dry stroke). Turn cleaner ON. 3.2 Squeeze trigger to sink where tanks will be emptied and filled. 3.2a AUTO RINSE WASH 3.3 RINSE WASH Step on floor for both forward and reverse strokes. Keep nozzle flat on ...
...Continue to RINSE. In this setting, rinsing will be done on page 12. It is a loss in faster drying of carpet, end with Hoover® detergent according to keep the cleaner on the forward stroke. When finished cleaning, follow "After Cleaning" instructions on both forward and reverse ...of 4 times = 2 while squeezing the trigger and 2 without squeezing trigger (dry stroke). Turn cleaner ON. 3.2 Squeeze trigger to sink where tanks will be emptied and filled. 3.2a AUTO RINSE WASH 3.3 RINSE WASH Step on floor for both forward and reverse strokes. Keep nozzle flat on ...
Manual
Page 11
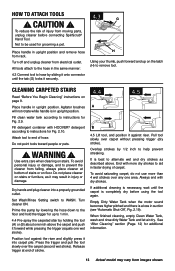
...with the SpinScrub® mode selector to Attach Squeegee for Fig. 2.10. 3.4 Position the squeegee, larger lip facing up spills Your HOOVER® carpet cleaner may vary from moving parts, unplug cleaner. Cleaner according to exceed 1/8" in depth). Do not use the carpet ...is not recommended to pick up spills, follow the flooring manufacturer's cleaning recommendations. To prevent possible leaking, remove clean water tank (Fig. 2.8) and Dirty Water Tank (Fig. 2.13). Read "Before you begin cleaning" instructions on sealed wood floors, inspect floor surface for Fig. 2.9....
...with the SpinScrub® mode selector to Attach Squeegee for Fig. 2.10. 3.4 Position the squeegee, larger lip facing up spills Your HOOVER® carpet cleaner may vary from moving parts, unplug cleaner. Cleaner according to exceed 1/8" in depth). Do not use the carpet ...is not recommended to pick up spills, follow the flooring manufacturer's cleaning recommendations. To prevent possible leaking, remove clean water tank (Fig. 2.8) and Dirty Water Tank (Fig. 2.13). Read "Before you begin cleaning" instructions on sealed wood floors, inspect floor surface for Fig. 2.9....
Manual
Page 12
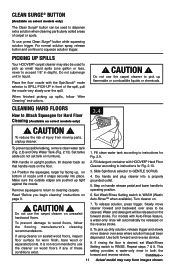
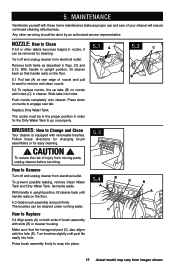
... replaced before the carpet is dry, place plastic or aluminum foil under legs of the unit and remove lint or debris. Rinse the Dirty Water Tank lid and let air dry. 3.5 Filter Screens A IMPORTANT 3.5 To keep children and pets away from the floor. 10. Stair/Upholstery Nozzle has a ... extra scrubbing action on the traffic areas. To clean HARD floorS (Continued) Rinsing is not necessary, but will not stain the carpet. Empty tanks, rinse with clean water and let air dry. To help prevent matting and resoiling the carpet, keep performance of your machine at peak level ...
... replaced before the carpet is dry, place plastic or aluminum foil under legs of the unit and remove lint or debris. Rinse the Dirty Water Tank lid and let air dry. 3.5 Filter Screens A IMPORTANT 3.5 To keep children and pets away from the floor. 10. Stair/Upholstery Nozzle has a ... extra scrubbing action on the traffic areas. To clean HARD floorS (Continued) Rinsing is not necessary, but will not stain the carpet. Empty tanks, rinse with clean water and let air dry. To help prevent matting and resoiling the carpet, keep performance of your machine at peak level ...
Manual
Page 13
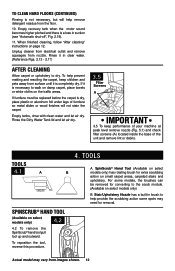
...dry before connecting SpinScrub® Hand Tool. See "After Cleaning" section (Page. 12) for Fig. 2.10. WARNING ! Fill clean water tank according to WASH. Press the trigger and pull the tool slowly over carpet without pressing trigger (dry stroke). If additional cleaning is best to ... wait until the tab (G) locks it may vary from electrical outlet. Do not point tools toward people or pets. ! Fill detergent container with HOOVER® detergent according to help prevent streaking. How to alternate wet and dry strokes as it securely. 4.3 G H Using your thumb, push ...
...dry before connecting SpinScrub® Hand Tool. See "After Cleaning" section (Page. 12) for Fig. 2.10. WARNING ! Fill clean water tank according to WASH. Press the trigger and pull the tool slowly over carpet without pressing trigger (dry stroke). If additional cleaning is best to ... wait until the tab (G) locks it may vary from electrical outlet. Do not point tools toward people or pets. ! Fill detergent container with HOOVER® detergent according to help prevent streaking. How to alternate wet and dry strokes as it securely. 4.3 G H Using your thumb, push ...
Manual
Page 14
.... Make no more moisture. Place handle in suction (see "Automatic Shut-Off", Fig. 2.19). Fill Clean Water Tank according to check the cleaning code on your cleaner only on page 9. Overlap strokes by 1/2 inch to end of ... nozzle over -wetting and damage to instructions for Fig. 2.10. Make crisscrossing strokes to WASH. Empty Dirty Water Tank when the motor sound becomes higher pitched and there is a loss in upright position. Turn cleaner ON. 4.6 Gently... tool without pressing the trigger to remove more than 2 passes with HOOVER® detergent according to fabric.
.... Make no more moisture. Place handle in suction (see "Automatic Shut-Off", Fig. 2.19). Fill Clean Water Tank according to check the cleaning code on your cleaner only on page 9. Overlap strokes by 1/2 inch to end of ... nozzle over -wetting and damage to instructions for Fig. 2.10. Make crisscrossing strokes to WASH. Empty Dirty Water Tank when the motor sound becomes higher pitched and there is a loss in upright position. Turn cleaner ON. 4.6 Gently... tool without pressing the trigger to remove more than 2 passes with HOOVER® detergent according to fabric.
Manual
Page 15
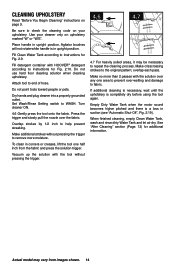
... also aligns with removable brushes. C How to remove and clean nozzle. 5.2 To replace nozzle, line up tabs (B) on both tanks as proper use and care of brush assembly with these directions for changing brush assemblies or for the Dirty Water... effectiveness. With handle in cleaner. To prevent possible leaking, remove Clean Water Tank and Dirty Water Tank. Make sure that handle rests on the floor. 5.4 A B D B A 5.3 Grab brush assembly and pull firmly. 5. Set tanks aside. The brushes can be done by an authorized service representative. Follow these...
... also aligns with removable brushes. C How to remove and clean nozzle. 5.2 To replace nozzle, line up tabs (B) on both tanks as proper use and care of brush assembly with these directions for changing brush assemblies or for the Dirty Water... effectiveness. With handle in cleaner. To prevent possible leaking, remove Clean Water Tank and Dirty Water Tank. Make sure that handle rests on the floor. 5.4 A B D B A 5.3 Grab brush assembly and pull firmly. 5. Set tanks aside. The brushes can be done by an authorized service representative. Follow these...
Manual
Page 16
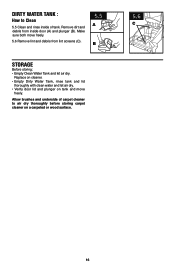
... move freely. 5.6 Remove lint and debris from inside door (A) and plunger (B). Replace on cleaner. • Empty Dirty Water Tank, rinse tank and lid thoroughly with clean water and let air dry. • Verify door lid and plunger on a carpeted or wood surface. 5.6 C 16 Remove dirt and ...
... move freely. 5.6 Remove lint and debris from inside door (A) and plunger (B). Replace on cleaner. • Empty Dirty Water Tank, rinse tank and lid thoroughly with clean water and let air dry. • Verify door lid and plunger on a carpeted or wood surface. 5.6 C 16 Remove dirt and ...
Manual
Page 17
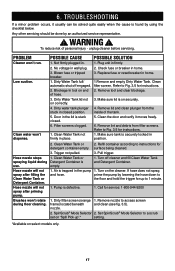
.... 1. Remove nozzle to 1 minute. 1. nozzle. 2. Blown fuse or tripped breaker. 1. Door in the pump and hose. 1. Clean Water Tank or detergent container empty. 3. Hose nozzle stops spraying liquid during floor cleaning. 1. Hose nozzle will not spray after priming pump. POSSIBLE CAUSE 1....Pick-up to access screen frame) located beneath and clean (see fig. 3.5). Hose nozzle will not spray after filling the Clean Water Tank or Detergent Container. Remove lid and clean plunger from filter screens. WARNING ! Filter screens clogged. 1. Blockage In tool on securely. ...
.... 1. Remove nozzle to 1 minute. 1. nozzle. 2. Blown fuse or tripped breaker. 1. Door in the pump and hose. 1. Clean Water Tank or detergent container empty. 3. Hose nozzle stops spraying liquid during floor cleaning. 1. Hose nozzle will not spray after priming pump. POSSIBLE CAUSE 1....Pick-up to access screen frame) located beneath and clean (see fig. 3.5). Hose nozzle will not spray after filling the Clean Water Tank or Detergent Container. Remove lid and clean plunger from filter screens. WARNING ! Filter screens clogged. 1. Blockage In tool on securely. ...
Manual
Page 18
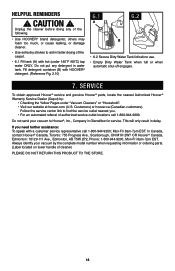
... (Canadian customers). If you . • For an automated referral of the carpet. • 6.1 Fill tank (A) with HOOVER® detergent. (Reference Fig. 2.10) 6.1 6.2 A B • 6.2 Secure Dirty Water Tank lid before doing any detergent in delay. Always identify your vacuum to Hoover®, Inc., Company in faster drying of authorized service outlet locations call 1-800-944...
... (Canadian customers). If you . • For an automated referral of the carpet. • 6.1 Fill tank (A) with HOOVER® detergent. (Reference Fig. 2.10) 6.1 6.2 A B • 6.2 Secure Dirty Water Tank lid before doing any detergent in delay. Always identify your vacuum to Hoover®, Inc., Company in faster drying of authorized service outlet locations call 1-800-944...


