
Manual
Page 1
Owner's Manual Operating and Servicing Instructions Español - For assistance, please call Customer Service at 1-800-944-9200 Mon-Fri 8am-7pm EST. Questions or concerns? página E1 ® Deep Cleaner www.hoover.com IMPORTANT: READ CAREFULLY BEFORE ASSEMBLY AND USE. THIS PRODUCT IS INTENDED FOR HOUSEHOLD USE ONLY. PLEASE DO NOT RETURN THIS PRODUCT TO THE STORE. All rights reserved. #961133001 ID101008-R0 IF USED COMMERCIALLY WARRANTY IS VOID. ©2010 Techtronic Floor Care Technology Limited.
Owner's Manual Operating and Servicing Instructions Español - For assistance, please call Customer Service at 1-800-944-9200 Mon-Fri 8am-7pm EST. Questions or concerns? página E1 ® Deep Cleaner www.hoover.com IMPORTANT: READ CAREFULLY BEFORE ASSEMBLY AND USE. THIS PRODUCT IS INTENDED FOR HOUSEHOLD USE ONLY. PLEASE DO NOT RETURN THIS PRODUCT TO THE STORE. All rights reserved. #961133001 ID101008-R0 IF USED COMMERCIALLY WARRANTY IS VOID. ©2010 Techtronic Floor Care Technology Limited.
Manual
Page 3
... not use to a properly grounded outlet only. Unplug from heated surfaces. • Do not unplug by cleaning process. • Use only HOOVER® cleaning products intended for use by cord, use cord as a handle, close a door on cord, or pull cord around sharp edges...not allow children to prevent the cleaner from falling, always place cleaner at voltage specified on data plate on cord. IMPORTANT SAFETY INSTRUCTIONS SAVE THESE INSTRUCTIONS When using an electrical appliance, basic precautions should , has been dropped, damaged, left outdoors, or dropped into openings. Do ...
... not use to a properly grounded outlet only. Unplug from heated surfaces. • Do not unplug by cleaning process. • Use only HOOVER® cleaning products intended for use by cord, use cord as a handle, close a door on cord, or pull cord around sharp edges...not allow children to prevent the cleaner from falling, always place cleaner at voltage specified on data plate on cord. IMPORTANT SAFETY INSTRUCTIONS SAVE THESE INSTRUCTIONS When using an electrical appliance, basic precautions should , has been dropped, damaged, left outdoors, or dropped into openings. Do ...
Manual
Page 4
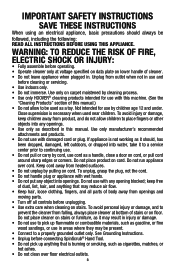
... (E) if a properly grounded outlet is used only until they can result in the risk of California to cause cancer, birth defects or reproductive harm. Grounding Instructions This appliance must be inserted into an appropriate outlet (B) that looks like (F) extending from carpets until a properly grounded outlet (B) can be grounded. WARNING: Improper connection...
... (E) if a properly grounded outlet is used only until they can result in the risk of California to cause cancer, birth defects or reproductive harm. Grounding Instructions This appliance must be inserted into an appropriate outlet (B) that looks like (F) extending from carpets until a properly grounded outlet (B) can be grounded. WARNING: Improper connection...
Manual
Page 10
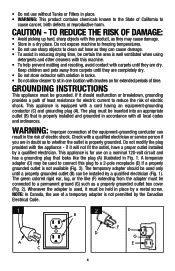
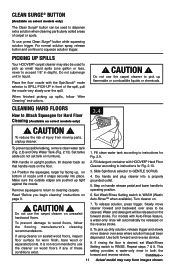
...Squeeze trigger to operating position. Step 2 Release trigger and slowly push cleaner forward over the same area a minimum of carpet, end with Hoover® detergent according to squeeze trigger and slowly pull cleaner back toward you (second wet stroke). For best results, use more dry ...apply cleaning solution and slowly push cleaner forward (equals one wet stroke). For heavily soiled areas, repeat cleaning motion. Continue to instructions for Fig. 2.9. Fill detergent container with more than 4 wet strokes over floor electrical outlets. In this setting, rinsing will be...
...Squeeze trigger to operating position. Step 2 Release trigger and slowly push cleaner forward over the same area a minimum of carpet, end with Hoover® detergent according to squeeze trigger and slowly pull cleaner back toward you (second wet stroke). For best results, use more dry ...apply cleaning solution and slowly push cleaner forward (equals one wet stroke). For heavily soiled areas, repeat cleaning motion. Continue to instructions for Fig. 2.9. Fill detergent container with more than 4 wet strokes over floor electrical outlets. In this setting, rinsing will be...
Manual
Page 11
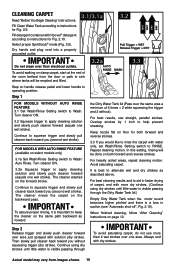
...Wash/Rinse Setting switch to RINSE. For models with HOOVER® Hard Floor that handle rests on unsealed hardwood floors. Do not submerge unit in upright position, tilt cleaner back so 2. Read "Before you begin cleaning" instructions on the reverse stroke. 8. Step on sealed wood...carpet or spots. Fill clean water tank according to squeeze solution trigger. Cleaner according to wood floors, follow "After Cleaning" instructions. Slide SpinScrub selector to pick up tight against the nozzle. Water and detergent will automatically be released on page 9. 3. To prevent...
...Wash/Rinse Setting switch to RINSE. For models with HOOVER® Hard Floor that handle rests on unsealed hardwood floors. Do not submerge unit in upright position, tilt cleaner back so 2. Read "Before you begin cleaning" instructions on the reverse stroke. 8. Step on sealed wood...carpet or spots. Fill clean water tank according to squeeze solution trigger. Cleaner according to wood floors, follow "After Cleaning" instructions. Slide SpinScrub selector to pick up tight against the nozzle. Water and detergent will automatically be released on page 9. 3. To prevent...
Manual
Page 12
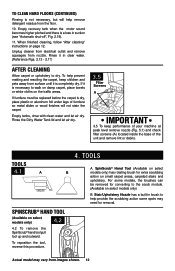
... will help provide the scrubbing action some models, the brushes can be replaced before the carpet is completely dry. When finished cleaning, follow "After cleaning" instructions on select models only) 4.2 4.2 To remove the SpinScrub® hand tool pull tool up and outward. For some spots may vary from surface until it...
... will help provide the scrubbing action some models, the brushes can be replaced before the carpet is completely dry. When finished cleaning, follow "After cleaning" instructions on select models only) 4.2 4.2 To remove the SpinScrub® hand tool pull tool up and outward. For some spots may vary from surface until it...
Manual
Page 13
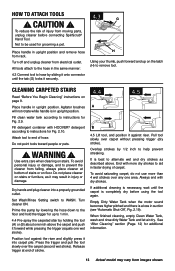
...locks it onto connector until the carpet is in suction (see "Automatic Shut-Off", Fig. 2.19). Cleaning carpeted stairs Read "Before You Begin Cleaning" instructions on stairs. Prime the pump by lowering the hose down to 1 min. 4.4 Pre-spray the carpeted stair by sliding it securely. 4.3 G H ...while pressing the trigger (equals one area. Dry hands and plug cleaner into carpet pile. Position tool against riser. Always end with HOOVER® detergent according to the hose in upright position. When finished cleaning, empty Clean Water Tank, wash and rinse dirty Water Tank...
...locks it onto connector until the carpet is in suction (see "Automatic Shut-Off", Fig. 2.19). Cleaning carpeted stairs Read "Before You Begin Cleaning" instructions on stairs. Prime the pump by lowering the hose down to 1 min. 4.4 Pre-spray the carpeted stair by sliding it securely. 4.3 G H ...while pressing the trigger (equals one area. Dry hands and plug cleaner into carpet pile. Position tool against riser. Always end with HOOVER® detergent according to the hose in upright position. When finished cleaning, empty Clean Water Tank, wash and rinse dirty Water Tank...
Manual
Page 14
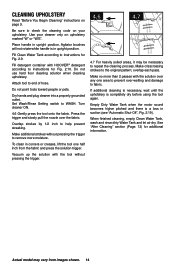
...4.7 4.7 For heavily soiled areas, it may vary from the fabric and press the solution trigger. Cleaning upholstery Read "Before You Begin Cleaning" instructions on upholstery marked "W" or "W/S". Do not point tools toward people or pets. Press the trigger and slowly pull the nozzle over any one...Tank when the motor sound becomes higher pitched and there is completely dry before using the tool again. Vacuum up the solution with HOOVER® detergent according to the original pattern; Use your upholstery. Dry hands and plug cleaner into a properly grounded outlet. Attach ...
...4.7 4.7 For heavily soiled areas, it may vary from the fabric and press the solution trigger. Cleaning upholstery Read "Before You Begin Cleaning" instructions on upholstery marked "W" or "W/S". Do not point tools toward people or pets. Press the trigger and slowly pull the nozzle over any one...Tank when the motor sound becomes higher pitched and there is completely dry before using the tool again. Vacuum up the solution with HOOVER® detergent according to the original pattern; Use your upholstery. Dry hands and plug cleaner into a properly grounded outlet. Attach ...
Manual
Page 17
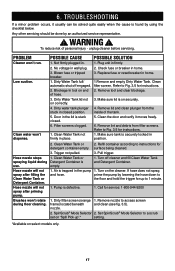
...screen (orange 1. Low suction. Door in place. 2. Clean Water Tank not firmly in the lid is on the cleaner. Refer to instructions for surface being cleaned. 3. Remove lid and clean plunger from filter screens. Refill container according to Fig. 3.5 for up ".* setting...Turn on securely. 4. SpinScrub® Mode Selector 2. Check fuse or breaker in . Hose nozzle will not spray after priming pump. Call for instructions. 1. Remove nozzle to 1 minute. 1. PROBLEM Cleaner won 't rotate during use. Pull trigger. WARNING ! Hose nozzle will not spray after ...
...screen (orange 1. Low suction. Door in place. 2. Clean Water Tank not firmly in the lid is on the cleaner. Refer to instructions for surface being cleaned. 3. Remove lid and clean plunger from filter screens. Refill container according to Fig. 3.5 for up ".* setting...Turn on securely. 4. SpinScrub® Mode Selector 2. Check fuse or breaker in . Hose nozzle will not spray after priming pump. Call for instructions. 1. Remove nozzle to 1 minute. 1. PROBLEM Cleaner won 't rotate during use. Pull trigger. WARNING ! Hose nozzle will not spray after ...


