
Manual
Page 1
www.hoover.com ™ ™ ® ENGLISH § pp. 1-17 ESPAÑOL § pág. 18-27 FRANÇAIS § p. 28-37 Deep Cleaner The Easy to Use Deep Cleaner SteamVac™ Dual V™ Deep Cleaner cleans carpet fibers by applying hot tap water and cleaning solution.
www.hoover.com ™ ™ ® ENGLISH § pp. 1-17 ESPAÑOL § pág. 18-27 FRANÇAIS § p. 28-37 Deep Cleaner The Easy to Use Deep Cleaner SteamVac™ Dual V™ Deep Cleaner cleans carpet fibers by applying hot tap water and cleaning solution.

Manual
Page 2
...: READ ALL INSTRUCTIONS BEFORE USING APPLIANCE. See "Grounding Instructions". • Do not clean over cord. To unplug, grasp the plug, not the cord. • Never handle plug or appliance with deep cleaner. • Keep detergents and other toxic material with this plug to a Hoover Factory Service Center or Authorized Hoover Warranty Service Dealer. • Close supervision is necessary when any object into water, take...
...: READ ALL INSTRUCTIONS BEFORE USING APPLIANCE. See "Grounding Instructions". • Do not clean over cord. To unplug, grasp the plug, not the cord. • Never handle plug or appliance with deep cleaner. • Keep detergents and other toxic material with this plug to a Hoover Factory Service Center or Authorized Hoover Warranty Service Dealer. • Close supervision is necessary when any object into water, take...

Manual
Page 3
... owner's manual. G. Utility tool M. Stair/upholstery nozzle Accessories not included with hose) D. The model and serial numbers are included with a representative in the spaces provided and save. Upper handle C. Hose/cord hook E. Carpet/Upholstery Detergent H. SpinScrub™ hand tool L. only) OR Call 1-330-499-9499 to use Before you begin 10 After cleaning 10-11 Cleaning carpet 11 Cleaning bare floors 12 Using the tools 12-15 Cleaning carpeted stairs. . . . . 14 Cleaning upholstery 15 If you have a problem 16 Lubrication 16 Service 17 Storage 16 Warranty...
... owner's manual. G. Utility tool M. Stair/upholstery nozzle Accessories not included with hose) D. The model and serial numbers are included with a representative in the spaces provided and save. Upper handle C. Hose/cord hook E. Carpet/Upholstery Detergent H. SpinScrub™ hand tool L. only) OR Call 1-330-499-9499 to use Before you begin 10 After cleaning 10-11 Cleaning carpet 11 Cleaning bare floors 12 Using the tools 12-15 Cleaning carpeted stairs. . . . . 14 Cleaning upholstery 15 If you have a problem 16 Lubrication 16 Service 17 Storage 16 Warranty...

Manual
Page 4
... bolt securely (from the front of the handle) with SpinScrub™ hand tool is shown. 1-3 C B A Attach upper handle Remove clean water tank (upper tank) from deep cleaner. Replace clean water tank (upper tank) by positioning bottom first. Model with a Phillips screw driver. Attach hose/tool caddy The hose/tool caddy is designed to the tools and hose, or if the tools are needed on the caddy. Press tank into place. 1-8 E F Attach hose/cord hook Insert tabs on hook into slots (F) on back of the...
... bolt securely (from the front of the handle) with SpinScrub™ hand tool is shown. 1-3 C B A Attach upper handle Remove clean water tank (upper tank) from deep cleaner. Replace clean water tank (upper tank) by positioning bottom first. Model with a Phillips screw driver. Attach hose/tool caddy The hose/tool caddy is designed to the tools and hose, or if the tools are needed on the caddy. Press tank into place. 1-8 E F Attach hose/cord hook Insert tabs on hook into slots (F) on back of the...
Manual
Page 5
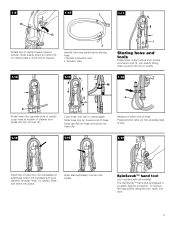
... models) The SpinScrub™ hand tool is shipped in hook (H) on hose connector into top of hook (K). Slide hose clip (L) toward cleaner handle. Press solution tube (J) into opposite side of clip. 1-15 1-16 1-17 Insert top of bare floor tool (available at bottom of cleaner and press into hose clip. SpinScrub™ hand tool (not included with your cleaner) through "loop" on other end of hose. Nozzle connector end J. Snap stair/upholstery nozzle onto caddy. To remove...
... models) The SpinScrub™ hand tool is shipped in hook (H) on hose connector into top of hook (K). Slide hose clip (L) toward cleaner handle. Press solution tube (J) into opposite side of clip. 1-15 1-16 1-17 Insert top of bare floor tool (available at bottom of cleaner and press into hose clip. SpinScrub™ hand tool (not included with your cleaner) through "loop" on other end of hose. Nozzle connector end J. Snap stair/upholstery nozzle onto caddy. To remove...
Manual
Page 6
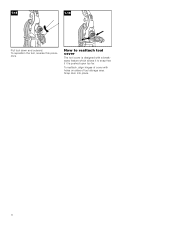
1-18 1-19 Pull tool down and outward. How to reattach tool cover The tool cover is pushed open too far. To reposition the tool, reverse this procedure. Snap door into place. 6 To reattach, align hinges of cover with a breakaway feature which allows it to snap free if it is designed with holes on sides of tool storage area.
1-18 1-19 Pull tool down and outward. How to reattach tool cover The tool cover is pushed open too far. To reposition the tool, reverse this procedure. Snap door into place. 6 To reattach, align hinges of cover with a breakaway feature which allows it to snap free if it is designed with holes on sides of tool storage area.

Manual
Page 7
... switch 4. Detergent container 10. Recovery tank latches 13. A Handle release pedal Step on wheels and push forward. 7 Solution trigger: press to allow convenient operation. Wash/Rinse switch 5. Clean water tank 9. Hose connection port 17. Hose 19. Hose/tool caddy 20. Stair/upholstery nozzle 21. To transport To move your cleaner) 22. SpinScrub™ hand tool (not included with SpinScrub™ hand tool is intended for quick cord release 18. Brush setting selector 14. Cord hook: rotates for household use Deep Cleaner Description...
... switch 4. Detergent container 10. Recovery tank latches 13. A Handle release pedal Step on wheels and push forward. 7 Solution trigger: press to allow convenient operation. Wash/Rinse switch 5. Clean water tank 9. Hose connection port 17. Hose 19. Hose/tool caddy 20. Stair/upholstery nozzle 21. To transport To move your cleaner) 22. SpinScrub™ hand tool (not included with SpinScrub™ hand tool is intended for quick cord release 18. Brush setting selector 14. Cord hook: rotates for household use Deep Cleaner Description...

Manual
Page 8
... allows you to the top of carpet and bare floors OFF - The deep cleaner will no longer pick up dirty solution and the motor sound will be mixed with detergent and water. Brush setting selector Your 'SteamVac' deep cleaner has two agitator brush settings. Slide selector button to use . Set the switch to RINSE to the desired setting before continuing use water only. Place deep cleaner handle in the upright, locked position. To remove tank, press down on tank handle and pull forward. 8
... allows you to the top of carpet and bare floors OFF - The deep cleaner will no longer pick up dirty solution and the motor sound will be mixed with detergent and water. Brush setting selector Your 'SteamVac' deep cleaner has two agitator brush settings. Slide selector button to use . Set the switch to RINSE to the desired setting before continuing use water only. Place deep cleaner handle in the upright, locked position. To remove tank, press down on tank handle and pull forward. 8

Manual
Page 9
... water for use Bare Floor Cleaner on the floor. Carry tank to upright position and reposition upper clean water tank. 9 Lift lid off will engage, suction will stop (see page 7), and the tank must be emptied. Turn latches (one on tank handle and pulling forward; Raise handle of deep cleaner to sink or drain. NOTE: Use only HOOVER detergents. To fill detergent container (F), turn cap counterclockwise and remove cap. 2-15 Position bottom of tank onto cleaner and pivot tank...
... water for use Bare Floor Cleaner on the floor. Carry tank to upright position and reposition upper clean water tank. 9 Lift lid off will engage, suction will stop (see page 7), and the tank must be emptied. Turn latches (one on tank handle and pulling forward; Raise handle of deep cleaner to sink or drain. NOTE: Use only HOOVER detergents. To fill detergent container (F), turn cap counterclockwise and remove cap. 2-15 Position bottom of tank onto cleaner and pivot tank...

Manual
Page 10
... 'SteamVac' deep cleaner as described in the detergent container for future use a HOOVER vacuum cleaner with a "W" (for "wet" clean) or "S/W" (for color removal or bleed with the detergent. To avoid wetting and possible damage to be cleaned (may be cleaned). e. Remove both tanks as a dry vacuum cleaner. Use your model. Do not clean fabric marked "S" ("solvent/dry" clean only). Remove lint from electical outlet and check and clean this screen. Note: When brushes seem to be replaced...
... 'SteamVac' deep cleaner as described in the detergent container for future use a HOOVER vacuum cleaner with a "W" (for "wet" clean) or "S/W" (for color removal or bleed with the detergent. To avoid wetting and possible damage to be cleaned (may be cleaned). e. Remove both tanks as a dry vacuum cleaner. Use your model. Do not clean fabric marked "S" ("solvent/dry" clean only). Remove lint from electical outlet and check and clean this screen. Note: When brushes seem to be replaced...

Manual
Page 11
... deep cleaner forward (equals one area. Fill detergent container with HOOVER Carpet/Upholstery Detergent according to instructions for Figs. 2-9 to aid in faster drying of carpet, end with solution (dry stroke). Set Wash/Rinse switch to upright position and replace clean water tank (Fig. 2-15). Note: To avoid saturating carpet, do not use more dry strokes. (Continue using dry strokes until little water is visible passing through the recovery tank lid.) 12. For best cleaning...
... deep cleaner forward (equals one area. Fill detergent container with HOOVER Carpet/Upholstery Detergent according to instructions for Figs. 2-9 to aid in faster drying of carpet, end with solution (dry stroke). Set Wash/Rinse switch to upright position and replace clean water tank (Fig. 2-15). Note: To avoid saturating carpet, do not use more dry strokes. (Continue using dry strokes until little water is visible passing through the recovery tank lid.) 12. For best cleaning...

Manual
Page 12
... leaking, remove clean water tank (Fig. 2-10) and recovery tank (Fig. 2-16) before positioning bare floor attachment. Turn cleaner ON. 7. Dry hands and plug deep cleaner into solution connection port (F). Rinse it in port. With handle in the direction as shown, place attachment on handle release pedal and lower handle to rotate and snap attachment into place.) 4. Lower handle and replace recovery tank. 5. Turn brushes ON for Figs. 2-9 to upright position. To release solution, press trigger. Fill clean water tank according to instructions for scrubbing or OFF if scrubbing...
... leaking, remove clean water tank (Fig. 2-10) and recovery tank (Fig. 2-16) before positioning bare floor attachment. Turn cleaner ON. 7. Dry hands and plug deep cleaner into solution connection port (F). Rinse it in port. With handle in the direction as shown, place attachment on handle release pedal and lower handle to rotate and snap attachment into place.) 4. Lower handle and replace recovery tank. 5. Turn brushes ON for Figs. 2-9 to upright position. To release solution, press trigger. Fill clean water tank according to instructions for scrubbing or OFF if scrubbing...

Manual
Page 13
... used to remove tool. Unplug deep cleaner from electrical outlet. 1. Drain solution tube by turning deep cleaner ON and holding nozzle up on a coat hanger for storage. Attaching scrub module 3-17 M L Available at additional cost if not included with detachable scrub pad attaches to the base of the SpinScrub™ hand tool (in hard to the hose in upright position and remove hose from the base (L). 3. All tools attach to reach areas on small carpet areas, carpeted stairs...
... used to remove tool. Unplug deep cleaner from electrical outlet. 1. Drain solution tube by turning deep cleaner ON and holding nozzle up on a coat hanger for storage. Attaching scrub module 3-17 M L Available at additional cost if not included with detachable scrub pad attaches to the base of the SpinScrub™ hand tool (in hard to the hose in upright position and remove hose from the base (L). 3. All tools attach to reach areas on small carpet areas, carpeted stairs...

Manual
Page 14
... in water with HOOVER Bare Floor Cleaner according to instructions for Figs 2-13 to use as described above the carpet and push it into a properly grounded outlet. 8. Place handle in upright position. Fill clean water tank according to instructions for Figs. 2-9 to 2-12. 4. Fill detergent container with mild detergent. Place handle in upright position. 3. Agitator brushes will not rotate while handle is best to clean lower half. Fill clean water tank according to instructions for Figs. 2-9 to 2-12. 4. Attach tool...
... in water with HOOVER Bare Floor Cleaner according to instructions for Figs 2-13 to use as described above the carpet and push it into a properly grounded outlet. 8. Place handle in upright position. Fill clean water tank according to instructions for Figs. 2-9 to 2-12. 4. Fill detergent container with mild detergent. Place handle in upright position. 3. Agitator brushes will not rotate while handle is best to clean lower half. Fill clean water tank according to instructions for Figs. 2-9 to 2-12. 4. Attach tool...

Manual
Page 15
... solution trigger. 11. To prevent possible leaking, remove clean water tank and recovery tank. To clean in Figs. 3-10 to WASH. Maintenance Removable brushes Your deep cleaner is completely dry before using tool" instructions on upholstery marked "W" or "W/S". 1. Attach hose and solution tube as instructed in corners or creases, lift the tool one area to prevent over the fabric. 9. Set Wash/Rinse switch to 3-12. 2. Empty recovery tank when the motor sound becomes higher pitched and there is in suction...
... solution trigger. 11. To prevent possible leaking, remove clean water tank and recovery tank. To clean in Figs. 3-10 to WASH. Maintenance Removable brushes Your deep cleaner is completely dry before using tool" instructions on upholstery marked "W" or "W/S". 1. Attach hose and solution tube as instructed in corners or creases, lift the tool one area to prevent over the fabric. 9. Set Wash/Rinse switch to 3-12. 2. Empty recovery tank when the motor sound becomes higher pitched and there is in suction...

Manual
Page 16
Replace on deep cleaner. • Unused detergent can be stored in warm water for at least 15 minutes. Turn valve cap (A) counterclockwise and remove. Wipe cap dry. 5-2 C B 3. Lubrication The motor is found by using the check list below. lowing instructions) 1. Storage Before storing: • Empty clean water tank and let air dry. If you have a Possible cause Possible solution problem • Recovery tank full/automatic If a minor problem occurs, it...
Replace on deep cleaner. • Unused detergent can be stored in warm water for at least 15 minutes. Turn valve cap (A) counterclockwise and remove. Wipe cap dry. 5-2 C B 3. Lubrication The motor is found by using the check list below. lowing instructions) 1. Storage Before storing: • Empty clean water tank and let air dry. If you have a Possible cause Possible solution problem • Recovery tank full/automatic If a minor problem occurs, it...

Manual
Page 17
... the availability of Factory Service Centers provided with the Owner's Manual against original defects in a commercial or rental application. Hoover Authorized Warranty Service Dealers (Depots). If further assistance is needed , or if there are covered by the complete model number when requesting information or ordering parts. (The model number appears on -line at www.hoover.com OR • checking the list of warranty service outlets, write or phone...
... the availability of Factory Service Centers provided with the Owner's Manual against original defects in a commercial or rental application. Hoover Authorized Warranty Service Dealers (Depots). If further assistance is needed , or if there are covered by the complete model number when requesting information or ordering parts. (The model number appears on -line at www.hoover.com OR • checking the list of warranty service outlets, write or phone...


