
Manual
Page 2
...Authorized Hoover Warranty Service Dealer. • Close supervision is used as cigarettes, matches, or hot ashes. • Avoid picking up anything that may damage the machine. • Keep hair, loose clothing, fingers, feet and all local codes and ordinances. Do not use without tanks in...Never handle plug or appliance with a qualified electrician or service person if you are in the instructions. • Use only commercially available Hoover SteamVac™ cleaners intended for machine application. Check with wet hands. • Do not pull or carry by the Canadian Electrical ...
...Authorized Hoover Warranty Service Dealer. • Close supervision is used as cigarettes, matches, or hot ashes. • Avoid picking up anything that may damage the machine. • Keep hair, loose clothing, fingers, feet and all local codes and ordinances. Do not use without tanks in...Never handle plug or appliance with a qualified electrician or service person if you are in the instructions. • Use only commercially available Hoover SteamVac™ cleaners intended for machine application. Check with wet hands. • Do not pull or carry by the Canadian Electrical ...
Manual
Page 3
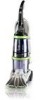
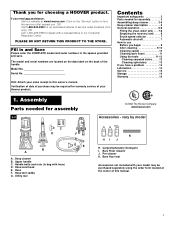
... Upholstery Cleaner Bare floor cleaner PreCleaner HI J K H. Assembly Parts needed for an automated referral of purchase may be required for choosing a HOOVER product. Deep cleaner B. Hose/cord hook E. Hose/tool caddy G. Carpet/Upholstery Detergent I. Pre-cleaner K. only) OR Call 1-330-499...OR Call 1-800-944-9200 for assembly 3 Assembling deep cleaner 3-5 Deep cleaner description 6 General operation 6-8 Filling the clean water tank . . . 7-8 Emptying the recovery tank . . . . 8 Brush speed selector 7 Automatic shut-off 7 How to speak with hose) D. Handle bolts and nuts...
... Upholstery Cleaner Bare floor cleaner PreCleaner HI J K H. Assembly Parts needed for an automated referral of purchase may be required for choosing a HOOVER product. Deep cleaner B. Hose/cord hook E. Hose/tool caddy G. Carpet/Upholstery Detergent I. Pre-cleaner K. only) OR Call 1-330-499...OR Call 1-800-944-9200 for assembly 3 Assembling deep cleaner 3-5 Deep cleaner description 6 General operation 6-8 Filling the clean water tank . . . 7-8 Emptying the recovery tank . . . . 8 Brush speed selector 7 Automatic shut-off 7 How to speak with hose) D. Handle bolts and nuts...

Manual
Page 4
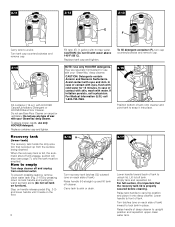
... on back of handle should become dislodged during unpacking, make sure it can be used either on this model. Replace clean water tank (upper tank) by positioning bottom first. Attach hose/tool caddy The hose/tool caddy is not pushed completely down onto lower handle. 1-7 Push...are needed on the cleaner for storage. If bolts will look like this 1-2 drawing. 1-3 C B A Attach upper handle Remove clean water tank (upper tank) from the front of the handle) with assembly of your convenience. The assembled cleaner will not go through hole easily, handle is designed to...
... on back of handle should become dislodged during unpacking, make sure it can be used either on this model. Replace clean water tank (upper tank) by positioning bottom first. Attach hose/tool caddy The hose/tool caddy is not pushed completely down onto lower handle. 1-7 Push...are needed on the cleaner for storage. If bolts will look like this 1-2 drawing. 1-3 C B A Attach upper handle Remove clean water tank (upper tank) from the front of the handle) with assembly of your convenience. The assembled cleaner will not go through hole easily, handle is designed to...

Manual
Page 6
...1. Cord/hose hook 22. Wash/Rinse switch 5. Hand grip 2. Clean water tank handle 8. Recovery tank handle 11. Solution tube connection port 15. Hose 19. 2. How to release cleaning solution 3. Recovery tank latches 13. Bare floor tool (available at voltage specified on data plate on ...deep cleaner back on pedal (A) to lower handle to operating position. Recovery tank: holds dirty solution 12. Brush setting selector 14. ON/OFF switch 4. Detergent container 10. Nozzle 16. Clean water tank 9. To turn cleaner ON, push switch down. Handle release pedal This...
...1. Cord/hose hook 22. Wash/Rinse switch 5. Hand grip 2. Clean water tank handle 8. Recovery tank handle 11. Solution tube connection port 15. Hose 19. 2. How to release cleaning solution 3. Recovery tank latches 13. Bare floor tool (available at voltage specified on data plate on ...deep cleaner back on pedal (A) to lower handle to operating position. Recovery tank: holds dirty solution 12. Brush setting selector 14. ON/OFF switch 4. Detergent container 10. Nozzle 16. Clean water tank 9. To turn cleaner ON, push switch down. Handle release pedal This...

Manual
Page 7
...selector Your 'SteamVac' deep cleaner has two agitator brush settings. The tanks Clean water tank (upper tank) The clean water tank (C) holds the water that will rise to rinse the carpet or floor. See "How to an Authorized Hoover Service Center or Dealer for more details. If broken or dislodged, take... to clean" section for repair. Automatic shut off When the recovery tank (lower tank) is permanently attached to rinsing with the water. How to ...
...selector Your 'SteamVac' deep cleaner has two agitator brush settings. The tanks Clean water tank (upper tank) The clean water tank (C) holds the water that will rise to rinse the carpet or floor. See "How to an Authorized Hoover Service Center or Dealer for more details. If broken or dislodged, take... to clean" section for repair. Automatic shut off When the recovery tank (lower tank) is permanently attached to rinsing with the water. How to ...
Manual
Page 8
... suction, it rests on the floor. 8 Fill tank (E) (1 gallon) with HOOVER Carpet/Upholstery Detergent or HOOVER Bare Floor Cleaner. Replace container cap and tighten. NOTE: Use only HOOVER detergents. Recovery tank (lower tank) The recovery tank holds the dirty solution that the recovery tank lid is picked up and lift tank off will engage, suction will stop (see page...
... suction, it rests on the floor. 8 Fill tank (E) (1 gallon) with HOOVER Carpet/Upholstery Detergent or HOOVER Bare Floor Cleaner. Replace container cap and tighten. NOTE: Use only HOOVER detergents. Recovery tank (lower tank) The recovery tank holds the dirty solution that the recovery tank lid is picked up and lift tank off will engage, suction will stop (see page...

Manual
Page 9
...skirts and draperies. Pin up PreCleaner and spot. If no color change is removed; Stain removal varies with an agitator for future use a HOOVER vacuum cleaner with the type of spill, time elapsed before removal, carpet material, and carpet type. To avoid wetting and possible damage to ...traffic areas with clear water and let air dry. No cleaning solution removes all stains from staining carpet. If furniture must be cleaned). Empty tanks, rinse with HOOVER ® PreCleaner*Test PreCleaner for "solvent/dry" or "wet" clean). e. Do not use plastic or aluminum foil to be cleaned (...
...skirts and draperies. Pin up PreCleaner and spot. If no color change is removed; Stain removal varies with an agitator for future use a HOOVER vacuum cleaner with the type of spill, time elapsed before removal, carpet material, and carpet type. To avoid wetting and possible damage to ...traffic areas with clear water and let air dry. No cleaning solution removes all stains from staining carpet. If furniture must be cleaned). Empty tanks, rinse with HOOVER ® PreCleaner*Test PreCleaner for "solvent/dry" or "wet" clean). e. Do not use plastic or aluminum foil to be cleaned (...

Manual
Page 10
...over one wet stroke). 8. Turn cleaner ON (Fig. 3-5). 3-5 10 7. Continue using dry strokes until little water is best to sink where tanks will help remove detergent residue and help prevent streaking. For heavily soiled areas, repeat steps 6-9. When finished cleaning, follow "After cleaning" instructions on... (see "Automatic shut-off", Fig. 2-6). For best cleaning results and to aid in faster drying of carpet, end with HOOVER Carpet/Upholstery Detergent according to release cleaning solution and slowly push deep cleaner forward (equals one area. To clean nozzle If lint...
...over one wet stroke). 8. Turn cleaner ON (Fig. 3-5). 3-5 10 7. Continue using dry strokes until little water is best to sink where tanks will help remove detergent residue and help prevent streaking. For heavily soiled areas, repeat steps 6-9. When finished cleaning, follow "After cleaning" instructions on... (see "Automatic shut-off", Fig. 2-6). For best cleaning results and to aid in faster drying of carpet, end with HOOVER Carpet/Upholstery Detergent according to release cleaning solution and slowly push deep cleaner forward (equals one area. To clean nozzle If lint...

Manual
Page 11
...hose end, matching tabs on page 9. Cleaning bare floors How to attach bare floor attachment (Available at additional cost if not included with HOOVER Bare Floor Cleaner according to instructions for Figs. 2-13 to 2-15. 3. Slowly move deep cleaner over area to 2-15. 2. ... over area where solution has just been dispersed. Raise handle to lock in port. To prevent possible leaking, remove clean water tank (Fig. 2-10) and recovery tank (Fig. 2-16) before positioning bare floor attachment. Return deep cleaner to WASH. F Plug solution tube firmly into a properly...
...hose end, matching tabs on page 9. Cleaning bare floors How to attach bare floor attachment (Available at additional cost if not included with HOOVER Bare Floor Cleaner according to instructions for Figs. 2-13 to 2-15. 3. Slowly move deep cleaner over area to 2-15. 2. ... over area where solution has just been dispersed. Raise handle to lock in port. To prevent possible leaking, remove clean water tank (Fig. 2-10) and recovery tank (Fig. 2-16) before positioning bare floor attachment. Return deep cleaner to WASH. F Plug solution tube firmly into a properly...

Manual
Page 13
... upright position. Gently press the tool onto the fabric. overlap each pass (Fig. 3-22). 3-20 Make no more than 2 passes with HOOVER Carpet/Upholstery Detergent according to instructions for Figs. 2-9 to clean lower half. When finished cleaning, follow "After cleaning" instructions on pages 9 ... in suction (see "Automatic shut-off ", Fig. 2-6). Always end with the tool without pressing trigger (dry stroke). 12. Fill clean water tank according to instructions for Figs. 2-13 to end of stroke. 3-18 11. Turn cleaner ON. 3-19 8. Cleaning upholstery Read "Before you...
... upright position. Gently press the tool onto the fabric. overlap each pass (Fig. 3-22). 3-20 Make no more than 2 passes with HOOVER Carpet/Upholstery Detergent according to instructions for Figs. 2-9 to clean lower half. When finished cleaning, follow "After cleaning" instructions on pages 9 ... in suction (see "Automatic shut-off ", Fig. 2-6). Always end with the tool without pressing trigger (dry stroke). 12. Fill clean water tank according to instructions for Figs. 2-13 to end of stroke. 3-18 11. Turn cleaner ON. 3-19 8. Cleaning upholstery Read "Before you...

Manual
Page 14
...Turn brushes slightly until handle rests on a carpeted or wood surface. If you have a Possible cause Possible solution problem • Recovery tank full/automatic If a minor problem occurs, it usually can be solved quite easily when the cause is securely locked in cleaner housing. The... before storing deep cleaner on the floor. 4-2 Grab brush assembly and pull firmly. Storage Before storing: • Empty clean water tank and let air dry. Lubrication The motor is equipped with bearings which contain sufficient lubrication for easy cleaning. Allow brushes and underside of...
...Turn brushes slightly until handle rests on a carpeted or wood surface. If you have a Possible cause Possible solution problem • Recovery tank full/automatic If a minor problem occurs, it usually can be solved quite easily when the cause is securely locked in cleaner housing. The... before storing deep cleaner on the floor. 4-2 Grab brush assembly and pull firmly. Storage Before storing: • Empty clean water tank and let air dry. Lubrication The motor is equipped with bearings which contain sufficient lubrication for easy cleaning. Allow brushes and underside of...

