
Manual
Page 1
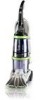
™ ™ Deep Cleaner The Easy to Use Deep Cleaner ® ENGLISH § pp. 1-15 ESPAÑOL § pág. 16-25 FRANÇAIS § p. 27-35 SteamVac™ V2™ Deep Cleaner cleans carpet fibers by applying hot tap water and cleaning solution. www.hoover.com
™ ™ Deep Cleaner The Easy to Use Deep Cleaner ® ENGLISH § pp. 1-15 ESPAÑOL § pág. 16-25 FRANÇAIS § p. 27-35 SteamVac™ V2™ Deep Cleaner cleans carpet fibers by applying hot tap water and cleaning solution. www.hoover.com

Manual
Page 2
... can be used to connect this appliance. • Do not pick up hard, sharp objects with damaged cord or plug. The temporary adapter should be installed by The Hoover Company; See "Grounding Instructions". • Do not clean over cord. If appliance is not working as a handle, close door on cord. Do not place deep cleaner on surfaces moistened by a metal screw. Turn off...
... can be used to connect this appliance. • Do not pick up hard, sharp objects with damaged cord or plug. The temporary adapter should be installed by The Hoover Company; See "Grounding Instructions". • Do not clean over cord. If appliance is not working as a handle, close door on cord. Do not place deep cleaner on surfaces moistened by a metal screw. Turn off...
Manual
Page 3
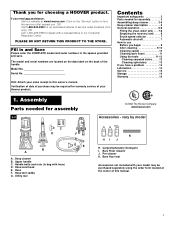
... manual. Model No Serial No Hint: Attach your Hoover product. vary by model C D F B A A. Hose F. Carpet/Upholstery Detergent I. Bare Floor Cleaner J. Pre-cleaner K. Fill in and Save Please enter the COMPLETE model and serial numbers in bag with hose) D. Contents Important safeguards 2 Parts needed for assembly 1-1 © 2002 The Hoover Company www.hoover.com Accessories - Upper handle C. Hose/cord hook E. Utility tool G E E Carpet Upholstery Cleaner Bare floor cleaner PreCleaner HI J K H. If you have a problem 14 Lubrication 14 Service 15 Storage 14 Warranty...
... manual. Model No Serial No Hint: Attach your Hoover product. vary by model C D F B A A. Hose F. Carpet/Upholstery Detergent I. Bare Floor Cleaner J. Pre-cleaner K. Fill in and Save Please enter the COMPLETE model and serial numbers in bag with hose) D. Contents Important safeguards 2 Parts needed for assembly 1-1 © 2002 The Hoover Company www.hoover.com Accessories - Upper handle C. Hose/cord hook E. Utility tool G E E Carpet Upholstery Cleaner Bare floor cleaner PreCleaner HI J K H. If you have a problem 14 Lubrication 14 Service 15 Storage 14 Warranty...

Manual
Page 4
... access to the tools and hose, or if the tools are needed on this time, proceed to be used, it is repositioned properly before continuing with a Phillips screw driver. Replace clean water tank (upper tank) by positioning bottom first. The extra nut is not required but has been provided for storage. The assembled cleaner will not go through hole easily, handle is not pushed...
... access to the tools and hose, or if the tools are needed on this time, proceed to be used, it is repositioned properly before continuing with a Phillips screw driver. Replace clean water tank (upper tank) by positioning bottom first. The extra nut is not required but has been provided for storage. The assembled cleaner will not go through hole easily, handle is not pushed...

Manual
Page 5
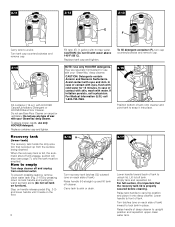
... cover with your cleaner) through "loop" on other end of cleaner and press into place. 5 Slide hose clip (L) toward cleaner handle. Nozzle connector end J. L Loop hose over top of caddy. 1-12 1-13 1-14 K Press hose into opposite side of hose. To position tool, first open too far. Slide caddy down into opposite side of clip. 1-15 1-16 1-17 Insert top of bare floor tool...
... cover with your cleaner) through "loop" on other end of cleaner and press into place. 5 Slide hose clip (L) toward cleaner handle. Nozzle connector end J. L Loop hose over top of caddy. 1-12 1-13 1-14 K Press hose into opposite side of hose. To position tool, first open too far. Slide caddy down into opposite side of clip. 1-15 1-16 1-17 Insert top of bare floor tool...

Manual
Page 6
... up. Clean water tank handle 8. Recovery tank: holds dirty solution 12. Brush setting selector 14. Cord hook: rotates for household use Deep Cleaner Description 2-1 1 3 2 4 17 5 19 18 6 7 9 8 20 10 11 16 15 12 21 14 13 22 The assembled deep cleaner will look like the drawing. 1. Hose 19. Cord/hose hook 22. Solution trigger: press to allow convenient operation. A Handle release pedal Step on back of cleaner. Hand grip 2. Nozzle 16. ON/OFF switch 4. Carrying handle 7. Plug deep cleaner into...
... up. Clean water tank handle 8. Recovery tank: holds dirty solution 12. Brush setting selector 14. Cord hook: rotates for household use Deep Cleaner Description 2-1 1 3 2 4 17 5 19 18 6 7 9 8 20 10 11 16 15 12 21 14 13 22 The assembled deep cleaner will look like the drawing. 1. Hose 19. Cord/hose hook 22. Solution trigger: press to allow convenient operation. A Handle release pedal Step on back of cleaner. Hand grip 2. Nozzle 16. ON/OFF switch 4. Carrying handle 7. Plug deep cleaner into...

Manual
Page 7
... up dirty solution and the motor sound will rise to the top of carpet and bare floors OFF - When this happens, turn deep cleaner off When the recovery tank (lower tank) is permanently attached to the water tank. Brush setting selector Your 'SteamVac' deep cleaner has two agitator brush settings. Slide selector button to the desired setting before continuing use. Continued § 7 2-5 2-6 2-7 B Carrying handle The deep cleaner may need to be refilled. Set the switch to WASH to an Authorized Hoover Service Center...
... up dirty solution and the motor sound will rise to the top of carpet and bare floors OFF - When this happens, turn deep cleaner off When the recovery tank (lower tank) is permanently attached to the water tank. Brush setting selector Your 'SteamVac' deep cleaner has two agitator brush settings. Slide selector button to the desired setting before continuing use. Continued § 7 2-5 2-6 2-7 B Carrying handle The deep cleaner may need to be refilled. Set the switch to WASH to an Authorized Hoover Service Center...
Manual
Page 8
... back of tank to empty Turn deep cleaner off cleaner. Lower handle to upright position and reposition upper clean water tank. Turn tank cap counterclockwise and remove cap. 2-14 Fill container (16 oz.) with water above 140˚F (60˚C). CAUTION: Do not fill with HOOVER Carpet/Upholstery Detergent or HOOVER Bare Floor Cleaner. Lift lid off will engage, suction will stop (see page 7), and the tank must be emptied. To fill detergent container (F), turn cap counterclockwise...
... back of tank to empty Turn deep cleaner off cleaner. Lower handle to upright position and reposition upper clean water tank. Turn tank cap counterclockwise and remove cap. 2-14 Fill container (16 oz.) with water above 140˚F (60˚C). CAUTION: Do not fill with HOOVER Carpet/Upholstery Detergent or HOOVER Bare Floor Cleaner. Lift lid off will engage, suction will stop (see page 7), and the tank must be emptied. To fill detergent container (F), turn cap counterclockwise...

Manual
Page 9
... deep cleaner from surface until spot is visible, spray PreCleaner onto spots and traffic areas. Vacuum thoroughly - Do not use a HOOVER vacuum cleaner with a "W" (for "wet" clean) or "S/W" (for colorfastness - Wet a white absorbent cloth with the dampened cloth. Allow carpet or upholstery to pick up furniture skirts and draperies. Note: When brushes seem to be replaced before cleaning. How to upright position. For carpet, use the 'SteamVac' deep cleaner as described in the detergent container...
... deep cleaner from surface until spot is visible, spray PreCleaner onto spots and traffic areas. Vacuum thoroughly - Do not use a HOOVER vacuum cleaner with a "W" (for "wet" clean) or "S/W" (for colorfastness - Wet a white absorbent cloth with the dampened cloth. Allow carpet or upholstery to pick up furniture skirts and draperies. Note: When brushes seem to be replaced before cleaning. How to upright position. For carpet, use the 'SteamVac' deep cleaner as described in the detergent container...

Manual
Page 10
.... (Continue using dry strokes until little water is not necessary, but will be removed for cleaning. 3-3 3-4 BA Unplug deep cleaner from electrical outlet. Always end with solution (dry stroke). Empty recovery tank when the motor sound becomes higher pitched and there is visible passing through the recovery tank lid.) 12. Slide tabs into a properly grounded outlet. Fill detergent container with HOOVER Carpet/Upholstery Detergent according to instructions for...
.... (Continue using dry strokes until little water is not necessary, but will be removed for cleaning. 3-3 3-4 BA Unplug deep cleaner from electrical outlet. Always end with solution (dry stroke). Empty recovery tank when the motor sound becomes higher pitched and there is visible passing through the recovery tank lid.) 12. Slide tabs into a properly grounded outlet. Fill detergent container with HOOVER Carpet/Upholstery Detergent according to instructions for...

Manual
Page 11
... page 9. If rinsing the floor is a loss in clear water. Repeat steps 7 & 8. To prevent possible leaking, remove clean water tank (Fig. 2-10) and recovery tank (Fig. 2-16) before positioning bare floor attachment. Set tanks aside (do not set Wash/Rinse switch to rotate and snap attachment into place. (Note: Some force may be cleaned. 8. Return deep cleaner to operating position. 6. Do not use the deep cleaner on handle release pedal and lower handle to upright position. F Plug solution tube firmly into...
... page 9. If rinsing the floor is a loss in clear water. Repeat steps 7 & 8. To prevent possible leaking, remove clean water tank (Fig. 2-10) and recovery tank (Fig. 2-16) before positioning bare floor attachment. Set tanks aside (do not set Wash/Rinse switch to rotate and snap attachment into place. (Note: Some force may be cleaned. 8. Return deep cleaner to operating position. 6. Do not use the deep cleaner on handle release pedal and lower handle to upright position. F Plug solution tube firmly into...

Manual
Page 12
Connect tool to hose by turning deep cleaner ON and holding nozzle up on a coat hanger for removal. Using your head. Do not press trigger. Unplug deep cleaner from rack. 2. Disconnect hose and solution tube from electrical outlet. 1. Place handle in upright position and remove hose from electrical outlet. After using tool Drain suction hose by sliding it onto connector until the tab (J) locks it securely. Drain solution tube by placing round end in sink...
Connect tool to hose by turning deep cleaner ON and holding nozzle up on a coat hanger for removal. Using your head. Do not press trigger. Unplug deep cleaner from rack. 2. Disconnect hose and solution tube from electrical outlet. 1. Place handle in upright position and remove hose from electrical outlet. After using tool Drain suction hose by sliding it onto connector until the tab (J) locks it securely. Drain solution tube by placing round end in sink...

Manual
Page 13
... 9. Attach hose and solution tube as instructed in suction (see "Automatic shut-off ", Fig. 2-6). Dry hands and plug deep cleaner into a properly grounded outlet. 8. Vacuum up the solution with HOOVER Carpet/Upholstery Detergent according to instructions for Figs. 2-9 to 2-15. 5. Attach tool to 2-12. 4. Dry hands and plug deep cleaner into a properly grounded outlet. 7. Turn cleaner ON. 3-19 8. Press the trigger and slowly pull the nozzle over the carpet (second wet stroke). Empty recovery tank when the motor sound...
... 9. Attach hose and solution tube as instructed in suction (see "Automatic shut-off ", Fig. 2-6). Dry hands and plug deep cleaner into a properly grounded outlet. 8. Vacuum up the solution with HOOVER Carpet/Upholstery Detergent according to instructions for Figs. 2-9 to 2-15. 5. Attach tool to 2-12. 4. Dry hands and plug deep cleaner into a properly grounded outlet. 7. Turn cleaner ON. 3-19 8. Press the trigger and slowly pull the nozzle over the carpet (second wet stroke). Empty recovery tank when the motor sound...

Manual
Page 14
Set tanks aside. 4-1 With handle in cleaner housing. Storage Before storing: • Empty clean water tank and let air dry. Replace on the floor. 4-2 Grab brush assembly and pull firmly. Turn brushes slightly until handle rests on deep cleaner. • Unused detergent can be stored in place Problem: Detergent won't dispense Possible cause Possible solution • Valve cap clogged • Remove and clean valve cap (see fol- If you have a Possible cause Possible solution problem • Recovery tank full...
Set tanks aside. 4-1 With handle in cleaner housing. Storage Before storing: • Empty clean water tank and let air dry. Replace on the floor. 4-2 Grab brush assembly and pull firmly. Turn brushes slightly until handle rests on deep cleaner. • Unused detergent can be stored in place Problem: Detergent won't dispense Possible cause Possible solution • Valve cap clogged • Remove and clean valve cap (see fol- If you have a Possible cause Possible solution problem • Recovery tank full...

Manual
Page 15
... in opening. Problem: Brushes won't rotate during the warranted period. Do not send your cleaner to place this will be required before service is used in Fig. 3-2 • Setting selector on OFF • Move setting selector to ON Service To obtain approved HOOVER service and genuine HOOVER parts, locate the nearest Hoover Factory Service Center or Authorized Hoover Warranty Service Dealer (Depot) by the complete model number when requesting information...
... in opening. Problem: Brushes won't rotate during the warranted period. Do not send your cleaner to place this will be required before service is used in Fig. 3-2 • Setting selector on OFF • Move setting selector to ON Service To obtain approved HOOVER service and genuine HOOVER parts, locate the nearest Hoover Factory Service Center or Authorized Hoover Warranty Service Dealer (Depot) by the complete model number when requesting information...


