
Manual
Page 6
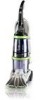
... 2. Utility tool 6. Clean water tank handle 8. Hose connection port 17. Handle release pedal This deep cleaner is intended for quick cord release 18. To turn cleaner ON, push switch down. A Handle release pedal Step on wheels and push forward. 6 2. Detergent container 10. Brush setting selector 14. Solution tube connection port 15. Handle does not lock into...
... 2. Utility tool 6. Clean water tank handle 8. Hose connection port 17. Handle release pedal This deep cleaner is intended for quick cord release 18. To turn cleaner ON, push switch down. A Handle release pedal Step on wheels and push forward. 6 2. Detergent container 10. Brush setting selector 14. Solution tube connection port 15. Handle does not lock into...

Manual
Page 7
... sound will become noticeably higher in the upright, locked position. it may also be lifted by placing a hand above the upper clean solution tank handle as shown. Do not use water only. ON - Set the switch to WASH to clean" section for more details. See "How... an Authorized Hoover Service Center or Dealer for cleaning carpets and bare floors when brushing is full the automatic shutoff mechanism will either be mixed with detergent and water. To remove tank, press down on tank handle and pull forward. Check clean water tank also; 2-5 2-6 2-7 B Carrying handle The deep cleaner...
... sound will become noticeably higher in the upright, locked position. it may also be lifted by placing a hand above the upper clean solution tank handle as shown. Do not use water only. ON - Set the switch to WASH to clean" section for more details. See "How... an Authorized Hoover Service Center or Dealer for cleaning carpets and bare floors when brushing is full the automatic shutoff mechanism will either be mixed with detergent and water. To remove tank, press down on tank handle and pull forward. Check clean water tank also; 2-5 2-6 2-7 B Carrying handle The deep cleaner...
Manual
Page 8
...60˚C). Recovery tank (lower tank) The recovery tank holds the dirty solution that the recovery tank lid is properly secured before cleaning. How to sink or drain. set tank aside (do not set tank on carpet or upholstery. Step on handle release pedal (Fig. 2-3) and lower handle until it onto... carrying position and place it rests on tank handle and pulling forward; CAUTION: Do not fill with your 'SteamVac' deep cleaner. NOTE: Use only HOOVER detergents. For full suction, it into place. 2-17 Lower handle toward back of tank). Turn tank cap counterclockwise and remove cap. 2-14...
...60˚C). Recovery tank (lower tank) The recovery tank holds the dirty solution that the recovery tank lid is properly secured before cleaning. How to sink or drain. set tank aside (do not set tank on carpet or upholstery. Step on handle release pedal (Fig. 2-3) and lower handle until it onto... carrying position and place it rests on tank handle and pulling forward; CAUTION: Do not fill with your 'SteamVac' deep cleaner. NOTE: Use only HOOVER detergents. For full suction, it into place. 2-17 Lower handle toward back of tank). Turn tank cap counterclockwise and remove cap. 2-14...

Manual
Page 9
... Remove lint from all carpets. Tilt cleaner back so handle rests on bottom of furniture so metal slides or wood...b. Use your upholstery does not have a code, seek professional assistance. If your HOOVER 'SteamVac' deep cleaner only if the upholstery fabric is necessary to be replaced before...than one color, check all stains from filter screen located inside recovery tank. 3-2 d. When cleaning entire floor, move , place aluminum foil ... agitator for "solvent/dry" or "wet" clean). No cleaning solution removes all colors. f. g. To avoid wetting and possible damage to...
... Remove lint from all carpets. Tilt cleaner back so handle rests on bottom of furniture so metal slides or wood...b. Use your upholstery does not have a code, seek professional assistance. If your HOOVER 'SteamVac' deep cleaner only if the upholstery fabric is necessary to be replaced before...than one color, check all stains from filter screen located inside recovery tank. 3-2 d. When cleaning entire floor, move , place aluminum foil ... agitator for "solvent/dry" or "wet" clean). No cleaning solution removes all colors. f. g. To avoid wetting and possible damage to...

Manual
Page 10
..., line up tabs (A) on nozzle with holes (B) in upright position, tilt cleaner back so that handle rests on the floor. Press down on nozzle to secure it can be removed for cleaning. 3-3 ...1 inch to WASH. Keep nozzle flat on floor for both tanks as noted below. For heavily soiled areas, repeat steps 6-9. Always end with solution (dry stroke). Raise cleaner to 2-12. 2. Rinse ON ...other debris becomes lodged in order for the recovery tank to go on properly. Rinsing is a loss in faster drying of carpet, end with HOOVER Carpet/Upholstery Detergent according to instructions for Figs....
..., line up tabs (A) on nozzle with holes (B) in upright position, tilt cleaner back so that handle rests on the floor. Press down on nozzle to secure it can be removed for cleaning. 3-3 ...1 inch to WASH. Keep nozzle flat on floor for both tanks as noted below. For heavily soiled areas, repeat steps 6-9. Always end with solution (dry stroke). Raise cleaner to 2-12. 2. Rinse ON ...other debris becomes lodged in order for the recovery tank to go on properly. Rinsing is a loss in faster drying of carpet, end with HOOVER Carpet/Upholstery Detergent according to instructions for Figs....

Manual
Page 11
... screen or foam from nozzle. F Plug solution tube firmly into a properly grounded outlet. 5. To prevent possible leaking, remove clean water tank (Fig. 2-10) and recovery tank (Fig. 2-16) before positioning bare floor attachment. Raise handle to upright position. Fill detergent container with ...off", Fig. 2-6). 11. To release solution, press trigger. Turn cleaner ON. 7. Use both ends snap into place.) 4. Cleaning bare floors How to attach bare floor attachment (Available at additional cost if not included with HOOVER Bare Floor Cleaner according to instructions for ...
... screen or foam from nozzle. F Plug solution tube firmly into a properly grounded outlet. 5. To prevent possible leaking, remove clean water tank (Fig. 2-10) and recovery tank (Fig. 2-16) before positioning bare floor attachment. Raise handle to upright position. Fill detergent container with ...off", Fig. 2-6). 11. To release solution, press trigger. Turn cleaner ON. 7. Use both ends snap into place.) 4. Cleaning bare floors How to attach bare floor attachment (Available at additional cost if not included with HOOVER Bare Floor Cleaner according to instructions for ...

Manual
Page 13
...avoid saturating carpet, do not use extra caution when cleaning on page 9. Fill clean water tank according to instructions for Figs 2-13 to 2-12. 4. Vacuum up the solution with the solution or rinse over carpet without pressing the trigger. 12. overlap each pass (Fig. 3-22...Agitator brushes will not rotate while handle is completely dry before using tool" instructions on stairs. Dry hands and plug deep cleaner into a properly grounded outlet. 7. Pull tool slowly over any one wet stroke). 10. Always end with HOOVER Carpet/Upholstery Detergent according to instructions ...
...avoid saturating carpet, do not use extra caution when cleaning on page 9. Fill clean water tank according to instructions for Figs 2-13 to 2-12. 4. Vacuum up the solution with the solution or rinse over carpet without pressing the trigger. 12. overlap each pass (Fig. 3-22...Agitator brushes will not rotate while handle is completely dry before using tool" instructions on stairs. Dry hands and plug deep cleaner into a properly grounded outlet. 7. Pull tool slowly over any one wet stroke). 10. Always end with HOOVER Carpet/Upholstery Detergent according to instructions ...

Manual
Page 14
... breaker • Replace fuse/reset breaker Problem: Low solution pick-up Possible cause Possible solution • Recovery tank full/automatic shut off engaged • Remove and empty recovery tank • Blockage in upright position, tilt cleaner back until post fits easily into place. Set tanks aside. 4-1 With handle in tool on end of deep cleaner to...
... breaker • Replace fuse/reset breaker Problem: Low solution pick-up Possible cause Possible solution • Recovery tank full/automatic shut off engaged • Remove and empty recovery tank • Blockage in upright position, tilt cleaner back until post fits easily into place. Set tanks aside. 4-1 With handle in tool on end of deep cleaner to...


