Product Manual
Page 1
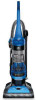
THIS PRODUCT IS INTENDED FOR HOUSEHOLD USE ONLY. página E1 ELITE REWIND PLUS hoover.com IMPORTANT: READ CAREFULLY BEFORE ASSEMBLY AND USE. IF USED COMMERCIALLY WARRANTY IS VOID. ©2017 Techtronic Floor Care Technology Limited. All Rights Reserved. #961152084-R0 PLEASE DO NOT RETURN THIS PRODUCT TO THE STORE. Questions or concerns? For assistance, please call Customer Service at 1-800-944-9200 Mon-Fri 8am-7pm EST. OWNER'S MANUAL Operating and Servicing Instructions Español -
THIS PRODUCT IS INTENDED FOR HOUSEHOLD USE ONLY. página E1 ELITE REWIND PLUS hoover.com IMPORTANT: READ CAREFULLY BEFORE ASSEMBLY AND USE. IF USED COMMERCIALLY WARRANTY IS VOID. ©2017 Techtronic Floor Care Technology Limited. All Rights Reserved. #961152084-R0 PLEASE DO NOT RETURN THIS PRODUCT TO THE STORE. Questions or concerns? For assistance, please call Customer Service at 1-800-944-9200 Mon-Fri 8am-7pm EST. OWNER'S MANUAL Operating and Servicing Instructions Español -

Product Manual
Page 2
... located on bottom of vacuum) CONTENTS Important Safety Instructions 3 Vacuum Assembly 5 Carton Contents...5 Attach Handle...5 Position Tools...5 Attach Dirt Cup...5 How To Use...6 Vacuum Description...6 On-Off Switch...6 Cord Release...6 Carpet Height Adjustment...6 Suction Only Mode/ Brushroll Shut-Off 7 Tools ...7 Select Proper Tool...7 Removing Hose...7 Attach Wand And Tools...7 Stair Cleaning...8 Cord Rewind & Storage...8 How To Clean Tools...8 Maintenance...8 Dirt Cup...9 Filters...9-10 Brushroll...11 Belt ...12 Hose...13 Pet Turbo Tool ...13 Troubleshooting 14 Service...15 Warranty...
... located on bottom of vacuum) CONTENTS Important Safety Instructions 3 Vacuum Assembly 5 Carton Contents...5 Attach Handle...5 Position Tools...5 Attach Dirt Cup...5 How To Use...6 Vacuum Description...6 On-Off Switch...6 Cord Release...6 Carpet Height Adjustment...6 Suction Only Mode/ Brushroll Shut-Off 7 Tools ...7 Select Proper Tool...7 Removing Hose...7 Attach Wand And Tools...7 Stair Cleaning...8 Cord Rewind & Storage...8 How To Clean Tools...8 Maintenance...8 Dirt Cup...9 Filters...9-10 Brushroll...11 Belt ...12 Hose...13 Pet Turbo Tool ...13 Troubleshooting 14 Service...15 Warranty...
Product Manual
Page 3
... or damage, keep free of stairs on floor. keep children away from product, and do not allow children to whip when rewinding. • Unplug before operating. • Operate cleaner only at bottom of dust, lint, hair, and anything that may reduce air flow. • Keep hair, loose clothing, fingers, and all controls before cleaning or servicing. • Do not use with any openings. • Use only as...
... or damage, keep free of stairs on floor. keep children away from product, and do not allow children to whip when rewinding. • Unplug before operating. • Operate cleaner only at bottom of dust, lint, hair, and anything that may reduce air flow. • Keep hair, loose clothing, fingers, and all controls before cleaning or servicing. • Do not use with any openings. • Use only as...
Product Manual
Page 4
... change the plug in a dry place. If it on , do not allow cleaner to clean out hose as damage to the floor can cause damage. • With brushroll on furniture, fringed area rugs, or carpeted stairs during tool use. • Do not use sharp objects to sit in the outlet, reverse the plug. CAUTION: TO REDUCE THE RISK OF DAMAGE: • Avoid picking...
... change the plug in a dry place. If it on , do not allow cleaner to clean out hose as damage to the floor can cause damage. • With brushroll on furniture, fringed area rugs, or carpeted stairs during tool use. • Do not use sharp objects to sit in the outlet, reverse the plug. CAUTION: TO REDUCE THE RISK OF DAMAGE: • Avoid picking...
Product Manual
Page 5
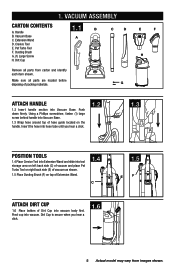
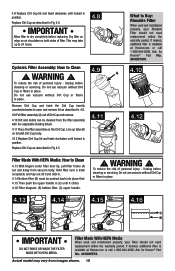
Pivot cup into Vacuum Base. 1.3 Wrap hose around top of hose guide located on top of Extension Wand. 1.4 C ATTACH DIRT CUP 1.6 Place bottom of packing materials. Extension Wand D. Using a Phillips screwdriver, fasten (1) large screw behind handle into vacuum. Insert the hose into hose tube until you hear a click. 1.6 1.5 E F 5 Actual model may vary from carton and identify each item shown. VACUUM ASSEMBLY CARTON CONTENTS A. Pet Turbo Tool F. Dirt Cup 1.1 B A C D Remove all parts are located before disposing of Dirt Cup into Vacuum Base. Dirt Cup is...
Pivot cup into Vacuum Base. 1.3 Wrap hose around top of hose guide located on top of Extension Wand. 1.4 C ATTACH DIRT CUP 1.6 Place bottom of packing materials. Extension Wand D. Using a Phillips screwdriver, fasten (1) large screw behind handle into vacuum. Insert the hose into hose tube until you hear a click. 1.6 1.5 E F 5 Actual model may vary from carton and identify each item shown. VACUUM ASSEMBLY CARTON CONTENTS A. Pet Turbo Tool F. Dirt Cup 1.1 B A C D Remove all parts are located before disposing of Dirt Cup into Vacuum Base. Dirt Cup is...
Product Manual
Page 6
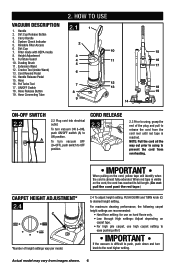
... height settings vary per model. 2. Handle 2.1 1 2. Dirt Cup 7. Furniture Guard 10. Hose Release Button 19. Carry Handle 4. Height Adjustment 3 9. To turn knob to using to ON position. When red tape is visible on the cord, yellow tape will identify when the cord is reached. Actual model may vary from overheating. Pet Turbo Tool 17. ON/OFF Switch 7 12 13 18 18. CORD RELEASE 2.3 2.3 Prior to the next higher setting. Handle Release Pedal 15. Filter made with HEPA...
... height settings vary per model. 2. Handle 2.1 1 2. Dirt Cup 7. Furniture Guard 10. Hose Release Button 19. Carry Handle 4. Height Adjustment 3 9. To turn knob to using to ON position. When red tape is visible on the cord, yellow tape will identify when the cord is reached. Actual model may vary from overheating. Pet Turbo Tool 17. ON/OFF Switch 7 12 13 18 18. CORD RELEASE 2.3 2.3 Prior to the next higher setting. Handle Release Pedal 15. Filter made with HEPA...
Product Manual
Page 7
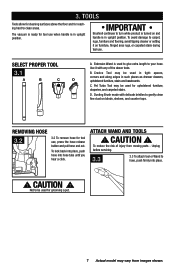
The vacuum is ready for tool use, press the hose release button and pull hose end out. IMPORTANT Brushroll continues to gently clean fine dust on blinds, shelves, and counter tops. Use it on and handle is in upright position. D. REMOVING HOSE 3.2 3.2 To remove hose for tool use . ATTACH WAND AND TOOLS ! CAUTION ! To avoid damage to carpet, rugs, furniture and flooring, avoid tipping cleaner or setting it with delicate bristles to turn while product is used in tight...
The vacuum is ready for tool use, press the hose release button and pull hose end out. IMPORTANT Brushroll continues to gently clean fine dust on blinds, shelves, and counter tops. Use it on and handle is in upright position. D. REMOVING HOSE 3.2 3.2 To remove hose for tool use . ATTACH WAND AND TOOLS ! CAUTION ! To avoid damage to carpet, rugs, furniture and flooring, avoid tipping cleaner or setting it with delicate bristles to turn while product is used in tight...

Product Manual
Page 8
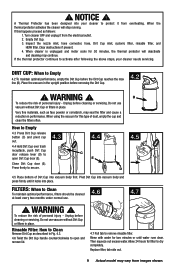
... cleaning effectiveness. 4.1 The System Check Indicator located at bottom of cord reel. 3.5 ! Rinsable filter and/or filter made with HEPA 1. reference pg. 9 and 10 2. STAIR CLEANING 3.4 Use the Hose, Pet Turbo Tool, and Crevice Tool for storage, hold plug and press down Cord Release Pedal (B) on stairs or furniture, as it should be washed in water. Rinse and air dry 24 hours before using tools, always ensure handle is in injury or damage. Empty Dirt Cup - Clean cyclone filter assembly...
... cleaning effectiveness. 4.1 The System Check Indicator located at bottom of cord reel. 3.5 ! Rinsable filter and/or filter made with HEPA 1. reference pg. 9 and 10 2. STAIR CLEANING 3.4 Use the Hose, Pet Turbo Tool, and Crevice Tool for storage, hold plug and press down Cord Release Pedal (B) on stairs or furniture, as it should be washed in water. Rinse and air dry 24 hours before using tools, always ensure handle is in injury or damage. Empty Dirt Cup - Clean cyclone filter assembly...
Product Manual
Page 9
... stop running. C E Close Dirt Cup door (E). Pivot Dirt Cup into vacuum body and press firmly until water runs clear. Allow 24 hours for two minutes or until it locks into your cleaner needs servicing. If this type of Dirt Cup into vacuum body first. Empty Dirt Cup. 3. If the thermal protector continues to activate after following the above steps, your cleaner to dry completely. How to Empty 4.3 Press Dirt Cup release button (C) and pivot cup out. 4.3 4.4 4.4 Hold Dirt Cup...
... stop running. C E Close Dirt Cup door (E). Pivot Dirt Cup into vacuum body and press firmly until water runs clear. Allow 24 hours for two minutes or until it locks into your cleaner needs servicing. If this type of Dirt Cup into vacuum body first. Empty Dirt Cup. 3. If the thermal protector continues to activate after following the above steps, your cleaner to dry completely. How to Empty 4.3 Press Dirt Cup release button (C) and pivot cup out. 4.3 4.4 4.4 Hold Dirt Cup...
Product Manual
Page 10
... With HEPA Media When used and maintained properly, your Filter should not need replacement within the warranty period. Do not use vacuum without Dirt Cup or filters in position. Line up to 24 hours. 4.8 Cyclonic Filter Assembly: How to Buy: Rinsable Filter When used and maintained properly, your Rinsable Filter should not need replacement within the warranty period. WARNING ! To reduce the risk of personal injury - Remove Dirt Cup and twist the Dirt Cup handle counterclockwise to Clean...
... With HEPA Media When used and maintained properly, your Filter should not need replacement within the warranty period. Do not use vacuum without Dirt Cup or filters in position. Line up to 24 hours. 4.8 Cyclonic Filter Assembly: How to Buy: Rinsable Filter When used and maintained properly, your Rinsable Filter should not need replacement within the warranty period. WARNING ! To reduce the risk of personal injury - Remove Dirt Cup and twist the Dirt Cup handle counterclockwise to Clean...
Product Manual
Page 11
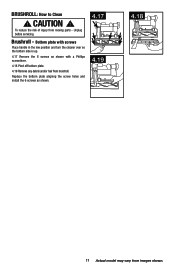
To reduce the risk of injury from images shown. Brushroll - BRUSHROLL: How to Clean ! CAUTION ! Replace the bottom plate aligning the screw holes and install the 6 screws as shown with screws Place handle in the low position and turn the cleaner over so the bottom side is up. 4.17 Remove the 6 screws as shown. 4.17 4.19 4.18 11 Actual model may vary from moving parts - Bottom plate with a Phillips screwdriver. 4.18 Pivot off bottom plate. 4.19 Remove any debris and/or hair from brushroll. Unplug before servicing.
To reduce the risk of injury from images shown. Brushroll - BRUSHROLL: How to Clean ! CAUTION ! Replace the bottom plate aligning the screw holes and install the 6 screws as shown with screws Place handle in the low position and turn the cleaner over so the bottom side is up. 4.17 Remove the 6 screws as shown. 4.17 4.19 4.18 11 Actual model may vary from moving parts - Bottom plate with a Phillips screwdriver. 4.18 Pivot off bottom plate. 4.19 Remove any debris and/or hair from brushroll. Unplug before servicing.
Product Manual
Page 12
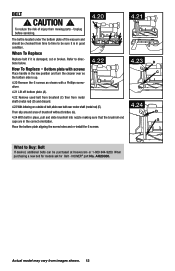
... in the low position and turn the cleaner over motor shaft (metal rod) (E). G Place the bottom plate aligning the screw holes and re-install the 6 screws. Unplug before servicing. 4.20 4.21 The belt is located under the bottom plate of belt, slide new belt over so C the bottom side is damaged, cut or broken. Bottom plate with a Phillips screwdriver. 4.21 Lift off bottom plate (A). 4.22 Remove used belt from...
... in the low position and turn the cleaner over motor shaft (metal rod) (E). G Place the bottom plate aligning the screw holes and re-install the 6 screws. Unplug before servicing. 4.20 4.21 The belt is located under the bottom plate of belt, slide new belt over so C the bottom side is damaged, cut or broken. Bottom plate with a Phillips screwdriver. 4.21 Lift off bottom plate (A). 4.22 Remove used belt from...
Product Manual
Page 13
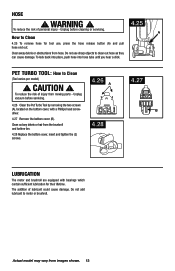
.... Do not use , press the hose release button (A) and pull hose end out. HOSE ! Unplug vacuum before cleaning or servicing. WARNING ! PET TURBO TOOL: How to motor or brushroll. Actual model may vary from the brushroll and turbine fan. 4.28 Replace the bottom cover, insert and tighten the (2) screws. 4.26 A 4.28 4.27 B LUBRICATION The motor and brushroll are equipped with a Phillips head screwdriver. 4.27 Remove the bottom cover...
.... Do not use , press the hose release button (A) and pull hose end out. HOSE ! Unplug vacuum before cleaning or servicing. WARNING ! PET TURBO TOOL: How to motor or brushroll. Actual model may vary from the brushroll and turbine fan. 4.28 Replace the bottom cover, insert and tighten the (2) screws. 4.26 A 4.28 4.27 B LUBRICATION The motor and brushroll are equipped with a Phillips head screwdriver. 4.27 Remove the bottom cover...
Product Manual
Page 14
.... Hose not installed correctly. 4. Pg.12. 4. Review Dirt Cup removal & replacement - Power cord not firmly plugged into water, take it usually can be done by using tool applying light pressure. 2. POSSIBLE SOLUTION 1. PROBLEM Vacuum won 't pick or Low suction." 1. Blown fuse or tripped breaker. 3. Vacuum is dirty. 2. Continue using the checklist below. Review Filter Removal and Cleaning - Pg. 9 and 10. 1. Set Carpet Height Adjustment to push or won't move forward Pet Turbo Tool brushroll won 't pick up or Low suction Cord Rewind does not work Dust...
.... Hose not installed correctly. 4. Pg.12. 4. Review Dirt Cup removal & replacement - Power cord not firmly plugged into water, take it usually can be done by using tool applying light pressure. 2. POSSIBLE SOLUTION 1. PROBLEM Vacuum won 't pick or Low suction." 1. Blown fuse or tripped breaker. 3. Vacuum is dirty. 2. Continue using the checklist below. Review Filter Removal and Cleaning - Pg. 9 and 10. 1. Set Carpet Height Adjustment to push or won't move forward Pet Turbo Tool brushroll won 't pick up or Low suction Cord Rewind does not work Dust...

Product Manual
Page 15
.... Do not send your vacuum by : • Checking the Yellow Pages under "Vacuum Cleaners" or "Household". • Visit our website at hoover.com (U.S. SERVICE To obtain approved Hoover® service and genuine Hoover® parts, locate the nearest Authorized Hoover® Warranty Service Dealer (Depot) by the complete model number when requesting information or ordering parts. (The model number appears on the bottom of authorized service outlet locations call 1-800-944...
.... Do not send your vacuum by : • Checking the Yellow Pages under "Vacuum Cleaners" or "Household". • Visit our website at hoover.com (U.S. SERVICE To obtain approved Hoover® service and genuine Hoover® parts, locate the nearest Authorized Hoover® Warranty Service Dealer (Depot) by the complete model number when requesting information or ordering parts. (The model number appears on the bottom of authorized service outlet locations call 1-800-944...
Product Manual
Page 16
... other acts beyond the control of Hoover®, owner's acts or omissions, use and in a commercial operation (such as warranted, take or send the product to either a Hoover® Authorized Warranty Service Dealer along with the Owner's Manual, your product to products purchased outside the United States, including its territories and possessions, outside of warranty service outlets, phone the Hoover® Consumer Response Center, Phone 1-800...
... other acts beyond the control of Hoover®, owner's acts or omissions, use and in a commercial operation (such as warranted, take or send the product to either a Hoover® Authorized Warranty Service Dealer along with the Owner's Manual, your product to products purchased outside the United States, including its territories and possessions, outside of warranty service outlets, phone the Hoover® Consumer Response Center, Phone 1-800...


