
Manual
Page 1
... as described in place. Verification of date of body away from electrical outlet before unplugging. • Do not unplug by The Hoover Company; keep free of fire, electric shock, or injury: • Do not use in use as a toy or to... Blockages 12 Important Safeguards 1 Maintenance Authorized Service 11 Cleaning Filters 7-8 Emptying Dirt Cup 7 Lubrication 10 Replacing Agitator Brush Roll ......10 Replacing Belt 9-10 Replacing Headlight 8 Thermal Protector 11 © 2004 The Hoover Company www.hoover.com Important Safeguards When using an electrical appliance, always follow...
... as described in place. Verification of date of body away from electrical outlet before unplugging. • Do not unplug by The Hoover Company; keep free of fire, electric shock, or injury: • Do not use in use as a toy or to... Blockages 12 Important Safeguards 1 Maintenance Authorized Service 11 Cleaning Filters 7-8 Emptying Dirt Cup 7 Lubrication 10 Replacing Agitator Brush Roll ......10 Replacing Belt 9-10 Replacing Headlight 8 Thermal Protector 11 © 2004 The Hoover Company www.hoover.com Important Safeguards When using an electrical appliance, always follow...

Manual
Page 3
... on front of cleaner. Carrying handle 6. Crevice wand: stores inside filter chamber) 8. Cord 22. Stair cleaning handle: 17 located above the headlight. 12. Dusting brush 3. HEPA filter (inside wand 20. Extension wand 19. Cord hook: hang cord ...; switch: located on bottom of cleaner body 11. Furniture nozzle 17. rect setting for storage. 21. Continued § 3 Upper handle release button 16. Pre-filter 7. Hose 2. Folding handle 15. Hood 13. Using fold down handle 1-5 1-6 A B Raise upper handle (A) to use Cleaner description 2-1 1 3 2 4...
... on front of cleaner. Carrying handle 6. Crevice wand: stores inside filter chamber) 8. Cord 22. Stair cleaning handle: 17 located above the headlight. 12. Dusting brush 3. HEPA filter (inside wand 20. Extension wand 19. Cord hook: hang cord ...; switch: located on bottom of cleaner body 11. Furniture nozzle 17. rect setting for storage. 21. Continued § 3 Upper handle release button 16. Pre-filter 7. Hose 2. Folding handle 15. Hood 13. Using fold down handle 1-5 1-6 A B Raise upper handle (A) to use Cleaner description 2-1 1 3 2 4...
Manual
Page 7
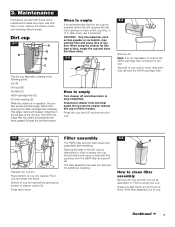
...fall from electrical outlet. Tap side of your cleaner will ensure continued cleaning effectiveness. Pivot cup and snap into cleaner. The filter assembly can also be removed for this type of cup into place. When using the cleaner for additional cleaning. 3-5 H How... to stop larger debris from the HEPA filter and pre-filter. Press dirt cup latch (F) and remove dirt cup. 3-3 Remove lid. Filter assembly The HEPA filter and pre-filter screen are essentially self-shedding. Disconnect cleaner from the HEPA cartridge filter. 3-4 G Replace dirt cup lid. Place bottom...
...fall from electrical outlet. Tap side of your cleaner will ensure continued cleaning effectiveness. Pivot cup and snap into cleaner. The filter assembly can also be removed for this type of cup into place. When using the cleaner for additional cleaning. 3-5 H How... to stop larger debris from the HEPA filter and pre-filter. Press dirt cup latch (F) and remove dirt cup. 3-3 Remove lid. Filter assembly The HEPA filter and pre-filter screen are essentially self-shedding. Disconnect cleaner from the HEPA cartridge filter. 3-4 G Replace dirt cup lid. Place bottom...

Manual
Page 8
.... 3-4). DO NOT tap the soft, pleated sides of the filters in the cup. To re-assemble the filter assembly, place large knob of cartridge filter in returning clean air to replace this filter, ask for HOOVER part no. 38765024 (filter package part no part of pre-filter screen extends above top edge of dirt cup. Cleaning final...
.... 3-4). DO NOT tap the soft, pleated sides of the filters in the cup. To re-assemble the filter assembly, place large knob of cartridge filter in returning clean air to replace this filter, ask for HOOVER part no. 38765024 (filter package part no part of pre-filter screen extends above top edge of dirt cup. Cleaning final...

Manual
Page 11
Turn the cleaner OFF and disconnect it usually can be solved quite easily when the cause is needed, contact The Hoover Company Consumer Response Center, North Canton, Ohio 44720, Phone: 330-499-9499. When cleaner is unplugged and the motor cools for...problem 4. Problem: Smoky/burning smell detected Possible cause Possible solution • Belt broken or stretched • Replace agitator brush roll belt as described in the "Filter assembly" section • Dirt cup not properly installed • Position dirt cup properly (Fig. 3-4) • Dirt cup lid not positioned properly or missing...
Turn the cleaner OFF and disconnect it usually can be solved quite easily when the cause is needed, contact The Hoover Company Consumer Response Center, North Canton, Ohio 44720, Phone: 330-499-9499. When cleaner is unplugged and the motor cools for...problem 4. Problem: Smoky/burning smell detected Possible cause Possible solution • Belt broken or stretched • Replace agitator brush roll belt as described in the "Filter assembly" section • Dirt cup not properly installed • Position dirt cup properly (Fig. 3-4) • Dirt cup lid not positioned properly or missing...
Manual
Page 12
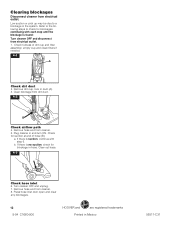
... end of dirt cup and filter assembly; Check fullness of hose (B). a. Clear out hose. 4-3 Check hose inlet 6. If there is no suction, check for blockage in the system. Press hose inlet door open and clear any blockages. 12 8-04 C1660-900 HOOVER and ® are registered ...trademarks Printed in and turn ON. Plug cleaner in Mexico 56511-C31 If there is found: Turn cleaner OFF and disconnect from electrical outlet. 1. empty cup and clean filters if needed. 4-1 A Check dirt duct 2....
... end of dirt cup and filter assembly; Check fullness of hose (B). a. Clear out hose. 4-3 Check hose inlet 6. If there is no suction, check for blockage in the system. Press hose inlet door open and clear any blockages. 12 8-04 C1660-900 HOOVER and ® are registered ...trademarks Printed in and turn ON. Plug cleaner in Mexico 56511-C31 If there is found: Turn cleaner OFF and disconnect from electrical outlet. 1. empty cup and clean filters if needed. 4-1 A Check dirt duct 2....


