
Manual
Page 1
...-19 ® Upright Vacuum Cleaner FRANÇAIS § p. 20-26 Please enter the COMPLETE model and serial numbers in the instructions. The numbers are located on cord or pull cord around sharp edges or corners. See "Extension cord instructions". • Connect to use 3 Cleaner Description 3 Cleaning Tools 5 If You Have a Problem 11 Clearing Blockages 12 Important Safeguards 1 Maintenance Authorized Service 11 Cleaning Filters 7-8 Emptying Dirt Cup 7 Lubrication 10 Replacing Agitator Brush Roll ......10 Replacing Belt 9-10 Replacing Headlight 8 Thermal Protector 11 ©...
...-19 ® Upright Vacuum Cleaner FRANÇAIS § p. 20-26 Please enter the COMPLETE model and serial numbers in the instructions. The numbers are located on cord or pull cord around sharp edges or corners. See "Extension cord instructions". • Connect to use 3 Cleaner Description 3 Cleaning Tools 5 If You Have a Problem 11 Clearing Blockages 12 Important Safeguards 1 Maintenance Authorized Service 11 Cleaning Filters 7-8 Emptying Dirt Cup 7 Lubrication 10 Replacing Agitator Brush Roll ......10 Replacing Belt 9-10 Replacing Headlight 8 Thermal Protector 11 ©...
Manual
Page 2
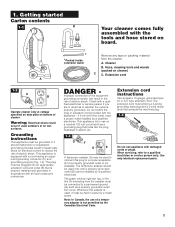
... cords or plugs. 1. Getting started Carton contents 1-1 B Your cleaner comes fully assembled with a qualified electrician or service person if you are in sketch (A). 1-3 D F G E A temporary adapter (D) may be grounded. Hose, cleaning tools and wands (packed on a nominal 120 volt circuit and has a grounding plug that accepts the machine plug. 1-4 Do not use of cleaner. Extension cord A 1-2 A B C Operate cleaner only at least a 16 gauge, grounded type SJ or SJT type extension cord...
... cords or plugs. 1. Getting started Carton contents 1-1 B Your cleaner comes fully assembled with a qualified electrician or service person if you are in sketch (A). 1-3 D F G E A temporary adapter (D) may be grounded. Hose, cleaning tools and wands (packed on a nominal 120 volt circuit and has a grounding plug that accepts the machine plug. 1-4 Do not use of cleaner. Extension cord A 1-2 A B C Operate cleaner only at least a 16 gauge, grounded type SJ or SJT type extension cord...

Manual
Page 3
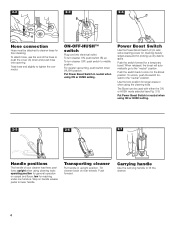
... handle release button 16. Carrying handle 6. Press upper handle release button (B) back to fold handle to use Cleaner description 2-1 1 3 2 4 9 11 22 19 18 20 5 21 6 7 8 10 12 14 1. Dusting brush 3. Hood 13. Handle release pedal: step on pedal to lower handle to operating or low positions. 13 Operate cleaner only at voltage specified on data plate on front of carpet being cleaned. 16 14. Furniture nozzle 17. HEPA filter (inside wand 20. rect setting for storage. 21. Dirt cup...
... handle release button 16. Carrying handle 6. Press upper handle release button (B) back to fold handle to use Cleaner description 2-1 1 3 2 4 9 11 22 19 18 20 5 21 6 7 8 10 12 14 1. Dusting brush 3. Hood 13. Handle release pedal: step on pedal to lower handle to operating or low positions. 13 Operate cleaner only at voltage specified on data plate on front of carpet being cleaned. 16 14. Furniture nozzle 17. HEPA filter (inside wand 20. rect setting for storage. 21. Dirt cup...
Manual
Page 4
.... low for a temporary boost. ON-OFF-HUSH™ switch Plug cord into electrical outlet. To turn cleaner ON, push switch (B) up dry debris spills. Power Boost Switch Use the Power Boost Switch (C) to middle position. To turn cleaner OFF, push switch to add extra cleaning power for cleaning heavily soiled areas and for floor cleaning. Step on rear wheels. Push forward. To attach hose, use the end of your cleaner has three positions; For quieter vacuuming, push switch down...
.... low for a temporary boost. ON-OFF-HUSH™ switch Plug cord into electrical outlet. To turn cleaner ON, push switch (B) up dry debris spills. Power Boost Switch Use the Power Boost Switch (C) to middle position. To turn cleaner OFF, push switch to add extra cleaning power for cleaning heavily soiled areas and for floor cleaning. Step on rear wheels. Push forward. To attach hose, use the end of your cleaner has three positions; For quieter vacuuming, push switch down...
Manual
Page 5
... wand is in operating position, place fingers under edge of stair cleaning handle and guide cleaner with other end or edge. Nozzle won't move cleaner toward other hand on handle. Furniture nozzle may be used in tight spaces, corners and along edges in upright position. • For best tool performance, set the ONOFF-HUSH™ switch to ON and set the Power Boost Switch to start again, lower nozzle, and use the hose...
... wand is in operating position, place fingers under edge of stair cleaning handle and guide cleaner with other end or edge. Nozzle won't move cleaner toward other hand on handle. Furniture nozzle may be used in tight spaces, corners and along edges in upright position. • For best tool performance, set the ONOFF-HUSH™ switch to ON and set the Power Boost Switch to start again, lower nozzle, and use the hose...
Manual
Page 6
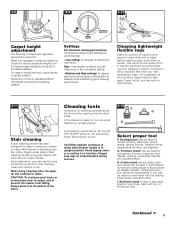
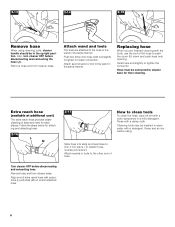
... for floor cleaning. Rinse and air dry before using cleaning tools, cleaner handle should be connected to reach places. Attach wand and tools The tools are finished cleaning with the tools, use the end of stairs and hard to cleaner base for attaching and detaching hose. 2-16 L M 2-17 How to clean tools To clean the hose, wipe off dirt with a detergent. Replacing hose When you are attached to push the cover (K) down and push hose onto opening. twist tool slightly...
... for floor cleaning. Rinse and air dry before using cleaning tools, cleaner handle should be connected to reach places. Attach wand and tools The tools are finished cleaning with the tools, use the end of stairs and hard to cleaner base for attaching and detaching hose. 2-16 L M 2-17 How to clean tools To clean the hose, wipe off dirt with a detergent. Replacing hose When you are attached to push the cover (K) down and push hose onto opening. twist tool slightly...
Manual
Page 7
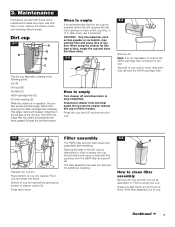
When using the cleaner for additional cleaning. 3-5 H How to stop larger debris from electrical outlet. Bottom of dust, empty the cup and clean the filters often. 3-2 F How to empty Turn cleaner off and allow motor to clean filter assembly Remove dirt cup and dirt cup lid as proper use if preferred. Press latch down. This larger debris will ensure continued cleaning effectiveness. Disconnect cleaner from entering the HEPA cartridge filter chamber. Slide filter assembly out of suction. 3. Maintenance Familiarize yourself...
When using the cleaner for additional cleaning. 3-5 H How to stop larger debris from electrical outlet. Bottom of dust, empty the cup and clean the filters often. 3-2 F How to empty Turn cleaner off and allow motor to clean filter assembly Remove dirt cup and dirt cup lid as proper use if preferred. Press latch down. This larger debris will ensure continued cleaning effectiveness. Disconnect cleaner from entering the HEPA cartridge filter chamber. Slide filter assembly out of suction. 3. Maintenance Familiarize yourself...

Manual
Page 8
... filter. Using a screwdriver, remove the two screws as shown and lift off lens. 3-12 K Headlight replacement What to buy This cleaner uses a 12 volt, wedge base type 912 bulb, HOOVER part No. 27313107. 3-13 3-14 Lift out filter (K) and hand wash in returning clean air to replace this filter, ask for HOOVER part no. 38765024 (filter package part no more dust particles fall from assembly. Pull old bulb straight out of the filters in dirt cup...
... filter. Using a screwdriver, remove the two screws as shown and lift off lens. 3-12 K Headlight replacement What to buy This cleaner uses a 12 volt, wedge base type 912 bulb, HOOVER part No. 27313107. 3-13 3-14 Lift out filter (K) and hand wash in returning clean air to replace this filter, ask for HOOVER part no. 38765024 (filter package part no more dust particles fall from assembly. Pull old bulb straight out of the filters in dirt cup...

Manual
Page 9
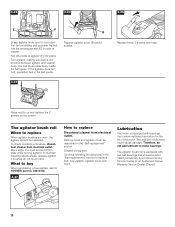
... brush roll cavity. 3-17 3-18 3-19 A Press on handle release pedal (A) and lower the nozzle so it is important for HOOVER part No. 38528040 (belt package part no. 40201190). 3-16 How to rotate and is in the upright position, tilt cleaner back until it is flat. Replace belt if it rests on your cleaner. Remove agitator cover (B). 3-20 Remove agitator and used belt. 3-21 3-22 C D With lettering to be checked from electrical...
... brush roll cavity. 3-17 3-18 3-19 A Press on handle release pedal (A) and lower the nozzle so it is important for HOOVER part No. 38528040 (belt package part no. 40201190). 3-16 How to rotate and is in the upright position, tilt cleaner back until it is flat. Replace belt if it rests on your cleaner. Remove agitator cover (B). 3-20 Remove agitator and used belt. 3-21 3-22 C D With lettering to be checked from electrical...
Manual
Page 10
... plate while turning agitator. The agitator brush roll When to buy When purchasing a new agitator, ask for the life of brushes, disconnect cleaner from electrical outlet. Therefore, do not touch card. Pull other side of cleaner. To check condition of the motor. What to replace When agitator brushes are worn, the agitator should be replaced. The agitator brush roll is not pinched between agitator and cleaner body. The belt must rotate freely inside the belt guide. Discard old agitator...
... plate while turning agitator. The agitator brush roll When to buy When purchasing a new agitator, ask for the life of brushes, disconnect cleaner from electrical outlet. Therefore, do not touch card. Pull other side of cleaner. To check condition of the motor. What to replace When agitator brushes are worn, the agitator should be replaced. The agitator brush roll is not pinched between agitator and cleaner body. The belt must rotate freely inside the belt guide. Discard old agitator...

Manual
Page 11
...; checking the list of the cleaner.) 4. Problem: Cleaner won 't pick up Possible cause Possible solution • Broken or worn belt • Replace belt • Agitator brush roll worn • Replace brush roll • Dirt cup full • Empty cup • Incorrect carpet height setting • Move nozzle control knob to lower setting • Blockage in air flow passage • Clear blockage • HEPA filter clogged • Clean HEPA filter as described in the "Filter assembly" section • Dirt cup not properly installed • Position dirt cup properly...
...; checking the list of the cleaner.) 4. Problem: Cleaner won 't pick up Possible cause Possible solution • Broken or worn belt • Replace belt • Agitator brush roll worn • Replace brush roll • Dirt cup full • Empty cup • Incorrect carpet height setting • Move nozzle control knob to lower setting • Blockage in air flow passage • Clear blockage • HEPA filter clogged • Clean HEPA filter as described in the "Filter assembly" section • Dirt cup not properly installed • Position dirt cup properly...
Manual
Page 12
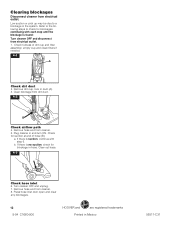
... is found: Turn cleaner OFF and disconnect from dirt duct. 4-2 B Check airflow path 4. Turn cleaner OFF and unplug. 7. Clearing blockages Disconnect cleaner from cleaner. 5. empty cup and clean filters if needed. 4-1 A Check dirt duct 2. Plug cleaner in Mexico 56511-C31 Refer to the following steps to a blockage in duct (A). 3. Clear out hose. 4-3 Check hose inlet 6. Remove dirt cup, look in the system. Clear blockage from electrical outlet. 1. Remove hose end from cleaner. 8. Low suction or pick up may be...
... is found: Turn cleaner OFF and disconnect from dirt duct. 4-2 B Check airflow path 4. Turn cleaner OFF and unplug. 7. Clearing blockages Disconnect cleaner from cleaner. 5. empty cup and clean filters if needed. 4-1 A Check dirt duct 2. Plug cleaner in Mexico 56511-C31 Refer to the following steps to a blockage in duct (A). 3. Clear out hose. 4-3 Check hose inlet 6. Remove dirt cup, look in the system. Clear blockage from electrical outlet. 1. Remove hose end from cleaner. 8. Low suction or pick up may be...

Manual
Page 28
HOOVER y ®son marcas registradas HOOVER et ®sont des marques déposées HOOVER and ® are registered trademarks 8-04 C1660-900 Printed in Mexico 56511-C31
HOOVER y ®son marcas registradas HOOVER et ®sont des marques déposées HOOVER and ® are registered trademarks 8-04 C1660-900 Printed in Mexico 56511-C31


