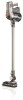
Product Manual
Page 3
YOUR GUIDE Important Safety Instructions...4 Getting started with your Cruise™ Cordless...6 Assembly...7 Attach the wall bracket...8 How to use...9 Before you begin cleaning...10 Using your machine...12 Using your machine as a Handheld vacuum 13 Using your machine to clean up high...14 Maintenance...16 How to order accessories...22 Need Help?...23 Service and Warranty...24
YOUR GUIDE Important Safety Instructions...4 Getting started with your Cruise™ Cordless...6 Assembly...7 Attach the wall bracket...8 How to use...9 Before you begin cleaning...10 Using your machine...12 Using your machine as a Handheld vacuum 13 Using your machine to clean up high...14 Maintenance...16 How to order accessories...22 Need Help?...23 Service and Warranty...24
Product Manual
Page 4
... cleaner from openings and moving parts. • Use extra care when cleaning on cord. Store appliances indoors. • The charger is necessary when used as a toy. Use only Hoover® recommended attachments and products. • Do not use appliance on floor. keep the battery and charger indoors in this manual. Not intended for indoor use only. Do not place product on cord, or pull cord around sharp edges or corners. Keep cord...
... cleaner from openings and moving parts. • Use extra care when cleaning on cord. Store appliances indoors. • The charger is necessary when used as a toy. Use only Hoover® recommended attachments and products. • Do not use appliance on floor. keep the battery and charger indoors in this manual. Not intended for indoor use only. Do not place product on cord, or pull cord around sharp edges or corners. Keep cord...

Product Manual
Page 5
... not use without Dirt Cup and/or Filters in a fire. • This product includes rechargeable lithium-ion batteries. If any liquid gets on the skin wash quickly with clean water continuously for directions. • Do not attempt to disassemble battery. • Unplug the charger from battery cells can explode in place. • Turn power switch off and remove battery before removing or installing brush roll. • Always turn off this appliance before any routine cleaning or maintenance...
... not use without Dirt Cup and/or Filters in a fire. • This product includes rechargeable lithium-ion batteries. If any liquid gets on the skin wash quickly with clean water continuously for directions. • Do not attempt to disassemble battery. • Unplug the charger from battery cells can explode in place. • Turn power switch off and remove battery before removing or installing brush roll. • Always turn off this appliance before any routine cleaning or maintenance...
Product Manual
Page 6
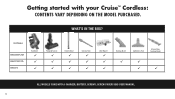
WHAT'S IN THE BOX? Getting started with your Cruise™ Cordless: CONTENTS VARY DEPENDING ON THE MODEL PURCHASED. Unit Model BH52200/PC/CDI BH52210/PC/CA BH52212 Handheld ü ü ü Powered Nozzle ü ü ü Reach Wand ü ü ü Crevice Tool ü ü ü Wall Mount ü ü ü Dusting Brush Upholstery Tool Articulating Dusting Brush ü ü ü ü ALL MODELS COME WITH A CHARGER, BATTERY, SCREWS, SCREW COVERS AND USER MANUAL. 6
WHAT'S IN THE BOX? Getting started with your Cruise™ Cordless: CONTENTS VARY DEPENDING ON THE MODEL PURCHASED. Unit Model BH52200/PC/CDI BH52210/PC/CA BH52212 Handheld ü ü ü Powered Nozzle ü ü ü Reach Wand ü ü ü Crevice Tool ü ü ü Wall Mount ü ü ü Dusting Brush Upholstery Tool Articulating Dusting Brush ü ü ü ü ALL MODELS COME WITH A CHARGER, BATTERY, SCREWS, SCREW COVERS AND USER MANUAL. 6
Product Manual
Page 7
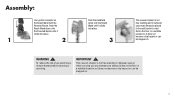
... personal injury, remove battery before cleaning or servicing. Assembly: Line up the connector on . 7 IMPORTANT ! WARNING ! This vacuum cleaner is not free standing and in between uses or when carrying out any maintenance always lie flat on the floor in a suitable location so it does not become a trip hazard or can be stepped on. Push the Reach Wand down onto the Powered Nozzle until it...
... personal injury, remove battery before cleaning or servicing. Assembly: Line up the connector on . 7 IMPORTANT ! WARNING ! This vacuum cleaner is not free standing and in between uses or when carrying out any maintenance always lie flat on the floor in a suitable location so it does not become a trip hazard or can be stepped on. Push the Reach Wand down onto the Powered Nozzle until it...
Product Manual
Page 8
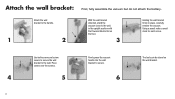
... remove the vacuum. Attach the wall bracket: First, fully assemble the vacuum but do not attach the battery. With the wall bracket attached, stand the vacuum close to the wall. Holding the wall bracket firmly in the upright position with the Powered Nozzle flat on the wall bracket. Place covers over the screws. 5 Firmly press the vacuum handle into the wall bracket to the handle. Attach...
... remove the vacuum. Attach the wall bracket: First, fully assemble the vacuum but do not attach the battery. With the wall bracket attached, stand the vacuum close to the wall. Holding the wall bracket firmly in the upright position with the Powered Nozzle flat on the wall bracket. Place covers over the screws. 5 Firmly press the vacuum handle into the wall bracket to the handle. Attach...
Product Manual
Page 9
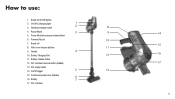
Handheld release button 8 4. Brush roll 8. Battery release button 12. Dirt empty button 14. Dirt container 14 15 16 17 9 Handle 4 10. Powered Nozzle 10 7. Reach Wand 3 9 5. Battery Charging Port 12 11. Power Nozzle/accessory release button 6. On/Off trigger 5 13 15. On/Off & charging light 1 2 3. Dirt container removal button (hidden) 13. Battery 7 17. Filter cover release buttons 11 9. How to use: 1. Brush roll On/Off button 2. Continuous power lever (hidden) 6 16.
Handheld release button 8 4. Brush roll 8. Battery release button 12. Dirt empty button 14. Dirt container 14 15 16 17 9 Handle 4 10. Powered Nozzle 10 7. Reach Wand 3 9 5. Battery Charging Port 12 11. Power Nozzle/accessory release button 6. On/Off trigger 5 13 15. On/Off & charging light 1 2 3. Dirt container removal button (hidden) 13. Battery 7 17. Filter cover release buttons 11 9. How to use: 1. Brush roll On/Off button 2. Continuous power lever (hidden) 6 16.
Product Manual
Page 10
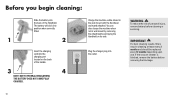
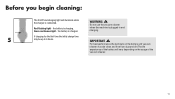
... of the Handheld. If the vacuum cleaner is blocked, remove the battery before cleaning or servicing. IMPORTANT ! The battery will click into position when correctly fitted. 1 2 Insert the charging cord into the outlet. WARNING ! Plug the charger plug into the charging port located on its side. Before you begin cleaning: Slide the battery into the back of personal injury, remove battery before removing the blockage. 10
... of the Handheld. If the vacuum cleaner is blocked, remove the battery before cleaning or servicing. IMPORTANT ! The battery will click into position when correctly fitted. 1 2 Insert the charging cord into the outlet. WARNING ! Plug the charger plug into the charging port located on its side. Before you begin cleaning: Slide the battery into the back of personal injury, remove battery before removing the blockage. 10
Product Manual
Page 11
... not use the vacuum cleaner when the machine is connected. Before you begin cleaning: The On/Off and charging light will vary depending on the usage of the vacuum cleaner. 11 If charging for the first time the initial charge time 5 may be clean and free from dust and dirt.The life expectancy of the battery will illuminate while the charger is plugged...
... not use the vacuum cleaner when the machine is connected. Before you begin cleaning: The On/Off and charging light will vary depending on the usage of the vacuum cleaner. 11 If charging for the first time the initial charge time 5 may be clean and free from dust and dirt.The life expectancy of the battery will illuminate while the charger is plugged...
Product Manual
Page 12
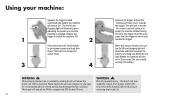
... hard floors. The brush roll should recharge the battery. Risk of servicing the brush roll. 12 When the vacuum cleaner is in use the On/Off and charging light will illuminate green indicating the power is on and the machine is charged. This vacuum cleaner has a constantly rotating brush roll when the brush roll 'ON' is running low. the brush roll may damage the floor surface. WARNING ! WARNING ! Turn power switch Off and remove the battery before cleaning of...
... hard floors. The brush roll should recharge the battery. Risk of servicing the brush roll. 12 When the vacuum cleaner is in use the On/Off and charging light will illuminate green indicating the power is on and the machine is charged. This vacuum cleaner has a constantly rotating brush roll when the brush roll 'ON' is running low. the brush roll may damage the floor surface. WARNING ! WARNING ! Turn power switch Off and remove the battery before cleaning of...

Product Manual
Page 13
Push the chosen accessory into the Handheld until it clicks into place. (All available accessories can be used for grooming a pet. 13 The Reach Wand when attached to the Powered Nozzle/accessory is not free standing, place safely and securely to be attached directly onto the Handheld). 3 4 IMPORTANT ! Not to one side. 1 2 Choose an accessory (all accessories not available on all models). Using your machine as a Handheld vacuum: Press the Handheld release button. Pull to separate the Handheld from the Reach Wand .
Push the chosen accessory into the Handheld until it clicks into place. (All available accessories can be used for grooming a pet. 13 The Reach Wand when attached to the Powered Nozzle/accessory is not free standing, place safely and securely to be attached directly onto the Handheld). 3 4 IMPORTANT ! Not to one side. 1 2 Choose an accessory (all accessories not available on all models). Using your machine as a Handheld vacuum: Press the Handheld release button. Pull to separate the Handheld from the Reach Wand .
Product Manual
Page 14
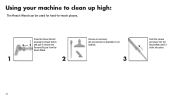
Press the Power Nozzle/ accessory release button and pull to -reach places. Using your machine to clean up high: The Reach Wand can be used for hard-to remove the Powered Nozzle from the Reach Wand. Choose an accessory (all accessories not available on all models). 1 2 3 Push the chosen accessory into the Reach Wand until it clicks into place. 14
Press the Power Nozzle/ accessory release button and pull to -reach places. Using your machine to clean up high: The Reach Wand can be used for hard-to remove the Powered Nozzle from the Reach Wand. Choose an accessory (all accessories not available on all models). 1 2 3 Push the chosen accessory into the Reach Wand until it clicks into place. 14
Product Manual
Page 17
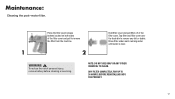
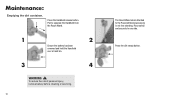
... TO 24 HOURS, BEFORE REINSTALLING INTO THE PRODUCT. 17 Tap filter and filter cover over the trash bin to remove the filter from the machine. NOTE: DO NOT USE SOAP OR ANY OTHER CHEMICAL TO CLEAN. Press the filter cover release buttons located on both sides of personal injury, remove battery before cleaning or servicing. Hold filter cover and pull filter off of the filter cover. Maintenance: Cleaning the post-motor filter.
... TO 24 HOURS, BEFORE REINSTALLING INTO THE PRODUCT. 17 Tap filter and filter cover over the trash bin to remove the filter from the machine. NOTE: DO NOT USE SOAP OR ANY OTHER CHEMICAL TO CLEAN. Press the filter cover release buttons located on both sides of personal injury, remove battery before cleaning or servicing. Hold filter cover and pull filter off of the filter cover. Maintenance: Cleaning the post-motor filter.
Product Manual
Page 18
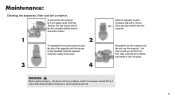
To reduce the risk of personal injury, remove battery before cleaning or servicing. 18 The Reach Wand when attached to one side. Place safely and securely to the Powered Nozzle/accessory is not free standing. Pull to separate the Handheld from the Reach Wand. 1 2 Ensure the battery has been removed and hold the Handheld over a trash bin. 3 4 WARNING ! Press the dirt empty button. Press the Handheld release button. Maintenance: Emptying the dirt container.
To reduce the risk of personal injury, remove battery before cleaning or servicing. 18 The Reach Wand when attached to one side. Place safely and securely to the Powered Nozzle/accessory is not free standing. Pull to separate the Handheld from the Reach Wand. 1 2 Ensure the battery has been removed and hold the Handheld over a trash bin. 3 4 WARNING ! Press the dirt empty button. Press the Handheld release button. Maintenance: Emptying the dirt container.
Product Manual
Page 19
... remove the dirt container, turn unit upside down. Clean any dust and dirt from the separator. Reassemble the dirt container onto the unit over the separator - the brush roll may suddenly restart. Risk of the separator with the arrows on the Handheld. Maintenance: Cleaning the separator, filter and dirt container. the hook should go onto the front first. Push the 'Remove Dirt Cup' button and tilt the dirt...
... remove the dirt container, turn unit upside down. Clean any dust and dirt from the separator. Reassemble the dirt container onto the unit over the separator - the brush roll may suddenly restart. Risk of the separator with the arrows on the Handheld. Maintenance: Cleaning the separator, filter and dirt container. the hook should go onto the front first. Push the 'Remove Dirt Cup' button and tilt the dirt...

Product Manual
Page 20
... end of brush roll first to release the brush roll. Turn power switch Off and remove the battery before cleaning or servicing the brush roll. 20 Ensure that the brush roll release button slides back into the housing first. Risk of brush roll and slide into place. Maintenance: Removing and replacing the brush roll. Slide to remove. 1 2 Clear any threads or hair from both ends of the brush roll and any dirt/ debris inside the housing of the Powered Nozzle. Lift...
... end of brush roll first to release the brush roll. Turn power switch Off and remove the battery before cleaning or servicing the brush roll. 20 Ensure that the brush roll release button slides back into the housing first. Risk of brush roll and slide into place. Maintenance: Removing and replacing the brush roll. Slide to remove. 1 2 Clear any threads or hair from both ends of the brush roll and any dirt/ debris inside the housing of the Powered Nozzle. Lift...

Product Manual
Page 21
... - Turn power switch Off and remove the battery before attempting to remove any threads or hair from around the brush roll and clear any dirt or debris from the Powered Nozzle before cleaning or servicing the brush roll. Removing blockages from the Powered Nozzle. The paper will drop through if the wand is not working as it to a service center prior to continuing use scissors to remove any blockage. 2 LUBRICATION The motor and brush roll are...
... - Turn power switch Off and remove the battery before attempting to remove any threads or hair from around the brush roll and clear any dirt or debris from the Powered Nozzle before cleaning or servicing the brush roll. Removing blockages from the Powered Nozzle. The paper will drop through if the wand is not working as it to a service center prior to continuing use scissors to remove any blockage. 2 LUBRICATION The motor and brush roll are...
Product Manual
Page 22
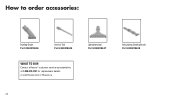
How to order accessories: Dusting Brush Part #440010636 Crevice Tool Part #440010635 WHAT TO BUY: Contact a Hoover® customer service representative at 1-888-679-2121 for replacement details or visit Hoover.com or Hoover.ca Upholstery tool Part #440010637 Articulating Dusting Brush Part #440010638 22
How to order accessories: Dusting Brush Part #440010636 Crevice Tool Part #440010635 WHAT TO BUY: Contact a Hoover® customer service representative at 1-888-679-2121 for replacement details or visit Hoover.com or Hoover.ca Upholstery tool Part #440010637 Articulating Dusting Brush Part #440010638 22
Product Manual
Page 23
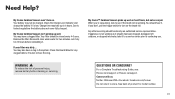
... before cleaning or servicing. Need Help? Your battery may also have a clogged filter. Check the Charge Level Indicator and charge the battery if it to a service center prior to see : Hoover.com/support or Hoover.ca/support Connect with clear warm water for any clogged debris. Rinse with us: Twitter: @HooverUSA • Facebook: facebook.com/hoover Do not return to turn on carpet. Let it dry for model number. 23 Check the Reach Wand...
... before cleaning or servicing. Need Help? Your battery may also have a clogged filter. Check the Charge Level Indicator and charge the battery if it to a service center prior to see : Hoover.com/support or Hoover.ca/support Connect with clear warm water for any clogged debris. Rinse with us: Twitter: @HooverUSA • Facebook: facebook.com/hoover Do not return to turn on carpet. Let it dry for model number. 23 Check the Reach Wand...

Product Manual
Page 24
... COVER: This warranty does not cover belts, filters and brush rolls, use of the product in a commercial operation (such as maid, janitorial and equipment rental services), improper maintenance of the product, damage due to misuse, acts of God, nature, vandalism or other acts beyond the control of Hoover®, owner's acts or omissions, use and in accordance with the Owner's Guide, your Hoover® product and battery are to be...
... COVER: This warranty does not cover belts, filters and brush rolls, use of the product in a commercial operation (such as maid, janitorial and equipment rental services), improper maintenance of the product, damage due to misuse, acts of God, nature, vandalism or other acts beyond the control of Hoover®, owner's acts or omissions, use and in accordance with the Owner's Guide, your Hoover® product and battery are to be...


