Manual
Page 1
... en Hoover.com, o llame al 1-800-944-9200 si prefiere hacerlo por teléfono. ©2010 Techtronic Floor Care ...Instructions d'Utilisation et d'Entretien Veuillez lire attentivement ces instructions avant d'utiliser votre aspirateur vertical HOOVERMD. All Rights Reserved. S T I C K ASPIRATEUR BARREDORA V A C V E RT I C A L DE SUCCIÓN OWNER'S MANUAL GUIDE D'UTILISATION • MANUAL DEL USUARIO Operating and Servicing Instructions Please read these instructions carefully before using your product online at Hoover.com or call 1-800-944-9200 to register your HOOVER® Stick Vac...
... en Hoover.com, o llame al 1-800-944-9200 si prefiere hacerlo por teléfono. ©2010 Techtronic Floor Care ...Instructions d'Utilisation et d'Entretien Veuillez lire attentivement ces instructions avant d'utiliser votre aspirateur vertical HOOVERMD. All Rights Reserved. S T I C K ASPIRATEUR BARREDORA V A C V E RT I C A L DE SUCCIÓN OWNER'S MANUAL GUIDE D'UTILISATION • MANUAL DEL USUARIO Operating and Servicing Instructions Please read these instructions carefully before using your product online at Hoover.com or call 1-800-944-9200 to register your HOOVER® Stick Vac...
Manual
Page 2
... tripping accidents. • Use only battery (Hoover Part # BH50000) supplied by charger cord, use the unit, store, or charge battery outdoors or on the skin wash quickly with clean water continuously for inspection. Close attention is burning or smoking, such as cigarettes, matches or hot ashes. • Do not use the vacuum cleaner without filter and dirt cup in areas where they may reduce air flow. • Do...
... tripping accidents. • Use only battery (Hoover Part # BH50000) supplied by charger cord, use the unit, store, or charge battery outdoors or on the skin wash quickly with clean water continuously for inspection. Close attention is burning or smoking, such as cigarettes, matches or hot ashes. • Do not use the vacuum cleaner without filter and dirt cup in areas where they may reduce air flow. • Do...
Manual
Page 3
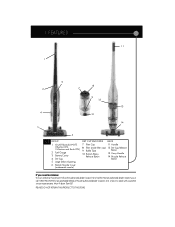
.../Off Switch (0=OFF, DIRT CUP AND FILTER 7. Battery Cavity 8. Large Debris Opening 6. Bottom Nozzle Cover (underneath nozzle) If you or call 1-800-944-9200 for an automated referral of Hoover® authorized dealer locations (U.S. Follow the authorized dealer locator link to speak with a customer service representative; Mon- Handle I=Suction ON, I I =Suction and Brush ON) 2. Nozzle Release 4. Fri 8am- 7pm EST. Baffle Tube Button 10. Filter Cap BACK 11. Dirt Cup Release 9. Carry Handle Release Button 14. PLEASE...
.../Off Switch (0=OFF, DIRT CUP AND FILTER 7. Battery Cavity 8. Large Debris Opening 6. Bottom Nozzle Cover (underneath nozzle) If you or call 1-800-944-9200 for an automated referral of Hoover® authorized dealer locations (U.S. Follow the authorized dealer locator link to speak with a customer service representative; Mon- Handle I=Suction ON, I I =Suction and Brush ON) 2. Nozzle Release 4. Fri 8am- 7pm EST. Baffle Tube Button 10. Filter Cap BACK 11. Dirt Cup Release 9. Carry Handle Release Button 14. PLEASE...
Manual
Page 4
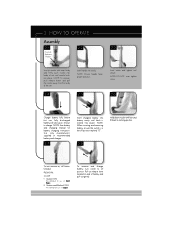
... NOT over tighten screw. 2.6 Charge battery fully before first use on end of the unit. 2.4 Insert handle into place. II - Pull on release lever located on carpet. NOTE: See battery and charging manual for use on , roll button forward. PUSH DIAL: O - To turn switch to charge. Suction and Brushroll ON - 2. To remove and charge battery, turn vacuum on hard floors. NOTE: Ensure handle faces proper direction. 2.5 Insert screw and tighten until...
... NOT over tighten screw. 2.6 Charge battery fully before first use on end of the unit. 2.4 Insert handle into place. II - Pull on release lever located on carpet. NOTE: See battery and charging manual for use on , roll button forward. PUSH DIAL: O - To turn switch to charge. Suction and Brushroll ON - 2. To remove and charge battery, turn vacuum on hard floors. NOTE: Ensure handle faces proper direction. 2.5 Insert screw and tighten until...
Manual
Page 5
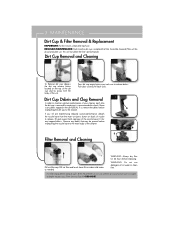
... filter's performance.) Dirt Cup Removal and Cleaning 3.1 3.2 3.3 To Remove dirt cup, depress the dirt cup release button located on the top of the dirt cup and tip away from the main unit (press button on back of nozzle to locate a dealer nearest you still are experiencing reduced suction/performance, detach the nozzle base from the body of your cleaner, each use detergent or hot water to clean filter. A If you . Remove any debris trapped in the dirt tube (A). 3. Filter Service Part...
... filter's performance.) Dirt Cup Removal and Cleaning 3.1 3.2 3.3 To Remove dirt cup, depress the dirt cup release button located on the top of the dirt cup and tip away from the main unit (press button on back of nozzle to locate a dealer nearest you still are experiencing reduced suction/performance, detach the nozzle base from the body of your cleaner, each use detergent or hot water to clean filter. A If you . Remove any debris trapped in the dirt tube (A). 3. Filter Service Part...
Manual
Page 6
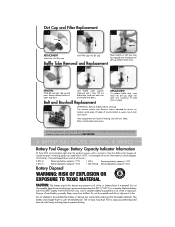
... WARNING: Remove battery before servicing. Do not disassemble and do not dispose of fire or explosion. Baffle Tube Removal and Replacement 3.11 3.12 Place bottom of fire or chemical burn if mistreated. Remove screws indicated by arrows on . Keep away from the battery terminals. Dirt Cup and Filter Replacement 3.8 3.9 3.10 REPLACEMENT Insert filter into dirt cup. Insert filter cap into filter cap. Turn vacuum nozzle over trash can and shake free debris. Lift plate off...
... WARNING: Remove battery before servicing. Do not disassemble and do not dispose of fire or explosion. Baffle Tube Removal and Replacement 3.11 3.12 Place bottom of fire or chemical burn if mistreated. Remove screws indicated by arrows on . Keep away from the battery terminals. Dirt Cup and Filter Replacement 3.8 3.9 3.10 REPLACEMENT Insert filter into dirt cup. Insert filter cap into filter cap. Turn vacuum nozzle over trash can and shake free debris. Lift plate off...
Manual
Page 7
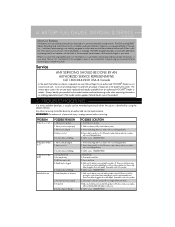
... product.) 5. Product does not pick up dirt 3. Filter may be dirty. 3. Baffle tube may be dirty. 4. Motor protection device tripped. 3. Remove and charge battery or replace with recommended belt and replace nozzle cover. 4. Empty dirt cup. 2. Reassemble nozzle to the product. 5. Remove any debris clogged in this unit are to be paid by using the checklist below. Turn product to preserving our environment and conserving our natural resources. TROUBLESHOOTING If a minor problem...
... product.) 5. Product does not pick up dirt 3. Filter may be dirty. 3. Baffle tube may be dirty. 4. Motor protection device tripped. 3. Remove and charge battery or replace with recommended belt and replace nozzle cover. 4. Empty dirt cup. 2. Reassemble nozzle to the product. 5. Remove any debris clogged in this unit are to be paid by using the checklist below. Turn product to preserving our environment and conserving our natural resources. TROUBLESHOOTING If a minor problem...


