User Manual
Page 1
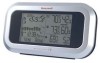
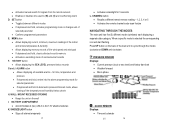
... YOUR WEATHER FORECASTER 18 BACKLIGHT 19 USING DIFFERENT DISPLAY WINDOWS 19 PRESSURE WINDOW 19 CLOCK WINDOW 23 SUNRISE/SUNSET WINDOW 29 Honeywell TEMPERATURE AND HUMIDITY WINDOW 32 Long-Range Weather Forecaster with Wind Speed WIND WINDOW 35 MAINTANANCE 37 TROUBLESHOOTING 38 PRECAUTIONS 38 APPENDIX - CITY CODES 39 SPECIFICATIONS 41 FCC STATEMENT 43 DECLARATION OF CONFORMITY 44 STANDARD WARRANTY INFORMATION 45 (TE852W) USER MANUAL 2
... YOUR WEATHER FORECASTER 18 BACKLIGHT 19 USING DIFFERENT DISPLAY WINDOWS 19 PRESSURE WINDOW 19 CLOCK WINDOW 23 SUNRISE/SUNSET WINDOW 29 Honeywell TEMPERATURE AND HUMIDITY WINDOW 32 Long-Range Weather Forecaster with Wind Speed WIND WINDOW 35 MAINTANANCE 37 TROUBLESHOOTING 38 PRECAUTIONS 38 APPENDIX - CITY CODES 39 SPECIFICATIONS 41 FCC STATEMENT 43 DECLARATION OF CONFORMITY 44 STANDARD WARRANTY INFORMATION 45 (TE852W) USER MANUAL 2

User Manual
Page 2
... Speed TE852W operates at 433MHz radio frequency, so no wire installation is critical to assemble and power up all remote weather sensors BEFORE setting up to measure and transmit a wind speed data. Remote wind speed meter must be measured. INTRODUCTION Thank you for selecting the Honeywell Long-Range Weather Forecaster with wrench tool for Wind Speed Meter • One User Manual Please keep this manual...
... Speed TE852W operates at 433MHz radio frequency, so no wire installation is critical to assemble and power up all remote weather sensors BEFORE setting up to measure and transmit a wind speed data. Remote wind speed meter must be measured. INTRODUCTION Thank you for selecting the Honeywell Long-Range Weather Forecaster with wrench tool for Wind Speed Meter • One User Manual Please keep this manual...
User Manual
Page 3
... using rechargeable batteries. (Rechargeable batteries cannot maintain correct power requirements) • ALWAYS install batteries in the remote weather sensors before the main unit • Insert batteries before first use, matching the polarity in hanger A. IMPORTANT: Make sure that it faces the main unit (receiver), minimizing obstructions such as the dirt and debris may have reduced voltage supply and a shorter effective range. LED INDICATOR • Flashes...
... using rechargeable batteries. (Rechargeable batteries cannot maintain correct power requirements) • ALWAYS install batteries in the remote weather sensors before the main unit • Insert batteries before first use, matching the polarity in hanger A. IMPORTANT: Make sure that it faces the main unit (receiver), minimizing obstructions such as the dirt and debris may have reduced voltage supply and a shorter effective range. LED INDICATOR • Flashes...

User Manual
Page 4
... battery compartment with a free air circulation and sheltered from the direct sunlight and an extreme weather conditions. • Ideally, place the thermo-hygrometer sensor above the ground. B. RESET • Resets all previous settings D. MOUNTING • The remote thermo-hygrometer sensor can be placed in the area with a small Phillips screwdriver. • Set the channel 1 through 3. OPERATION Immediately after batteries are correctly installed, the remote...
... battery compartment with a free air circulation and sheltered from the direct sunlight and an extreme weather conditions. • Ideally, place the thermo-hygrometer sensor above the ground. B. RESET • Resets all previous settings D. MOUNTING • The remote thermo-hygrometer sensor can be placed in the area with a small Phillips screwdriver. • Set the channel 1 through 3. OPERATION Immediately after batteries are correctly installed, the remote...

User Manual
Page 6
... wind gust averages and memory • Operating range from US Atomic clock • 12 or 24 hour time format • Manual adjustment of time and date • Calendar displaying date with the geographical information entered by trees, metal structures and electronic appliances. • Test reception before permanently mounting all remote weather sensors. atomic time data from the wireless devices (such as cordless phones, radio headsets, baby listening devices) and electronic...
... wind gust averages and memory • Operating range from US Atomic clock • 12 or 24 hour time format • Manual adjustment of time and date • Calendar displaying date with the geographical information entered by trees, metal structures and electronic appliances. • Test reception before permanently mounting all remote weather sensors. atomic time data from the wireless devices (such as cordless phones, radio headsets, baby listening devices) and electronic...
User Manual
Page 7
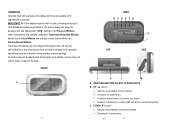
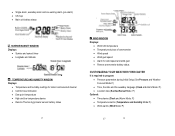
... 14 FRONT A 13 REAR B CDEFG H I TOP SIDE J K L M A. WEATHER AND TIME IN EASY-TO READ DIGITS B. IMPORTANT: All of the display functions will be locked, allowing setting your altitude, use the main unit control panel, located on the back. UP ( ▲) button • Selects next available mode clockwise • Increases the parameters • Activates manual search for a moment. If pressure and altitude...
... 14 FRONT A 13 REAR B CDEFG H I TOP SIDE J K L M A. WEATHER AND TIME IN EASY-TO READ DIGITS B. IMPORTANT: All of the display functions will be locked, allowing setting your altitude, use the main unit control panel, located on the back. UP ( ▲) button • Selects next available mode clockwise • Increases the parameters • Activates manual search for a moment. If pressure and altitude...
User Manual
Page 8
... alkaline batteries K. for time, temperature and pressure • If depressed and hold, enters into the alarm programming mode for signals from the remote sensors • Enables or disables time alarms (W) and (S) and Ice Warning Alarm D. SNOOZE/LIGHT button • Stops all available alarms - PRESSURE WINDOW Displays: • Current pressure (local or sea level) and history bar-chart • Weather forecast • Moon phase CLOCK WINDOW Displays: • Time and calendar...
... alkaline batteries K. for time, temperature and pressure • If depressed and hold, enters into the alarm programming mode for signals from the remote sensors • Enables or disables time alarms (W) and (S) and Ice Warning Alarm D. SNOOZE/LIGHT button • Stops all available alarms - PRESSURE WINDOW Displays: • Current pressure (local or sea level) and history bar-chart • Weather forecast • Moon phase CLOCK WINDOW Displays: • Time and calendar...
User Manual
Page 9
... Displays: • Wind Chill temperature • Temperature at place of anemometer • Wind speed • Wind gust speed • Alarm for wind speed and wind gust • Remote anemometer battery status CUSTOMAZING YOUR WEATHER FORECASTER It is required to program: • Pressure parameters during Initial Setup (See Pressure and Weather Forecast Mode P.) • Time, the date and the weekday language (Clock and Alarm Mode...
... Displays: • Wind Chill temperature • Temperature at place of anemometer • Wind speed • Wind gust speed • Alarm for wind speed and wind gust • Remote anemometer battery status CUSTOMAZING YOUR WEATHER FORECASTER It is required to program: • Pressure parameters during Initial Setup (See Pressure and Weather Forecast Mode P.) • Time, the date and the weekday language (Clock and Alarm Mode...
User Manual
Page 10
... adjusted according to adjust an altitude value. Press and hold SET until the weather forecast icon display starts flashing. 19 on the upper left of the SETTING PRESSURE PARAMETERS IMPORTANT: During the main unit initial setup, after main unit powered up for the advanced setting. • Press SET to know pressure changes in your specific location (house), then LOCAL barometric pressure should be programmed...
... adjusted according to adjust an altitude value. Press and hold SET until the weather forecast icon display starts flashing. 19 on the upper left of the SETTING PRESSURE PARAMETERS IMPORTANT: During the main unit initial setup, after main unit powered up for the advanced setting. • Press SET to know pressure changes in your specific location (house), then LOCAL barometric pressure should be programmed...
User Manual
Page 11
... MEMORY until the altitude unit is displayed, press HISTORY repeatedly viewing the sea level pressure history for the quick digits advance. • Press SET to confirm selection. VIEWING SEA LEVEL PRESSURE HISTORY • In any mode, press HISTORY button entering the sea level pressure display. • When the SEA LEVEL is flashing. • Set the altitude unit in meters or...
... MEMORY until the altitude unit is displayed, press HISTORY repeatedly viewing the sea level pressure history for the quick digits advance. • Press SET to confirm selection. VIEWING SEA LEVEL PRESSURE HISTORY • In any mode, press HISTORY button entering the sea level pressure display. • When the SEA LEVEL is flashing. • Set the altitude unit in meters or...
User Manual
Page 12
...; If Weekday alarm is activated, it will sound at the set automatically. In case of the manual programming, select the code USR (user) from the city codes list, then you would need to enter all necessary location data (longitude, latitude, time zone and daylight savings time adjustment) will not activate on subsequent days. • The Ice Warning Alarm is activated at programmed time interval (from the codes list programmed in English, German, French...
...; If Weekday alarm is activated, it will sound at the set automatically. In case of the manual programming, select the code USR (user) from the city codes list, then you would need to enter all necessary location data (longitude, latitude, time zone and daylight savings time adjustment) will not activate on subsequent days. • The Ice Warning Alarm is activated at programmed time interval (from the codes list programmed in English, German, French...
User Manual
Page 13
..." will flash prompting to enter the Time Zone setting mode (the Time Zone data is complete the display will return to display the Weekday Alarm (W), Single Alarm (S) or Ice Warning Alarm (Pre-Al) time. format, hour and minutes • Press SET every time to confirm each selection and move to the next MANUAL PROGRAMMING • In the Clock Window, press and hold SET button until the hour digit will flash • Set the alarm hour using the UP...
..." will flash prompting to enter the Time Zone setting mode (the Time Zone data is complete the display will return to display the Weekday Alarm (W), Single Alarm (S) or Ice Warning Alarm (Pre-Al) time. format, hour and minutes • Press SET every time to confirm each selection and move to the next MANUAL PROGRAMMING • In the Clock Window, press and hold SET button until the hour digit will flash • Set the alarm hour using the UP...
User Manual
Page 14
... specific alarm mode and press ALARM again to keep the clock accuracy within 1 second. • Make sure the unit is programmed that receives the atomic time signal from the WWVB station. A single daily reception is sufficient enough to disable this WWVB signal through Friday. the snooze interval digits will return to confirm selection • Set the alarm minutes using UP or DOWN. After the clock is completed, the display will flash...
... specific alarm mode and press ALARM again to keep the clock accuracy within 1 second. • Make sure the unit is programmed that receives the atomic time signal from the WWVB station. A single daily reception is sufficient enough to disable this WWVB signal through Friday. the snooze interval digits will return to confirm selection • Set the alarm minutes using UP or DOWN. After the clock is completed, the display will flash...
User Manual
Page 15
... your specific location, select "USR" as a city code. • Press SET to confirm your area by pressing the UP or DOWN. tower icon will flash PROGRAMMING LATITUDE, LONGITUDE, TIME ZONE AND DST • Press UP or DOWN to adjust the digits. for different dates. Icon Atomic Time Reception Strength (Flashing) Undefined data Reception failed for the past 24 hours Weak signal, but can be displayed in the Clock Window...
... your specific location, select "USR" as a city code. • Press SET to confirm your area by pressing the UP or DOWN. tower icon will flash PROGRAMMING LATITUDE, LONGITUDE, TIME ZONE AND DST • Press UP or DOWN to adjust the digits. for different dates. Icon Atomic Time Reception Strength (Flashing) Undefined data Reception failed for the past 24 hours Weak signal, but can be displayed in the Clock Window...
User Manual
Page 16
... below the pre-set upper and lower limits. No sunset for all channels. A temperature alert function is capable of detecting and displaying the current indoor comfort levels of surrounding environment. COMFORT LEVEL INDICATION The main unit is available for whole day the whole day 31 TEMPERATURE AND HUMIDITY WINDOW The Weather Forecaster supports up to 5 remote thermo-hygrometers...
... below the pre-set upper and lower limits. No sunset for all channels. A temperature alert function is capable of detecting and displaying the current indoor comfort levels of surrounding environment. COMFORT LEVEL INDICATION The main unit is available for whole day the whole day 31 TEMPERATURE AND HUMIDITY WINDOW The Weather Forecaster supports up to 5 remote thermo-hygrometers...
User Manual
Page 17
..., press and hold ALARM button until the remote temperature and ▲or ▼ icon starts flashing. • Adjust the temperature digits for all channels. Each valid channel will flash. VIEWING REMOTE (CHANNEL) TEMPERATURE AND HUMIDITY Static Display: In Temperature and Humidity Window, press the CHANNEL button to recall a different channel. Channel Auto-Scan Display: To enable automatic scan of the corresponding remote sensor: Icon...
..., press and hold ALARM button until the remote temperature and ▲or ▼ icon starts flashing. • Adjust the temperature digits for all channels. Each valid channel will flash. VIEWING REMOTE (CHANNEL) TEMPERATURE AND HUMIDITY Static Display: In Temperature and Humidity Window, press the CHANNEL button to recall a different channel. Channel Auto-Scan Display: To enable automatic scan of the corresponding remote sensor: Icon...
User Manual
Page 18
... the temperature adjusted to activate or deactivate it. RESETTING STATISTICS MEMORY In the Wind Window, press and hold SET to display either a temperature at anemometer with a "GUST DAILY MAX" displayed. When the wind alarm is disabled, "OFF" will be displayed in km/h, mph, m/s or knots. Searching for the signals from remote sensors by pressing and holding DOWN button. WIND WINDOW...
... the temperature adjusted to activate or deactivate it. RESETTING STATISTICS MEMORY In the Wind Window, press and hold SET to display either a temperature at anemometer with a "GUST DAILY MAX" displayed. When the wind alarm is disabled, "OFF" will be displayed in km/h, mph, m/s or knots. Searching for the signals from remote sensors by pressing and holding DOWN button. WIND WINDOW...
User Manual
Page 19
... properly installed, the remote weather sensor will flash. • Set the alarm using the UP or DOWN. speed or wind gust speed) • Press and hold either button for fast digits advance. • Press ALARM to confirm your weather sensors in the best possible way. Do not mix old and new batteries • Replace the battery compartment door CHANGING BATTERIES IN REMOTE SENSORS • Replace the batteries following the setup instructions...
... properly installed, the remote weather sensor will flash. • Set the alarm using the UP or DOWN. speed or wind gust speed) • Press and hold either button for fast digits advance. • Press ALARM to confirm your weather sensors in the best possible way. Do not mix old and new batteries • Replace the battery compartment door CHANGING BATTERIES IN REMOTE SENSORS • Replace the batteries following the setup instructions...
User Manual
Page 21
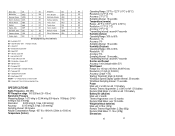
...DST SH = Havana, Cuba DST SI = Iraq and Syria DST SK = Irkutsk & Moscow DST SM = Montevideo, Uruguay DST SN = Namibia DST SP = Paraguay DST SQ = Iran DST maybe changed annually. ST = Tasmania DST SU = Standard American DST. ON = Always add 1 hour to the local standard time SPECIFICATIONS Radio Frequency: 433 MHz RF Reception...2 NO Naples, Italy NAP 1 SE Vienna, Austria VIE 1 SE New Delhi, India DEL 5.5 NO Warsaw, Poland WAW 1 SE Odessa, Ukraine ODS 2 SE Zürich, Switzerland ZRH 1 SE Osaka, Japan KIX 9 NO DST (Daylight Savings Time) definitions: SA =...
...DST SH = Havana, Cuba DST SI = Iraq and Syria DST SK = Irkutsk & Moscow DST SM = Montevideo, Uruguay DST SN = Namibia DST SP = Paraguay DST SQ = Iran DST maybe changed annually. ST = Tasmania DST SU = Standard American DST. ON = Always add 1 hour to the local standard time SPECIFICATIONS Radio Frequency: 433 MHz RF Reception...2 NO Naples, Italy NAP 1 SE Vienna, Austria VIE 1 SE New Delhi, India DEL 5.5 NO Warsaw, Poland WAW 1 SE Odessa, Ukraine ODS 2 SE Zürich, Switzerland ZRH 1 SE Osaka, Japan KIX 9 NO DST (Daylight Savings Time) definitions: SA =...
User Manual
Page 22
... instructions, may cause undesired operation. Warning: Changes or modification to Part 15 of the FCC Rules. This equipment, installed and used as a contact for a Class B Digital device, pursuant to this equipment does cause harmful interference to radio or television reception, which can be used in a particular installation. Operation is no guarantee that interference will not occur in accordance with the limits for support...
... instructions, may cause undesired operation. Warning: Changes or modification to Part 15 of the FCC Rules. This equipment, installed and used as a contact for a Class B Digital device, pursuant to this equipment does cause harmful interference to radio or television reception, which can be used in a particular installation. Operation is no guarantee that interference will not occur in accordance with the limits for support...

