Owners Manual
Page 1
ARIUS™ 19" Wide LCD Monitor Owner's Manual
ARIUS™ 19" Wide LCD Monitor Owner's Manual

Owners Manual
Page 3
Table of Contents Before You Start Compliance Information 2 Important Safety Instructions 3 Copyright Information 4 Getting Started Unwrapping The Monitor 5 Package Contents 5 Quick Installation ...9 Adjusting The Visual Angle 7 Using the LCD Display Operation Of The Control Panel 8 Using The On Screen Display (OSD) Menu 8 Adjusting The Screen Automatically 9 OSD Options ...9 Other Information Specifications ...10 Troubleshooting ...11 Customer Support 12 Cleaning the LCD Display 13 Warranty Information 14 Product Registration 15-16 - 1 -
Table of Contents Before You Start Compliance Information 2 Important Safety Instructions 3 Copyright Information 4 Getting Started Unwrapping The Monitor 5 Package Contents 5 Quick Installation ...9 Adjusting The Visual Angle 7 Using the LCD Display Operation Of The Control Panel 8 Using The On Screen Display (OSD) Menu 8 Adjusting The Screen Automatically 9 OSD Options ...9 Other Information Specifications ...10 Troubleshooting ...11 Customer Support 12 Cleaning the LCD Display 13 Warranty Information 14 Product Registration 15-16 - 1 -
Owners Manual
Page 4
... interference. The equipment will take place even after a specific installation mode. In this case, some protective measures should be taken by the test proof the restriction of the relevant B series digital device of the receiving antenna. - Compliance Information FCC Safety Compliance The equipment meets by its user. - 2 - Change the direction or the location of Article 15, FCC...
... interference. The equipment will take place even after a specific installation mode. In this case, some protective measures should be taken by the test proof the restriction of the relevant B series digital device of the receiving antenna. - Compliance Information FCC Safety Compliance The equipment meets by its user. - 2 - Change the direction or the location of Article 15, FCC...
Owners Manual
Page 5
... cable resulting in a moist environment may adversely affect its intended performance, shorten its life and increase the risk of power surges and could cause further damage to fix or replace any object on , bend or place any internal parts by yourself. The display contains parts that store electricity even after the monitor is off the monitor and detach the power cord...
... cable resulting in a moist environment may adversely affect its intended performance, shorten its life and increase the risk of power surges and could cause further damage to fix or replace any object on , bend or place any internal parts by yourself. The display contains parts that store electricity even after the monitor is off the monitor and detach the power cord...
Owners Manual
Page 6
... of such revision or changes. No part of their respective companies. - 4 - Trademark Acknowledgments: - The Honeywell trademark is protected by Soyo Inc. All specifications and information are reserved. General Disclaimer: We have made every effort to change the specification without obligation to any person of their respective owners. We reserve the rights to make any changes without notice. Other names...
... of such revision or changes. No part of their respective companies. - 4 - Trademark Acknowledgments: - The Honeywell trademark is protected by Soyo Inc. All specifications and information are reserved. General Disclaimer: We have made every effort to change the specification without obligation to any person of their respective owners. We reserve the rights to make any changes without notice. Other names...
Owners Manual
Page 7
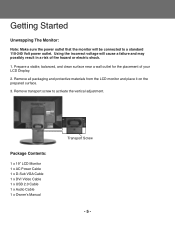
... a risk of your LCD Display. 2. Using the incorrect voltage will be connected to activate the vertical adjustment. Prepare a stable, balanced, and clean surface near a wall outlet for the placement of fire hazard or electric shock. 1. Remove all packaging and protective materials from the LCD monitor and place it on the prepared surface. 3. Package Contents: 1 x 19" LCD Monitor 1 x AC Power Cable 1 x D-Sub VGA Cable 1 x DVI Video Cable 1 x USB 2.0 Cable 1 x Audio Cable 1 x Owner's Manual Transport Screw - 5 - Remove transport screw to a standard 110...
... a risk of your LCD Display. 2. Using the incorrect voltage will be connected to activate the vertical adjustment. Prepare a stable, balanced, and clean surface near a wall outlet for the placement of fire hazard or electric shock. 1. Remove all packaging and protective materials from the LCD monitor and place it on the prepared surface. 3. Package Contents: 1 x 19" LCD Monitor 1 x AC Power Cable 1 x D-Sub VGA Cable 1 x DVI Video Cable 1 x USB 2.0 Cable 1 x Audio Cable 1 x Owner's Manual Transport Screw - 5 - Remove transport screw to a standard 110...

Owners Manual
Page 8
Quick Installation Connecting The Monitor To The PC: 1. Turn on the back of the video cable with the built-in order to ensure a good connection. 3. Audio Connector 05. USB 2.0 06. VGA Connector 02. DVI Connector 03. USB 2.0 07. USB 2.0 09. USB 2.0 AC Power Input DVI Digital Signal Input VGA Analog Signal Input Audio Input Input Output Output Output Output - 6 - Fasten each end of your electronics from damage caused by unstable power or power surges. 5. Power Connector Upward / Downward Adjustment 01. Power Connector 02. Connect one end of the AC Power...
Quick Installation Connecting The Monitor To The PC: 1. Turn on the back of the video cable with the built-in order to ensure a good connection. 3. Audio Connector 05. USB 2.0 06. VGA Connector 02. DVI Connector 03. USB 2.0 07. USB 2.0 09. USB 2.0 AC Power Input DVI Digital Signal Input VGA Analog Signal Input Audio Input Input Output Output Output Output - 6 - Fasten each end of your electronics from damage caused by unstable power or power surges. 5. Power Connector Upward / Downward Adjustment 01. Power Connector 02. Connect one end of the AC Power...

Owners Manual
Page 9
... desired height Vertical Tilt - Note: Transport screw must be removed to the screen Adjustments: Vertical Height - Lift up and press down on the sides of the display to horizontally swivel the monitor to your documents in either portrait or landscape mode 180° Left or Right Swivel 90° Counter-Clockwise Rotation 3.5" Upward / Downward Adjustment 30° Backward Tilt / 15° Forward Tilt To turn the monitor 90...
... desired height Vertical Tilt - Note: Transport screw must be removed to the screen Adjustments: Vertical Height - Lift up and press down on the sides of the display to horizontally swivel the monitor to your documents in either portrait or landscape mode 180° Left or Right Swivel 90° Counter-Clockwise Rotation 3.5" Upward / Downward Adjustment 30° Backward Tilt / 15° Forward Tilt To turn the monitor 90...
Owners Manual
Page 10
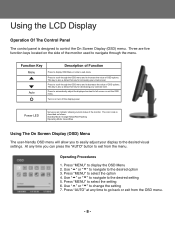
... display the OSD Menu 2. Press "MENU" to control the On Screen Display (OSD) menu. Using the LCD Display Operation Of The Control Panel The control panel is designed to select the option 4. At any time to navigate through the menu. Three are five function keys located on or turn off the display power Power LED Serves as follows: Standby Mode: Orange/Yellow/Red Flashing Operating Mode: Green/Blue Using The On Screen Display (OSD) Menu The user-friendly OSD menu will allow you can press the "AUTO" button...
... display the OSD Menu 2. Press "MENU" to control the On Screen Display (OSD) menu. Using the LCD Display Operation Of The Control Panel The control panel is designed to select the option 4. At any time to navigate through the menu. Three are five function keys located on or turn off the display power Power LED Serves as follows: Standby Mode: Orange/Yellow/Red Flashing Operating Mode: Green/Blue Using The On Screen Display (OSD) Menu The user-friendly OSD menu will allow you can press the "AUTO" button...
Owners Manual
Page 11
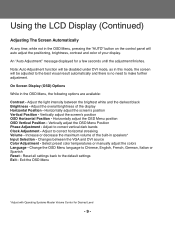
... LCD Display (Continued) Adjusting The Screen Automatically At any time, while not in the OSD Menu, pressing the "AUTO" button on the control panel will be adjusted to the best visual result automatically and there is no need to Chinese, English, French, German, Italian or Spanish Reset - An "Auto Adjustment" message displayed for Desired Level - 9 - Adjust the overall brightness of the display Horizontal Position - Adjust to correct horizontal streaking Volume - Changes between the brightest white and the darkest black Brightness...
... LCD Display (Continued) Adjusting The Screen Automatically At any time, while not in the OSD Menu, pressing the "AUTO" button on the control panel will be adjusted to the best visual result automatically and there is no need to Chinese, English, French, German, Italian or Spanish Reset - An "Auto Adjustment" message displayed for Desired Level - 9 - Adjust the overall brightness of the display Horizontal Position - Adjust to correct horizontal streaking Volume - Changes between the brightest white and the darkest black Brightness...
Owners Manual
Page 13
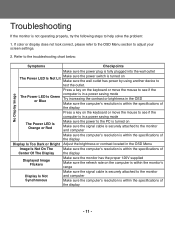
... Bright Adjust the brightness or contrast located in the OSD Menu Image Is Not On The Center Of The Display Make sure the computer's resolution is within the specifications of the display Displayed Image Flickers Make sure the monitor has the proper 120V supplied Make sure the refresh rate on the computer is within the specifications of the display Press a key on Make sure the signal cable is securely attached to test the outlet. Troubleshooting If the monitor...
... Bright Adjust the brightness or contrast located in the OSD Menu Image Is Not On The Center Of The Display Make sure the computer's resolution is within the specifications of the display Displayed Image Flickers Make sure the monitor has the proper 120V supplied Make sure the refresh rate on the computer is within the specifications of the display Press a key on Make sure the signal cable is securely attached to test the outlet. Troubleshooting If the monitor...

Owners Manual
Page 14
... to change the specification without further notice to any person of this document may therefore not coincide with regard to the performance or use of this document. Soyo Inc. We reserve the rights to make any changes without notice and may be photocopied, reproduced, or translated into another publication. Customer Support For Technical support or product service, please...
... to change the specification without further notice to any person of this document may therefore not coincide with regard to the performance or use of this document. Soyo Inc. We reserve the rights to make any changes without notice and may be photocopied, reproduced, or translated into another publication. Customer Support For Technical support or product service, please...

Owners Manual
Page 15
...clean the display. 2. For your safety, please turn off dirt: For best results, use on the screen. 2. Using the following cleaning compounds are not recommended for use a damp cloth and softly wipe the screen. Immediately after , use a soft material to remove any liquid directly onto the monitor. Cleaning off dust: For best results, it is recommended to use... damage to remove any remaining moisture. Cleaning off dust or dirt: For best results, use a rough object or cloth on the screen. - 13 - Cleaning off the power switch and unplug the monitor before you use a soft,...
...clean the display. 2. For your safety, please turn off dirt: For best results, use on the screen. 2. Using the following cleaning compounds are not recommended for use a damp cloth and softly wipe the screen. Immediately after , use a soft material to remove any liquid directly onto the monitor. Cleaning off dust: For best results, it is recommended to use... damage to remove any remaining moisture. Cleaning off dust or dirt: For best results, use a rough object or cloth on the screen. - 13 - Cleaning off the power switch and unplug the monitor before you use a soft,...
Owners Manual
Page 16
...the terms and conditions set forth within fifteen (15) days of purchase of the original warranty period. For more detail information and tips please check www.honeywellce.com End-User Three Year Limited Warranty Honeywell International Inc. If the...use its best efforts to change without notice. You are subject to service Products within the continental United States, Hawaii, Alaska or Canada for the remainder of any product not purchased from defects in become lost or stolen. SOYO, Inc. Repaired or Replaced Products: All repaired or replaced parts or Products shall be free...
...the terms and conditions set forth within fifteen (15) days of purchase of the original warranty period. For more detail information and tips please check www.honeywellce.com End-User Three Year Limited Warranty Honeywell International Inc. If the...use its best efforts to change without notice. You are subject to service Products within the continental United States, Hawaii, Alaska or Canada for the remainder of any product not purchased from defects in become lost or stolen. SOYO, Inc. Repaired or Replaced Products: All repaired or replaced parts or Products shall be free...
Owners Manual
Page 17
... also help us to return this opportunity. The Honeywell trademark is your needs and desires. under license from a number of warranty claims. The additional information will be able to the specific interests, hobbies and other information indicated above. Product Registration Part 1 MR. MRS. MS. MISS. Failure to develop new products that best meet your product registration card. Part 3 WHERE...
... also help us to return this opportunity. The Honeywell trademark is your needs and desires. under license from a number of warranty claims. The additional information will be able to the specific interests, hobbies and other information indicated above. Product Registration Part 1 MR. MRS. MS. MISS. Failure to develop new products that best meet your product registration card. Part 3 WHERE...

Owners Manual
Page 20
... SOYO, Inc. under license from Honeywell International Inc. All specifications and information are the property of their respective owners. All trademarks mentioned or listed herein are subject to operating conditions. Actual performance may vary due to change without notice. We are not responsible for typographical and photographical errors. The Honeywell trademark is used by SOYO, Inc. 1420 S.
... SOYO, Inc. under license from Honeywell International Inc. All specifications and information are the property of their respective owners. All trademarks mentioned or listed herein are subject to operating conditions. Actual performance may vary due to change without notice. We are not responsible for typographical and photographical errors. The Honeywell trademark is used by SOYO, Inc. 1420 S.

