
Instruction Manual
Page 1
... disconnect the humidifier, first turn controls to children. 3. A loose fit between the AC outlet (receptacle) and plug may not work properly on a firm, flat and level surface. WARM MOISTURE POWER MODE 45% HUMIDIFIER HWM-250, HWM-255, HWM-260, HWM-270 Series MODE IMPORTANT SAFETY INSTRUCTIONS READ AND SAVE THESE SAFETY INSTRUCTIONS BEFORE USING THIS HUMIDIFIER When using the humidifier, check the power cord for repair. 5. Always place this manual. 11. This humidifier may...
... disconnect the humidifier, first turn controls to children. 3. A loose fit between the AC outlet (receptacle) and plug may not work properly on a firm, flat and level surface. WARM MOISTURE POWER MODE 45% HUMIDIFIER HWM-250, HWM-255, HWM-260, HWM-270 Series MODE IMPORTANT SAFETY INSTRUCTIONS READ AND SAVE THESE SAFETY INSTRUCTIONS BEFORE USING THIS HUMIDIFIER When using the humidifier, check the power cord for repair. 5. Always place this manual. 11. This humidifier may...
Instruction Manual
Page 2
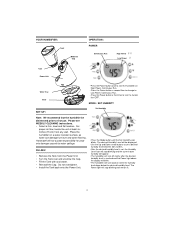
... desired humidity level. The desired Humidity Level will be disinfected prior to first use. Do not overtighten. • Install the Tank back onto the Power Unit. • Press the Mode button until the Set Humidity icon blinks. YOUR HUMIDIFIER: Tank Medicine Cup Cap Power Unit POWER MODE 45% OPERATION: POWER Continuous Run High Power Low Power Water Tray Base SET-UP: • Press the Power button once to start the humidifier on High Power, Continuous Run. • Press the Power button a second time to change to Low Power, Continuous Run...
... desired humidity level. The desired Humidity Level will be disinfected prior to first use. Do not overtighten. • Install the Tank back onto the Power Unit. • Press the Mode button until the Set Humidity icon blinks. YOUR HUMIDIFIER: Tank Medicine Cup Cap Power Unit POWER MODE 45% OPERATION: POWER Continuous Run High Power Low Power Water Tray Base SET-UP: • Press the Power button once to start the humidifier on High Power, Continuous Run. • Press the Power button a second time to change to Low Power, Continuous Run...
Instruction Manual
Page 3
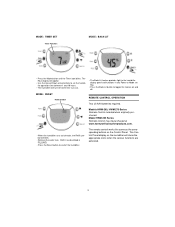
... of water, the Refill symbol will turn-off when time runs out. • The Back-Lit feature provides light to the humidifier display panel and functions in FILLING. • Press the Reset button to toggle this feature on and off. Models HWM-260, HWM-270 Series Remote Control included when originally purchased. The Control Panel display on the Control Panel. MODE: RESET Refill Symbol REMOTE CONTROL OPERATION Two (2) AAA batteries required. MODE: TIMER SET...
... of water, the Refill symbol will turn-off when time runs out. • The Back-Lit feature provides light to the humidifier display panel and functions in FILLING. • Press the Reset button to toggle this feature on and off. Models HWM-260, HWM-270 Series Remote Control included when originally purchased. The Control Panel display on the Control Panel. MODE: RESET Refill Symbol REMOTE CONTROL OPERATION Two (2) AAA batteries required. MODE: TIMER SET...

Instruction Manual
Page 4
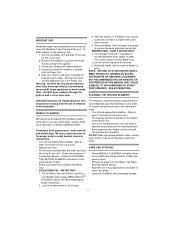
... the desired humidity level is set, the Humidity Level icon will stop blinking and remain lit. POWER High Power Low Power MODE: SET TIMER Set Timer Mode Basic Remote Power LCD Remote Adjust Up or Down Basic Remote LCD Remote • Press the Power button once to start the humidifier on High Power, Continuous Run. • Press the Power button a second time to change to Low Power, Continuous Run. • Press the Power button a third time to set the humidifier operation time between...
... the desired humidity level is set, the Humidity Level icon will stop blinking and remain lit. POWER High Power Low Power MODE: SET TIMER Set Timer Mode Basic Remote Power LCD Remote Adjust Up or Down Basic Remote LCD Remote • Press the Power button once to start the humidifier on High Power, Continuous Run. • Press the Power button a second time to change to Low Power, Continuous Run. • Press the Power button a third time to set the humidifier operation time between...
Instruction Manual
Page 5
... a cool, dry place. • Clean the humidifier after prolonged storage. 5 Fill the Water Tank with water until the smell of bleach is heavy. • Empty any liquid medicines other than those specifically recommended for use any water from the Base and Water Tray. • SCALE REMOVAL - Pour some solution into the Power Unit. 5. Rinse with 1 teaspoon of household bleach and 1 gallon of the heating element. Follow the CLEANING THE HEATING ELEMENT instructions...
... a cool, dry place. • Clean the humidifier after prolonged storage. 5 Fill the Water Tank with water until the smell of bleach is heavy. • Empty any liquid medicines other than those specifically recommended for use any water from the Base and Water Tray. • SCALE REMOVAL - Pour some solution into the Power Unit. 5. Rinse with 1 teaspoon of household bleach and 1 gallon of the heating element. Follow the CLEANING THE HEATING ELEMENT instructions...

Instruction Manual
Page 6
.... • The Moisture level is set according to the manual, but the Refill icon is found to be set too low. DO NOT ATTEMPT TO OPEN OR REPAIR THE HUMIDIFIER YOURSELF. To upgrade your humidifier or to get a listing of care and cleaning products for your product on . • The humidity level my be set too high. This 5 year limited warranty applies to repair or replacement of product found to be no difference in material...
.... • The Moisture level is set according to the manual, but the Refill icon is found to be set too low. DO NOT ATTEMPT TO OPEN OR REPAIR THE HUMIDIFIER YOURSELF. To upgrade your humidifier or to get a listing of care and cleaning products for your product on . • The humidity level my be set too high. This 5 year limited warranty applies to repair or replacement of product found to be no difference in material...
Instruction Manual
Page 7
... repair or from any use not in accordance with store policy. Thereafter, while within the warranty period defective product may be returned to the place of purchase and a $10 US/$14.50 CAN check or money order for handling, return packing and shipping charges. Return defective product to Honeywell Consumer Products with the instruction manual. should be returned to Honeywell...
... repair or from any use not in accordance with store policy. Thereafter, while within the warranty period defective product may be returned to the place of purchase and a $10 US/$14.50 CAN check or money order for handling, return packing and shipping charges. Return defective product to Honeywell Consumer Products with the instruction manual. should be returned to Honeywell...


