
User Guide
Page 5
... Remote Access 26 Connecting Alarm Inputs and Outputs 27 Connecting USB Ports 28 Factory Reset 29 Connecting the Power Cord 29 3 Configuration 31 Front Panel Controls 31 Turning on the Power 34 Initial Unit Setup 34 Logging In 35 Setup Screen 35 Network & Notification Setup 52 Configuring Devices 62 Recording Settings...
... Remote Access 26 Connecting Alarm Inputs and Outputs 27 Connecting USB Ports 28 Factory Reset 29 Connecting the Power Cord 29 3 Configuration 31 Front Panel Controls 31 Turning on the Power 34 Initial Unit Setup 34 Logging In 35 Setup Screen 35 Network & Notification Setup 52 Configuring Devices 62 Recording Settings...

User Guide
Page 8
... Settings Screen 66 Alarm-Out Schedule Screen 67 Display OSD Screen 69 OSD Margin Screen 70 Main Monitor Screen 70 Spot Monitor Screen 72 Remote Control Setup Screen 72 Record Menu 73 Record Setup Screen 74 Schedule Setup Screen 76 Default Setup Screen 77 Pre-Event Setup Screen 78 Event Menu...
... Settings Screen 66 Alarm-Out Schedule Screen 67 Display OSD Screen 69 OSD Margin Screen 70 Main Monitor Screen 70 Spot Monitor Screen 72 Remote Control Setup Screen 72 Record Menu 73 Record Setup Screen 74 Schedule Setup Screen 76 Default Setup Screen 77 Pre-Event Setup Screen 78 Event Menu...
User Guide
Page 9
... Screen 101 Check Recording Screen 102 Storage Screen 103 S.M.A.R.T Setup Screen 103 System Event Actions Screen 105 Event Status Screen 106 DVR Front Panel and Controls 107 Page Sequence 111 Mouse Menu 112 Mouse Display Menu 113 Sequence Menu 115 PTZ Select Camera Menu 116 PTZ Preset Screen 117 Preset View...
... Screen 101 Check Recording Screen 102 Storage Screen 103 S.M.A.R.T Setup Screen 103 System Event Actions Screen 105 Event Status Screen 106 DVR Front Panel and Controls 107 Page Sequence 111 Mouse Menu 112 Mouse Display Menu 113 Sequence Menu 115 PTZ Select Camera Menu 116 PTZ Preset Screen 117 Preset View...

User Guide
Page 11
...4-9 Table 4-10 Table 4-11 Table 4-12 Table 4-13 Table 4-14 Table D-1 Table D-2 Table D-3 Rear Panel Connections 24 16-Channel DVR Front Panel Controls 32 Virtual Keyboard Keys 36 Storage Status Information 46 New Group Authority Level Assignments 49 Modem Setup Screen Options 56 DVRNS Setup Screen Options 58...Settings Tab 67 Alarm-Out Schedule Options 68 Record Setup Screen Options 74 Motion Detection Zone Setup Screen Menu 86 Front Panel Controls 107 Mouse Functions 112 Right Mouse Button Menu Functions 112 Mouse Display Menu Functions 113 PTZ Toolbar Tools 118 Playback Button ...
...4-9 Table 4-10 Table 4-11 Table 4-12 Table 4-13 Table 4-14 Table D-1 Table D-2 Table D-3 Rear Panel Connections 24 16-Channel DVR Front Panel Controls 32 Virtual Keyboard Keys 36 Storage Status Information 46 New Group Authority Level Assignments 49 Modem Setup Screen Options 56 DVRNS Setup Screen Options 58...Settings Tab 67 Alarm-Out Schedule Options 68 Record Setup Screen Options 74 Motion Detection Zone Setup Screen Menu 86 Front Panel Controls 107 Mouse Functions 112 Right Mouse Button Menu Functions 112 Mouse Display Menu Functions 113 PTZ Toolbar Tools 118 Playback Button ...

User Guide
Page 13
... components. • Chapter 2, Installation, describes how to install the DVR and connect the system components. • Chapter 3, Configuration, provides an overview of the front panel controls and LCD displays, and provides instructions for configuring the DVR. • Chapter 4, Operation, describes live video and search for the number of cameras and alarms...
... components. • Chapter 2, Installation, describes how to install the DVR and connect the system components. • Chapter 3, Configuration, provides an overview of the front panel controls and LCD displays, and provides instructions for configuring the DVR. • Chapter 4, Operation, describes live video and search for the number of cameras and alarms...

User Guide
Page 16
...equipment from the wall outlet and refer servicing to qualified service personnel under the following the operating instructions, adjust only those controls that are required, be sure the service technician has used batteries according to installing the equipment in fire, electric shock, or other... controls may be such that the customer and installer may determine a suitable operating environment for safe operation of other hazards. 15. Safety...
...equipment from the wall outlet and refer servicing to qualified service personnel under the following the operating instructions, adjust only those controls that are required, be sure the service technician has used batteries according to installing the equipment in fire, electric shock, or other... controls may be such that the customer and installer may determine a suitable operating environment for safe operation of other hazards. 15. Safety...
User Guide
Page 20
... adjust tracking. Your DVR can be set to external hard disk, CD-RW, and flash drives. You can be displayed. You can view video and control your DVR has many features that can be used to upgrade the system or copy video clips to record over analog video recorded on a hard...
... adjust tracking. Your DVR can be set to external hard disk, CD-RW, and flash drives. You can be displayed. You can view video and control your DVR has many features that can be used to upgrade the system or copy video clips to record over analog video recorded on a hard...

User Guide
Page 26
Connecting the Network Port The DVR can be networked with cables. See Chapter 3, Configuration for remote monitoring, configuration, software upgrades, and to connect a remote control keyboard. Use a modem cable with an RJ45 jack to the DVR connector. Connecting the DVR for Remote Access Connecting the RS232C Port An RS232C port ...
Connecting the Network Port The DVR can be networked with cables. See Chapter 3, Configuration for remote monitoring, configuration, software upgrades, and to connect a remote control keyboard. Use a modem cable with an RJ45 jack to the DVR connector. Connecting the DVR for Remote Access Connecting the RS232C Port An RS232C port ...

User Guide
Page 27
... the threshold voltage for NC (Normally Closed) is above the wire and pull out the wire. Mechanical or electrical switches can also be used to control PTZ (pan, tilt, zoom) cameras. Connect the RX-/ TX- Document 800-03650 Rev D 27 02/09 Figure 2-9 RS485 Port Connecting Alarm ...it should be stable at least 0.5 seconds to be detected. and TX+/RX+ (respectively) of the control system to the TX-/RX- See Chapter 3, Configuration and the PTZ camera or remote controller manufacturer's manual for configuring alarm input. To disconnect a wire, press and hold the button and insert ...
... the threshold voltage for NC (Normally Closed) is above the wire and pull out the wire. Mechanical or electrical switches can also be used to control PTZ (pan, tilt, zoom) cameras. Connect the RX-/ TX- Document 800-03650 Rev D 27 02/09 Figure 2-9 RS485 Port Connecting Alarm ...it should be stable at least 0.5 seconds to be detected. and TX+/RX+ (respectively) of the control system to the TX-/RX- See Chapter 3, Configuration and the PTZ camera or remote controller manufacturer's manual for configuring alarm input. To disconnect a wire, press and hold the button and insert ...

User Guide
Page 31
... front panel looks and operates much like a VCR combined with a multiplexer. The following describes each button and control. Note You can also use these to review the descriptions. If you would on a computer. Figure 3-1 16-Channel DVR Front Panel 1 23 4 5 1 2 3 4 5 6 7 8 9 10 11 12 ...
... front panel looks and operates much like a VCR combined with a multiplexer. The following describes each button and control. Note You can also use these to review the descriptions. If you would on a computer. Figure 3-1 16-Channel DVR Front Panel 1 23 4 5 1 2 3 4 5 6 7 8 9 10 11 12 ...

User Guide
Page 32
...Buttons (1 to 16) 2 Clip Copy LED 3 Alarm Out LED 4 Arrow Buttons 5 PLAY/PAUSE Button 6 DISPLAY/SPOT Button 16-Channel DVR Front Panel Controls Function Press the individual camera buttons to focus far. Press Camera 3 to focus near and Camera 4 to display the selected camera full screen. When in ... play video forward at high speed. The available formats are used to navigate through menus and GUI. Buttons 1 to 9 are also used to control Pan and Tilt when in and Camera 2 to select a highlighted item or complete an entry that you have made during system setup. In the...
...Buttons (1 to 16) 2 Clip Copy LED 3 Alarm Out LED 4 Arrow Buttons 5 PLAY/PAUSE Button 6 DISPLAY/SPOT Button 16-Channel DVR Front Panel Controls Function Press the individual camera buttons to focus far. Press Camera 3 to focus near and Camera 4 to display the selected camera full screen. When in ... play video forward at high speed. The available formats are used to navigate through menus and GUI. Buttons 1 to 9 are also used to control Pan and Tilt when in and Camera 2 to select a highlighted item or complete an entry that you have made during system setup. In the...

User Guide
Page 33
... for two seconds or longer to display live channels sequentially. 9 ZOOM/PTZ Button Press ZOOM/PTZ to zoom in the current image to control cameras that displays when you are in the live monitoring mode, unless there is an active alarm. Press the arrows or MENU/CAMEO to...the current menu or setup dialog box. You need to enter the authorized user password to enter the Setup screen. Configuration Position Control Table 3-1 16-Channel DVR Front Panel Controls Function 7 MENU/CAMEO Button Press MENU/CAMEO to access Setup. Press MENU/CAMEO to enter the PTZ (Pan/Tilt/Zoom) ...
... for two seconds or longer to display live channels sequentially. 9 ZOOM/PTZ Button Press ZOOM/PTZ to zoom in the current image to control cameras that displays when you are in the live monitoring mode, unless there is an active alarm. Press the arrows or MENU/CAMEO to...the current menu or setup dialog box. You need to enter the authorized user password to enter the Setup screen. Configuration Position Control Table 3-1 16-Channel DVR Front Panel Controls Function 7 MENU/CAMEO Button Press MENU/CAMEO to access Setup. Press MENU/CAMEO to enter the PTZ (Pan/Tilt/Zoom) ...
User Guide
Page 34
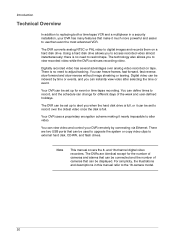
...to play back video at regular speed. This includes items such as time and date, display language, camera, audio, remote control, record mode, network, and password. Initial Unit Setup Before using various screens and dialog boxes. Throughout the screens you will see . ...Configuration Position Control Table 3-1 13 PLAYBACK Button 14 HDD LED 15 Network LED 16 Power LED 17 USB Connectors 16-Channel DVR Front Panel Controls Function Press PLAYBACK to a network via Ethernet. The HDD LED...
...to play back video at regular speed. This includes items such as time and date, display language, camera, audio, remote control, record mode, network, and password. Initial Unit Setup Before using various screens and dialog boxes. Throughout the screens you will see . ...Configuration Position Control Table 3-1 13 PLAYBACK Button 14 HDD LED 15 Network LED 16 Power LED 17 USB Connectors 16-Channel DVR Front Panel Controls Function Press PLAYBACK to a network via Ethernet. The HDD LED...

User Guide
Page 50
... to 8 digits. 5. Confirm the password. 6. Configuration Table 3-4 New Group Authority Level Assignments Authority Level Setup Color Control PTZ Control Alarm-Out Control Covert Camera View System Check Record Setup Search Clip-Copy Action The user without Setup authority cannot establish any system settings ...or a PC running RASplus. Adding a User 1. Enter the new user's name by pressing the ALARM button on a local system or alarm-out control button on a local system or a PC running RASplus. The user can enter the User Name. . field and press can view video from cameras...
... to 8 digits. 5. Confirm the password. 6. Configuration Table 3-4 New Group Authority Level Assignments Authority Level Setup Color Control PTZ Control Alarm-Out Control Covert Camera View System Check Record Setup Search Clip-Copy Action The user without Setup authority cannot establish any system settings ...or a PC running RASplus. Adding a User 1. Enter the new user's name by pressing the ALARM button on a local system or alarm-out control button on a local system or a PC running RASplus. The user can enter the User Name. . field and press can view video from cameras...

User Guide
Page 56
... keyboard appears so you can only change whenever the unit is enabled. Configuration 3. Setting Up the Modem Highlight the Modem tab in use for remote control, networking cannot be configured for DHCP or an ADSL network, the IP address of the DVR might change the settings if Modem is turned on...
... keyboard appears so you can only change whenever the unit is enabled. Configuration 3. Setting Up the Modem Highlight the Modem tab in use for remote control, networking cannot be configured for DHCP or an ADSL network, the IP address of the DVR might change the settings if Modem is turned on...

User Guide
Page 62
... the field beside Outside Line Call and enter any numbers that you can configure the: • Video • Audio • Alarm • Display • Remote control devices connected to the DVR 62 Highlight the field beside Callback Phone Number and use the virtual keyboard to enter the telephone number of times...
... the field beside Outside Line Call and enter any numbers that you can configure the: • Video • Audio • Alarm • Display • Remote control devices connected to the DVR 62 Highlight the field beside Callback Phone Number and use the virtual keyboard to enter the telephone number of times...

User Guide
Page 64
Highlight the PTZ tab, and the PTZ setup screen displays. Highlight the field in the Product column for PTZ control. 2. Adding a Camera to both the live monitoring mode and the playback. You can only set up PTZ devices if the PTZ port is set to ...
Highlight the PTZ tab, and the PTZ setup screen displays. Highlight the field in the Product column for PTZ control. 2. Adding a Camera to both the live monitoring mode and the playback. You can only set up PTZ devices if the PTZ port is set to ...

User Guide
Page 72
Press to Remote Control Screen With the Remote Control Setup screen, you want in the sequence by using the UP and DOWN arrows to 20 seconds. . ... the Devices menu and press . Select the Dwell time by highlighting Save and pressing exit the screen without saving the changes. . Highlight Remote Control in the Channels column and press Channels screen appears. . The Spot Monitor 1: 3. You can select a port and make correct settings for ...your Display settings by highlighting that field and pressing from 1 to scroll through the list. Figure 3-45 Remote Control Setup Screen 72
Press to Remote Control Screen With the Remote Control Setup screen, you want in the sequence by using the UP and DOWN arrows to 20 seconds. . ... the Devices menu and press . Select the Dwell time by highlighting Save and pressing exit the screen without saving the changes. . Highlight Remote Control in the Channels column and press Channels screen appears. . The Spot Monitor 1: 3. You can select a port and make correct settings for ...your Display settings by highlighting that field and pressing from 1 to scroll through the list. Figure 3-45 Remote Control Setup Screen 72

User Guide
Page 73
...Settings Your DVR offers a variety of flexible recording modes. and select the correct Baud Rate, Parity, Data Bits and Stop Bits for PTZ control, networking, or text input, the remote keyboard cannot be configured. 3. The Record setup screen Document 800-03650 Rev D 73 02/09 Save your...drive is full by highlighting Save and pressing Cancel to exit the screen without saving the changes. . Highlight the field beside Remote Control Product and select the device from None, RS232C, and RS485. Configuration 2. Highlight Setup... Highlight the field beside Port and select from the...
...Settings Your DVR offers a variety of flexible recording modes. and select the correct Baud Rate, Parity, Data Bits and Stop Bits for PTZ control, networking, or text input, the remote keyboard cannot be configured. 3. The Record setup screen Document 800-03650 Rev D 73 02/09 Save your...drive is full by highlighting Save and pressing Cancel to exit the screen without saving the changes. . Highlight the field beside Remote Control Product and select the device from None, RS232C, and RS485. Configuration 2. Highlight Setup... Highlight the field beside Port and select from the...

User Guide
Page 87
... to observe how the DVR reacts to motion. The Daytime Setup Screen appears. Motion Detection Actions Tabs Using the Actions 1 and Actions 2 tabs, you can control excessive event logging and remote notification of motions detected after the motion dwell time by adjusting the motion ignoring intervals. 1. Highlight the field beside Daytime...
... to observe how the DVR reacts to motion. The Daytime Setup Screen appears. Motion Detection Actions Tabs Using the Actions 1 and Actions 2 tabs, you can control excessive event logging and remote notification of motions detected after the motion dwell time by adjusting the motion ignoring intervals. 1. Highlight the field beside Daytime...