
User Guide
Page 5
... Installation Tools 23 Connecting the Video Source 24 Connecting the Loop Through Video 24 Connecting Audio 25 Connecting the Monitor 25 Connecting the DVR for Remote Access 26 Connecting Alarm Inputs and Outputs 27 Connecting USB Ports 28 Factory Reset 29 Connecting the Power Cord 29 3 Configuration 31 Front Panel Controls 31 Turning on the Power 34 Initial Unit Setup 34 Logging In 35 Setup Screen 35 Network & Notification Setup 52 Configuring Devices 62 Recording Settings 73 Event Settings 79 4 Operation 107 Turning on the Power 108 Live Monitoring 108 Using PIP Mode...
... Installation Tools 23 Connecting the Video Source 24 Connecting the Loop Through Video 24 Connecting Audio 25 Connecting the Monitor 25 Connecting the DVR for Remote Access 26 Connecting Alarm Inputs and Outputs 27 Connecting USB Ports 28 Factory Reset 29 Connecting the Power Cord 29 3 Configuration 31 Front Panel Controls 31 Turning on the Power 34 Initial Unit Setup 34 Logging In 35 Setup Screen 35 Network & Notification Setup 52 Configuring Devices 62 Recording Settings 73 Event Settings 79 4 Operation 107 Turning on the Power 108 Live Monitoring 108 Using PIP Mode...

User Guide
Page 8
... (Manual) Setup Screen 53 Port Numbers Setup Screen 54 LAN (DHCP) Setup Screen 55 LAN (ADSL) Setup Screen 55 Modem Setup Screen 56 DVRNS Setup Screen 57 WebGuard Screen 59 Notification Mail Setup Screen 60 Notification Callback Setup Screen 61 Devices Menu 63 Camera Setup Screen 63 Camera PTZ Setup Screen 64 PTZ Device List 64 Port Setup Window 65 Audio Setup Screen 65 Alarm-Out Settings Screen 66 Alarm-Out Schedule Screen 67 Display OSD Screen 69 OSD Margin Screen 70 Main Monitor Screen 70 Spot Monitor Screen 72 Remote Control Setup Screen 72 Record Menu 73 Record Setup...
... (Manual) Setup Screen 53 Port Numbers Setup Screen 54 LAN (DHCP) Setup Screen 55 LAN (ADSL) Setup Screen 55 Modem Setup Screen 56 DVRNS Setup Screen 57 WebGuard Screen 59 Notification Mail Setup Screen 60 Notification Callback Setup Screen 61 Devices Menu 63 Camera Setup Screen 63 Camera PTZ Setup Screen 64 PTZ Device List 64 Port Setup Window 65 Audio Setup Screen 65 Alarm-Out Settings Screen 66 Alarm-Out Schedule Screen 67 Display OSD Screen 69 OSD Margin Screen 70 Main Monitor Screen 70 Spot Monitor Screen 72 Remote Control Setup Screen 72 Record Menu 73 Record Setup...

User Guide
Page 13
... of the front panel controls and LCD displays, and provides instructions for configuring the DVR. • Chapter 4, Operation, describes live monitoring, recording video and audio, playing recorded video, and searching for video. • Appendix A, USB Hard Disk Drive Preparation, shows how to prepare the USB hard disk drive for computers using Microsoft® Windows 2000/98/SP/Vista operating systems. • Appendix B, Text-In Query Examples, shows how to access a remote DVR, monitor live video and search for the number of cameras...
... of the front panel controls and LCD displays, and provides instructions for configuring the DVR. • Chapter 4, Operation, describes live monitoring, recording video and audio, playing recorded video, and searching for video. • Appendix A, USB Hard Disk Drive Preparation, shows how to prepare the USB hard disk drive for computers using Microsoft® Windows 2000/98/SP/Vista operating systems. • Appendix B, Text-In Query Examples, shows how to access a remote DVR, monitor live video and search for the number of cameras...
User Guide
Page 20
... connected and the number of the week and user-defined holidays. The DVRs are two USB ports that make it much more powerful and easier to rewind tape. The technology also allows you to record, and the schedule can be set to adjust tracking. The DVR converts analog NTSC or PAL video to access recorded video almost instantaneously; Using a hard disk drive allows you when the hard disk drive is full. There is no need to record over analog video recorded...
... connected and the number of the week and user-defined holidays. The DVRs are two USB ports that make it much more powerful and easier to rewind tape. The technology also allows you to record, and the schedule can be set to adjust tracking. The DVR converts analog NTSC or PAL video to access recorded video almost instantaneously; Using a hard disk drive allows you when the hard disk drive is full. There is no need to record over analog video recorded...
User Guide
Page 23
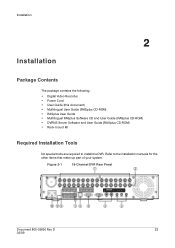
...; Digital Video Recorder • Power Cord • User Guide (this document) • Multilingual User Guide (RASplus CD-ROM) • RASplus User Guide • Multilingual RASplus Software CD and User Guide (RASplus CD-ROM) • DVRNS Server Software and User Guide (RASplus CD-ROM) • Rack-mount Kit Required Installation Tools No special tools are required to the installation manuals for the other items that make up part of your system. Refer to install the DVR...
...; Digital Video Recorder • Power Cord • User Guide (this document) • Multilingual User Guide (RASplus CD-ROM) • RASplus User Guide • Multilingual RASplus Software CD and User Guide (RASplus CD-ROM) • DVRNS Server Software and User Guide (RASplus CD-ROM) • Rack-mount Kit Required Installation Tools No special tools are required to the installation manuals for the other items that make up part of your system. Refer to install the DVR...

User Guide
Page 27
... be controlled remotely by an external device or control system, such as a control keyboard, using RS485 half-duplex serial communications signals. Connect the RX-/ TX- See Chapter 3, Configuration and the PTZ camera or remote controller manufacturer's manual for configuring alarm input. Document 800-03650 Rev D 27 02/09 Connecting the RS485 Port The DVR can use . and RX+/TX+ of the DVR. Figure 2-9 RS485 Port Connecting Alarm Inputs and Outputs Note To make connections...
... be controlled remotely by an external device or control system, such as a control keyboard, using RS485 half-duplex serial communications signals. Connect the RX-/ TX- See Chapter 3, Configuration and the PTZ camera or remote controller manufacturer's manual for configuring alarm input. Document 800-03650 Rev D 27 02/09 Connecting the RS485 Port The DVR can use . and RX+/TX+ of the DVR. Figure 2-9 RS485 Port Connecting Alarm Inputs and Outputs Note To make connections...

User Guide
Page 28
... Alarm Outputs) The DVR can make the cable connections, usually less than 6 feet. See Chapter 3, Configuration for video clip copying or system upgrades. Mechanical or electrical switches can be wired to Serial converter. 28 Multiple text-in devices can use the mouse to the GND connector. NC/NO is below 0.3V and should be used to connect external hard disk, CD-RW, or flash drives for configuring alarm output. The...
... Alarm Outputs) The DVR can make the cable connections, usually less than 6 feet. See Chapter 3, Configuration for video clip copying or system upgrades. Mechanical or electrical switches can be wired to Serial converter. 28 Multiple text-in devices can use the mouse to the GND connector. NC/NO is below 0.3V and should be used to connect external hard disk, CD-RW, or flash drives for configuring alarm output. The...

User Guide
Page 31
... use these to initially set up your DVR and for daily operations. The following describes each button and control. You will use a USB mouse (not supplied) to review the descriptions. Configuration 3 Configuration Your DVR should be completely installed before proceeding. Many of the buttons have not installed the DVR, please see Chapter 2, Installation. Front Panel Controls The front panel looks and operates much like a VCR combined with a multiplexer. Figure 3-1 16-Channel DVR Front Panel...
... use these to initially set up your DVR and for daily operations. The following describes each button and control. You will use a USB mouse (not supplied) to review the descriptions. Configuration 3 Configuration Your DVR should be completely installed before proceeding. Many of the buttons have not installed the DVR, please see Chapter 2, Installation. Front Panel Controls The front panel looks and operates much like a VCR combined with a multiplexer. Figure 3-1 16-Channel DVR Front Panel...

User Guide
Page 33
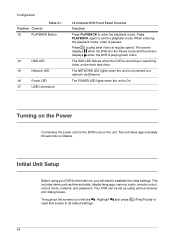
... mode by a user password. 11 CLIP COPY Button Press CLIP COPY to copy video clips. 12 PANIC Button Press PANIC to stop panic recording. Press to zoom in on the image in the active cameo to edit the cameo and display the video of all camera channels. The icon displays on the screen. Configuration Position Control Table 3-1 16-Channel DVR Front Panel Controls Function 7 MENU/CAMEO Button Press MENU/CAMEO to display the Search menu. The screen displays...
... mode by a user password. 11 CLIP COPY Button Press CLIP COPY to copy video clips. 12 PANIC Button Press PANIC to stop panic recording. Press to zoom in on the image in the active cameo to edit the cameo and display the video of all camera channels. The icon displays on the screen. Configuration Position Control Table 3-1 16-Channel DVR Front Panel Controls Function 7 MENU/CAMEO Button Press MENU/CAMEO to display the Search menu. The screen displays...
User Guide
Page 34
... connected to establish the initial settings. Highlight and press reset that screen to its default settings. (Play/Pause) to the DVR turns on the Power Connecting the power cord to 34 Your DVR can be set up using your DVR for the first time, you will want to a network via Ethernet. The NETWORK LED lights when the unit is playing back video. This includes items such as time and date, display language, camera, audio, remote control, record mode, network, and password. The POWER LED lights...
... connected to establish the initial settings. Highlight and press reset that screen to its default settings. (Play/Pause) to the DVR turns on the Power Connecting the power cord to 34 Your DVR can be set up using your DVR for the first time, you will want to a network via Ethernet. The NETWORK LED lights when the unit is playing back video. This includes items such as time and date, display language, camera, audio, remote control, record mode, network, and password. The POWER LED lights...
User Guide
Page 54
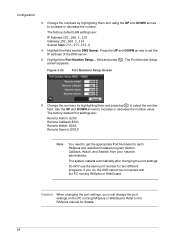
... change the port settings on the PC running RASplus or WebGuard. Do NOT use the same port number for details. 54 Change the numbers by highlighting them and using the UP and DOWN arrows to select the number field. The factory default LAN settings are : Remote Admin: 8200 Remote Callback:8201 Remote Watch: 8016 Remote Search:10019 Note You need to set the IP address of the DNS server. 5. Highlight the Port Number Setup...
... change the port settings on the PC running RASplus or WebGuard. Do NOT use the same port number for details. 54 Change the numbers by highlighting them and using the UP and DOWN arrows to select the number field. The factory default LAN settings are : Remote Admin: 8200 Remote Callback:8201 Remote Watch: 8016 Remote Search:10019 Note You need to set the IP address of the DNS server. 5. Highlight the Port Number Setup...

User Guide
Page 77
...-Event recording mode, the yellow icon displays when there is no event and the DVR is in the Settings column, the DVR follows the default settings. Use the No Record mode when you set the recorded image quality for any event occurs and the DVR starts recording. The DVR follows the Event settings and the icon displays. When the DVR is not recording. See Setting Recording Defaults on page 77 for Time and Event recording. Highlight Default...
...-Event recording mode, the yellow icon displays when there is no event and the DVR is in the Settings column, the DVR follows the default settings. Use the No Record mode when you set the recorded image quality for any event occurs and the DVR starts recording. The DVR follows the Event settings and the icon displays. When the DVR is not recording. See Setting Recording Defaults on page 77 for Time and Event recording. Highlight Default...
User Guide
Page 79
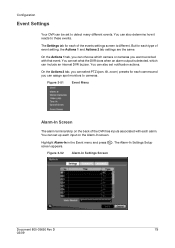
... which camera or cameras you can be set what the DVR does when an alarm output is different. On the Actions 2 tab, you can select PTZ (pan, tilt, zoom) presets for each camera and you want recorded with each of the DVR has inputs associated with that event. Configuration Event Settings Your DVR can assign spot monitors to cameras.
... which camera or cameras you can be set what the DVR does when an alarm output is different. On the Actions 2 tab, you can select PTZ (pan, tilt, zoom) presets for each camera and you want recorded with each of the DVR has inputs associated with that event. Configuration Event Settings Your DVR can assign spot monitors to cameras.

User Guide
Page 81
... whenever the DVR detects an input on the associated alarm input. 3. Setting Alarm-Out Actions 1. Select the Alarm Output connectors that you would like to load the Alarm-Out Actions settings. Turn On or Off the internal buzzer of 2. Document 800-03650 Rev D 81 02/09 When set to the Event or Time & Event recording mode in the Alarm-Out setup screen (Schedule...
... whenever the DVR detects an input on the associated alarm input. 3. Setting Alarm-Out Actions 1. Select the Alarm Output connectors that you would like to load the Alarm-Out Actions settings. Turn On or Off the internal buzzer of 2. Document 800-03650 Rev D 81 02/09 When set to the Event or Time & Event recording mode in the Alarm-Out setup screen (Schedule...

User Guide
Page 99
... Notification setup screen and the DVR should be registered in device, it starts recording video from all the associated cameras. Setting Alarm-Out Actions You can toggle the individual items On and Off by highlighting Notification and pressing . Configuration 2. If the DVR detects text input on the selected text-in device, it triggers output signals on the selected text-in the RASplus (Remote Administration...
... Notification setup screen and the DVR should be registered in device, it starts recording video from all the associated cameras. Setting Alarm-Out Actions You can toggle the individual items On and Off by highlighting Notification and pressing . Configuration 2. If the DVR detects text input on the selected text-in device, it triggers output signals on the selected text-in the RASplus (Remote Administration...

User Guide
Page 108
... monitoring. 108 Operation # Function Table 4-1 # Front Panel Controls Function 10 ALARM Button 11 CLIP COPY Button 13 PLAYBACK Button 14 HDD LED 16 Power LED 17 USB Connectors # Function 12 PANIC Button 15 Network LED Turning on the Power After installing the DVR (see Chapter 2, Installation), press POWER on the attached monitor. Live Monitoring As soon as the DVR completes its initialization process, live video full screen, press a camera button. To cycle the DVR through the different display formats, press DISPLAY. The default mode...
... monitoring. 108 Operation # Function Table 4-1 # Front Panel Controls Function 10 ALARM Button 11 CLIP COPY Button 13 PLAYBACK Button 14 HDD LED 16 Power LED 17 USB Connectors # Function 12 PANIC Button 15 Network LED Turning on the Power After installing the DVR (see Chapter 2, Installation), press POWER on the attached monitor. Live Monitoring As soon as the DVR completes its initialization process, live video full screen, press a camera button. To cycle the DVR through the different display formats, press DISPLAY. The default mode...

User Guide
Page 139
Note The partition size should display on the icon and checking under Windows XP is selected for the file system. Connect the USB hard disk drive to My Computer. 7. Open Disk Management in Storage and right-click an unallocated region of Microsoft® limitations. After formatting is complete, the USB hard disk drive is partitioned or has data, it shows up in the Control Panel and launch Computer Management. Document 800-03650...
Note The partition size should display on the icon and checking under Windows XP is selected for the file system. Connect the USB hard disk drive to My Computer. 7. Open Disk Management in Storage and right-click an unallocated region of Microsoft® limitations. After formatting is complete, the USB hard disk drive is partitioned or has data, it shows up in the Control Panel and launch Computer Management. Document 800-03650...

User Guide
Page 143
... ClipPlayer program has at maximum speed with 16 MB or more video RAM is suggested that the computer used a recordable DVD or CD, insert the DVD/CD in your personal computer to review the video clips. Reviewing Video Clips C Reviewing Video Clips You do not need to install any special software on your computer's DVD/CD drive. If you used a USB device, disconnect either the external USB hard disk drive or USB flash drive from the DVR, and connect...
... ClipPlayer program has at maximum speed with 16 MB or more video RAM is suggested that the computer used a recordable DVD or CD, insert the DVD/CD in your personal computer to review the video clips. Reviewing Video Clips C Reviewing Video Clips You do not need to install any special software on your computer's DVD/CD drive. If you used a USB device, disconnect either the external USB hard disk drive or USB flash drive from the DVR, and connect...

User Guide
Page 144
... display problems after changing all display settings as described above, try replacing the video card. The DirectX Diagnostic Tool dialog box displays. Go to 32 bit. Play the video clip in the current screen mode. Show the previous camera group if there is recorded video in the previous camera group in fast forward. To check the version of the video clip. Video cards with an ATI chipset are experiencing display problems...
... display problems after changing all display settings as described above, try replacing the video card. The DirectX Diagnostic Tool dialog box displays. Go to 32 bit. Play the video clip in the current screen mode. Show the previous camera group if there is recorded video in the previous camera group in fast forward. To check the version of the video clip. Video cards with an ATI chipset are experiencing display problems...

User Guide
Page 174
... settings 99 associating a spot monitor 100 camera settings 98 notification settings 99 PTZ settings 100 text-in screen, setup 95 text-in search 129 time overlap 157 U USB ports, connecting 28 user setup adding a user 50 auto log in 51 auto log out 51 deleting a user 48 setting passwords 48 user setup screen 47 V video clip, naming 136 video loss selecting a substitute camera 92 setting alarm 93 setting remote site notification 93 setting the sensitivity 91 video, backing up using clip-copy...
... settings 99 associating a spot monitor 100 camera settings 98 notification settings 99 PTZ settings 100 text-in screen, setup 95 text-in search 129 time overlap 157 U USB ports, connecting 28 user setup adding a user 50 auto log in 51 auto log out 51 deleting a user 48 setting passwords 48 user setup screen 47 V video clip, naming 136 video loss selecting a substitute camera 92 setting alarm 93 setting remote site notification 93 setting the sensitivity 91 video, backing up using clip-copy...


