User Guide
Page 13
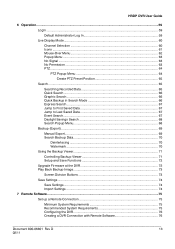
HRDP DVR User Guide 6 Operation...59 Login ...59 Default Administrator Log In 59 Live Display Mode...60 Channel Selection ...60 Icons ...61 Mouse-Over Menu ...62 Popup Menu ...... to First Saved Data 67 Jump to Last Saved Data 67 Event Search...67 Daylight Savings Search 68 Search Popup Menu 68 Backup (Export) ...69 Manual Export...69 Search Backup Data 70 Deinterlacing ...70 Watermark ...70 Using the Backup Viewer 71 Controlling Backup Viewer 71 Setup and Save Functions 72 Upgrade...
HRDP DVR User Guide 6 Operation...59 Login ...59 Default Administrator Log In 59 Live Display Mode...60 Channel Selection ...60 Icons ...61 Mouse-Over Menu ...62 Popup Menu ...... to First Saved Data 67 Jump to Last Saved Data 67 Event Search...67 Daylight Savings Search 68 Search Popup Menu 68 Backup (Export) ...69 Manual Export...69 Search Backup Data 70 Deinterlacing ...70 Watermark ...70 Using the Backup Viewer 71 Controlling Backup Viewer 71 Setup and Save Functions 72 Upgrade...

User Guide
Page 21
...set up the date, time and system ID. See the Motion/Event Configuration section for more details. 2. See the Operation section in this manual for more details. 10. Turn on using the DVR. Complete Camera Configuration for more detail. 7. See the Record > Motion/Event Configuration ...8. The DVR is - Complete Disk Configuration to enable any attached Pan / Tilt / Zoom cameras. Create a recording schedule. See the System >User Configuration section for all attached cameras. The default password is now configured to set overwrite options and enable SMART Check.
...set up the date, time and system ID. See the Motion/Event Configuration section for more details. 2. See the Operation section in this manual for more details. 10. Turn on using the DVR. Complete Camera Configuration for more detail. 7. See the Record > Motion/Event Configuration ...8. The DVR is - Complete Disk Configuration to enable any attached Pan / Tilt / Zoom cameras. Create a recording schedule. See the System >User Configuration section for all attached cameras. The default password is now configured to set overwrite options and enable SMART Check.

User Guide
Page 27
... a Sensor Input To make connections on each side of the DVR. Connecting to the Alarm Out and Ground (GND) connectors. See the PTZ camera manufacturer's manual for external control systems such as buzzers or lights. Attach the rackmount brackets with the screws provided on the Alarm Connector Strip: Press and hold... / Tilt / Zoom (PTZ) cameras. To disconnect the wire press and hold the button and insert the wire into the hole below the button. HRDP DVR User Guide Connecting a PTZ Camera The RS485 connector can be used to the Alarm In and Ground (GND) connectors.
... a Sensor Input To make connections on each side of the DVR. Connecting to the Alarm Out and Ground (GND) connectors. See the PTZ camera manufacturer's manual for external control systems such as buzzers or lights. Attach the rackmount brackets with the screws provided on the Alarm Connector Strip: Press and hold... / Tilt / Zoom (PTZ) cameras. To disconnect the wire press and hold the button and insert the wire into the hole below the button. HRDP DVR User Guide Connecting a PTZ Camera The RS485 connector can be used to the Alarm In and Ground (GND) connectors.
User Guide
Page 31
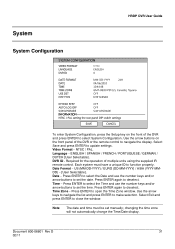
... keys and/or arrow buttons to set the time. Press ENTER again to update settings. Time Zone - NTSC / PAL. ENGLISH / SPANISH / FRENCH / PORTUGUESE / GERMAN / DUTCH [User Selectable]. Time - changing the time zone will not automatically change the Time/Date display. Select Save and press ENTER to deselect. Use the arrow keys... multiple units using the supplied IR remote control. Press ENTER to select the Time and use the number keys and/or arrow buttons to set manually; Select Exit and press ENTER to deselect.
... keys and/or arrow buttons to set the time. Press ENTER again to update settings. Time Zone - NTSC / PAL. ENGLISH / SPANISH / FRENCH / PORTUGUESE / GERMAN / DUTCH [User Selectable]. Time - changing the time zone will not automatically change the Time/Date display. Select Save and press ENTER to deselect. Use the arrow keys... multiple units using the supplied IR remote control. Press ENTER to select the Time and use the number keys and/or arrow buttons to set manually; Select Exit and press ENTER to deselect.

User Guide
Page 52
... Verify that all these ports are available when setting up the connection ports and Max transfer speed for this information. STATIC IP (User must be 4224). This port must manually define a static IP address. The DVR assigns the secondary port based on the remote port, in increments of two. (ex: if you... as the port setting on the network. Network HOST NAME - CENTER PORT - The HRDP uses multiple ports to create remote connections: the remote port is user defined (default 4000), and a secondary port is automatically assigned (default 4002).
... Verify that all these ports are available when setting up the connection ports and Max transfer speed for this information. STATIC IP (User must be 4224). This port must manually define a static IP address. The DVR assigns the secondary port based on the remote port, in increments of two. (ex: if you... as the port setting on the network. Network HOST NAME - CENTER PORT - The HRDP uses multiple ports to create remote connections: the remote port is user defined (default 4000), and a secondary port is automatically assigned (default 4002).

User Guide
Page 69
HRDP DVR User Guide Backup (Export) Manual Export Back up your data, you are using a new USB device to back up recorded data on the front panel or remote control. Press BACKUP ...
HRDP DVR User Guide Backup (Export) Manual Export Back up your data, you are using a new USB device to back up recorded data on the front panel or remote control. Press BACKUP ...

User Guide
Page 76
... in the Site Name box. 6. Open the Remote Software. Select HRDP H.264 or HRDPX H.264 as defined in SYSTEM > USER CONFIGURATION on the front of an authorized user as the Site Type. 5. Install the Remote Software on your network (Ask your DVR. 2. Click OK. 9. Note If ...the DVR or remote control to save current settings. Note User Name and Password are both case sensitive. 10. Remote Software Configuring the DVR 1. If STATIC IP is selected - Click New. 4. Click Connect. 76 Enter the IP address of this manual for the system in . 2. Enter a name for more...
... in the Site Name box. 6. Open the Remote Software. Select HRDP H.264 or HRDPX H.264 as defined in SYSTEM > USER CONFIGURATION on the front of an authorized user as the Site Type. 5. Install the Remote Software on your network (Ask your DVR. 2. Click OK. 9. Note If ...the DVR or remote control to save current settings. Note User Name and Password are both case sensitive. 10. Remote Software Configuring the DVR 1. If STATIC IP is selected - Click New. 4. Click Connect. 76 Enter the IP address of this manual for the system in . 2. Enter a name for more...

User Guide
Page 85
... save was successful. 9. Although 50 is not an issue, set quality to record. When size is the longest time displayed, a longer recording may be entered manually. Select Quality - 50>100. Enter the duration (seconds) to 100. Perform a basic search to locate the desired clip. 2. Select Mark Digital Signature. Click OK. Select...
... save was successful. 9. Although 50 is not an issue, set quality to record. When size is the longest time displayed, a longer recording may be entered manually. Select Quality - 50>100. Enter the duration (seconds) to 100. Perform a basic search to locate the desired clip. 2. Select Mark Digital Signature. Click OK. Select...

User Guide
Page 87
... PTZ Onscreen Menu. For explanations of these options can vary slightly. Controlling a PTZ Camera • The first method is to use the mouse to the manual that appears when PAN/TILT is clicked on the PTZ controller move through the PTZ Menu options and/or highlight options. Since every PTZ camera... is different, the functions of what those options are please refer to control the camera directly from the live video display. PTZ Overview HRDP DVR User Guide Accessing PTZ Menus Some protocols support the ability to access the cameras options.
... PTZ Onscreen Menu. For explanations of these options can vary slightly. Controlling a PTZ Camera • The first method is to use the mouse to the manual that appears when PAN/TILT is clicked on the PTZ controller move through the PTZ Menu options and/or highlight options. Since every PTZ camera... is different, the functions of what those options are please refer to control the camera directly from the live video display. PTZ Overview HRDP DVR User Guide Accessing PTZ Menus Some protocols support the ability to access the cameras options.

User Guide
Page 93
...function to save file. 5. Click Next to select a save video clips in an .AVI format. Note Only one camera can be entered manually. Click Print to record. Virtually every computer offers some type of quality, compatibility and file-size. Double-click the image. The Print ...export type, JPEG or AVI. Click Next to 100. 4. Refer to export a video clip. 1. c) Select Quality - 50>100. Print HRDP DVR User Guide 1. Although 50 is the longest time displayed, a longer recording may be stored uncompressed, but it is installed. Depending on the printer being used to...
...function to save file. 5. Click Next to select a save video clips in an .AVI format. Note Only one camera can be entered manually. Click Print to record. Virtually every computer offers some type of quality, compatibility and file-size. Double-click the image. The Print ...export type, JPEG or AVI. Click Next to 100. 4. Refer to export a video clip. 1. c) Select Quality - 50>100. Print HRDP DVR User Guide 1. Although 50 is the longest time displayed, a longer recording may be stored uncompressed, but it is installed. Depending on the printer being used to...
User Guide
Page 101
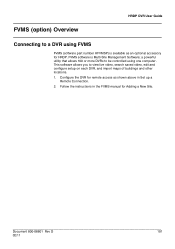
Follow the instructions in Set up a Remote Connection. 2. Document 800-06801 Rev D 101 02/11 FVMS software is available as shown above in the FVMS manual for HRDP. This software allows you to view live video, search saved video, edit and configure setup on each DVR, and import maps of buildings .... a powerful utility that allows 100 or more DVRs to be controlled using FVMS FVMS (software part number HFVMSP) is Multi-Site Management Software; HRDP DVR User Guide FVMS (option) Overview Connecting to a DVR using one computer.
Follow the instructions in Set up a Remote Connection. 2. Document 800-06801 Rev D 101 02/11 FVMS software is available as shown above in the FVMS manual for HRDP. This software allows you to view live video, search saved video, edit and configure setup on each DVR, and import maps of buildings .... a powerful utility that allows 100 or more DVRs to be controlled using FVMS FVMS (software part number HFVMSP) is Multi-Site Management Software; HRDP DVR User Guide FVMS (option) Overview Connecting to a DVR using one computer.