
User Guide
Page 7
...service this product. Dispose of any service or repairs to this indicates a need for service. 20. Grounded Outlet - Adjust only those controls that the unit is replaced by an Incorrect Type. When the unit exhibits a distinct change in proper operating condition. Servicing - Unauthorized ... of other hazards. 22. If the unit has been exposed to qualified personnel. 21. If the unit does not operate normally by Honeywell. this unit, ask the service technician to perform safety checks to a properly grounded outlet." 18. Replacement Parts - This equipment must ...
...service this product. Dispose of any service or repairs to this indicates a need for service. 20. Grounded Outlet - Adjust only those controls that the unit is replaced by an Incorrect Type. When the unit exhibits a distinct change in proper operating condition. Servicing - Unauthorized ... of other hazards. 22. If the unit has been exposed to qualified personnel. 21. If the unit does not operate normally by Honeywell. this unit, ask the service technician to perform safety checks to a properly grounded outlet." 18. Replacement Parts - This equipment must ...

User Guide
Page 11
...PTZ Compatibility List ...20 Quick Start Instructions...21 Logging In for the First Time 21 4 Installation...22 Front Panel Controls ...22 Rear Panel Connectors...23 16 Channel...23 8 Channel...24 4 Channel...24 Remote Control ...25 Connection Guide ...26 Connecting the Monitor 26 Video Inputs and Looping Outputs 26 Connecting to a Network 26... 27 Connecting to a Relay Output 27 Installing the Rackmount Kit 27 Turning on the DVR...28 Using the Power Button 28 Setting the Remote Controller ID 28 5 Setup ...29 Setup Menus ...29 Setup Wizard...30 Document 800-06801 Rev D 11 02/11
...PTZ Compatibility List ...20 Quick Start Instructions...21 Logging In for the First Time 21 4 Installation...22 Front Panel Controls ...22 Rear Panel Connectors...23 16 Channel...23 8 Channel...24 4 Channel...24 Remote Control ...25 Connection Guide ...26 Connecting the Monitor 26 Video Inputs and Looping Outputs 26 Connecting to a Network 26... 27 Connecting to a Relay Output 27 Installing the Rackmount Kit 27 Turning on the DVR...28 Using the Power Button 28 Setting the Remote Controller ID 28 5 Setup ...29 Setup Menus ...29 Setup Wizard...30 Document 800-06801 Rev D 11 02/11
User Guide
Page 13
... Search 68 Search Popup Menu 68 Backup (Export) ...69 Manual Export...69 Search Backup Data 70 Deinterlacing ...70 Watermark ...70 Using the Backup Viewer 71 Controlling Backup Viewer 71 Setup and Save Functions 72 Upgrade Firmware at the DVR 72 Play Back Backup Image 73 Screen Division Buttons 73 Save Settings...
... Search 68 Search Popup Menu 68 Backup (Export) ...69 Manual Export...69 Search Backup Data 70 Deinterlacing ...70 Watermark ...70 Using the Backup Viewer 71 Controlling Backup Viewer 71 Setup and Save Functions 72 Upgrade Firmware at the DVR 72 Play Back Backup Image 73 Screen Division Buttons 73 Save Settings...

User Guide
Page 14
...78 Setting the Time and Date 78 Live View Screen ...79 Camera View ...80 Screen Division Buttons 81 Setup Overview...81 Search Overview...82 Play Controls ...83 Performing a Basic Search 83 Adjust the Brightness of an Image 83 Zooming in on an Image 83 Zooming in on a Portion of ...Clip ...84 Saving a Video Clip 85 Status Search ...86 Performing a Status Search 86 PTZ Overview...87 Accessing PTZ Menus 87 Controlling a PTZ Camera 87 Using the Graphical PTZ Controller 88 Using the On-screen Compass 89 Web Viewer Overview ...90 Connecting to a DVR Using Web Viewer 91 Search Video Using ...
...78 Setting the Time and Date 78 Live View Screen ...79 Camera View ...80 Screen Division Buttons 81 Setup Overview...81 Search Overview...82 Play Controls ...83 Performing a Basic Search 83 Adjust the Brightness of an Image 83 Zooming in on an Image 83 Zooming in on a Portion of ...Clip ...84 Saving a Video Clip 85 Status Search ...86 Performing a Status Search 86 PTZ Overview...87 Accessing PTZ Menus 87 Controlling a PTZ Camera 87 Using the Graphical PTZ Controller 88 Using the On-screen Compass 89 Web Viewer Overview ...90 Connecting to a DVR Using Web Viewer 91 Search Video Using ...

User Guide
Page 15
... 101 8 Appendix ...102 Button Index ...102 LED Status Indicators 102 Enter / Exit Buttons 103 Function Buttons ...103 Numeric Buttons and Rec 103 Directional and Playback Control Buttons 104 DVR FAQ ...105 General ...105 Live Monitoring ...105 Recording ...106 Searching and Playing Video 106 Backup ...106 Network...106 Miscellaneous ...106 Troubleshooting ...107...
... 101 8 Appendix ...102 Button Index ...102 LED Status Indicators 102 Enter / Exit Buttons 103 Function Buttons ...103 Numeric Buttons and Rec 103 Directional and Playback Control Buttons 104 DVR FAQ ...105 General ...105 Live Monitoring ...105 Recording ...106 Searching and Playing Video 106 Backup ...106 Network...106 Miscellaneous ...106 Troubleshooting ...107...

User Guide
Page 18
... Open or Normally Closed) • 4 Built in Relay Outputs (Normally Open or Normally Closed) • Remote Access via Ethernet and/or Modem • PTZ Camera Control • Internal DVD-RW supports CD-RW and DVD-RW media 18
... Open or Normally Closed) • 4 Built in Relay Outputs (Normally Open or Normally Closed) • Remote Access via Ethernet and/or Modem • PTZ Camera Control • Internal DVD-RW supports CD-RW and DVD-RW media 18

User Guide
Page 22
Installation Installation Front Panel Controls DVD Drive Arrow Buttons Backup Menu Search Mode Numeric Keypad USB Port LED Lights • Power • HDD • Record • Network • HDD Temp. Instant Record Live Display Rotate Setup Menu Lock (logout) 22
Installation Installation Front Panel Controls DVD Drive Arrow Buttons Backup Menu Search Mode Numeric Keypad USB Port LED Lights • Power • HDD • Record • Network • HDD Temp. Instant Record Live Display Rotate Setup Menu Lock (logout) 22

User Guide
Page 25
HRDP DVR User Guide Remote Control ID Select* Pause REC ID 1 2 3 4 5 6 7 8 9 +10 0 ZOOM FOCUS IRIS PRESET PTZ -30 REPL AY +30 Record Toggle Log Off (Lock) PTZ Controls Play Rewind Arrow / Panorama BACKUP SEARCH SETUP LIVE P Fast Forward Arrow Arrow ENTER EXI T S ROTATE ALARM OSD PTZ Display Options *The ID Select button allows you to use one remote control for several DVRs. Document 800-06801 Rev D 25 02/11
HRDP DVR User Guide Remote Control ID Select* Pause REC ID 1 2 3 4 5 6 7 8 9 +10 0 ZOOM FOCUS IRIS PRESET PTZ -30 REPL AY +30 Record Toggle Log Off (Lock) PTZ Controls Play Rewind Arrow / Panorama BACKUP SEARCH SETUP LIVE P Fast Forward Arrow Arrow ENTER EXI T S ROTATE ALARM OSD PTZ Display Options *The ID Select button allows you to use one remote control for several DVRs. Document 800-06801 Rev D 25 02/11

User Guide
Page 27
... and hold the button and insert the wire into the hole below the button. Note Use the RS485 connector for external control systems such as buzzers or lights. Connecting to control Pan / Tilt / Zoom (PTZ) cameras. Alarm In Use external devices to send a signal to the Alarm In and Ground...and hold the button and insert the wire into the hole below the button. Mechanical or electrical switches can activate external devices such as a control keyboard. Note All connectors marked GND are common. Alarm Out The DVR can be a minimum 1U space between the DVR and any other items...
... and hold the button and insert the wire into the hole below the button. Note Use the RS485 connector for external control systems such as buzzers or lights. Connecting to control Pan / Tilt / Zoom (PTZ) cameras. Alarm In Use external devices to send a signal to the Alarm In and Ground...and hold the button and insert the wire into the hole below the button. Mechanical or electrical switches can activate external devices such as a control keyboard. Note All connectors marked GND are common. Alarm Out The DVR can be a minimum 1U space between the DVR and any other items...
User Guide
Page 28
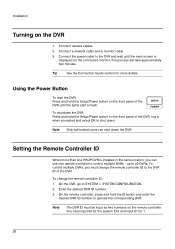
... until the main screen is installed in when prompted and select OK to operate the corresponding DVR. Note Only authorized users can use one remote controller to the DVR ID of the DVR, log in the same location, you must input 00 for the system ID 0 and input 01 for 1. 28... To change the remote controller ID to control multiple DVRs - Setting the Remote Controller ID When more details Using the Power Button To start to flash. To control multiple DVRs, you can shut down . On the DVR, go to 20 DVRs. On the...
... until the main screen is installed in when prompted and select OK to operate the corresponding DVR. Note Only authorized users can use one remote controller to the DVR ID of the DVR, log in the same location, you must input 00 for the system ID 0 and input 01 for 1. 28... To change the remote controller ID to control multiple DVRs - Setting the Remote Controller ID When more details Using the Power Button To start to flash. To control multiple DVRs, you can shut down . On the DVR, go to 20 DVRs. On the...
User Guide
Page 29
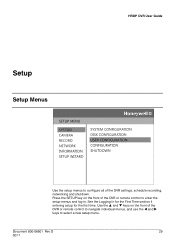
See the Logging In for the First Time section if entering setup for the first time. Document 800-06801 Rev D 29 02/11 Use the and keys on the front of the DVR settings, schedule recording, networking and shutdown. Setup Setup Menus HRDP DVR User Guide Use the setup menus to select a new setup menu. Press the SETUP key on the front of the DVR or remote control to navigate individual menus, and use the and keys to configure all of the DVR or remote control to enter the setup menus and log in.
See the Logging In for the First Time section if entering setup for the first time. Document 800-06801 Rev D 29 02/11 Use the and keys on the front of the DVR settings, schedule recording, networking and shutdown. Setup Setup Menus HRDP DVR User Guide Use the setup menus to select a new setup menu. Press the SETUP key on the front of the DVR or remote control to navigate individual menus, and use the and keys to configure all of the DVR or remote control to enter the setup menus and log in.
User Guide
Page 31
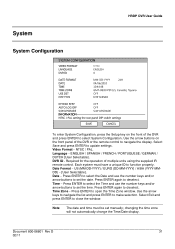
.... System System Configuration HRDP DVR User Guide To enter System Configuration, press the Setup key on the front panel of the DVR or the remote control to deselect. DVR ID - ENGLISH / SPANISH / FRENCH / PORTUGUESE / GERMAN / DUTCH [User Selectable]. Required for the operation of the DVR and .../ PAL. Press ENTER again to navigate the display. Use the arrow buttons on the front of multiple units using the supplied IR remote control. Press ENTER to update settings. Select Save and press ENTER to open the Time Zone window. Date Format - Press ENTER to select the...
.... System System Configuration HRDP DVR User Guide To enter System Configuration, press the Setup key on the front panel of the DVR or the remote control to deselect. DVR ID - ENGLISH / SPANISH / FRENCH / PORTUGUESE / GERMAN / DUTCH [User Selectable]. Required for the operation of the DVR and .../ PAL. Press ENTER again to navigate the display. Use the arrow buttons on the front of multiple units using the supplied IR remote control. Press ENTER to update settings. Select Save and press ENTER to open the Time Zone window. Date Format - Press ENTER to select the...
User Guide
Page 32
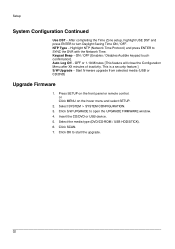
.... 4. OFF or 1-10 Minutes [This feature will close the Configuration Menu after XX minutes of inactivity. or Click MENU on the front panel or remote control. Select the media type (DVD/CD-ROM / USB HDD/STICK). 6. NTP Type - ON / OFF [Enables / Disables Audible keypad touch confirmation]. Select SYSTEM > SYSTEM CONFIGURATION. 3. Setup...
.... 4. OFF or 1-10 Minutes [This feature will close the Configuration Menu after XX minutes of inactivity. or Click MENU on the front panel or remote control. Select the media type (DVD/CD-ROM / USB HDD/STICK). 6. NTP Type - ON / OFF [Enables / Disables Audible keypad touch confirmation]. Select SYSTEM > SYSTEM CONFIGURATION. 3. Setup...

User Guide
Page 37
...CONNECTION - LIVE & PLAYBACK - Enter a USER name. 5. USE CD/DVD/USB - To add a new user: 1. Press MENU on the front panel or remote control. Select SYSTEM > USER CONFIGURATION. 3. Select the FUNCTIONs and MENU ACCESS options for the new user. 6. Allow the user to view live and recorded data for... only the selected cameras. Enter a PASSWORD and CONFIRM for the user. 7. This is made. Allow the user control of the Backup Viewer application when a local backup is a Server side feature only. Allow the user to perform an export or backup saved data...
...CONNECTION - LIVE & PLAYBACK - Enter a USER name. 5. USE CD/DVD/USB - To add a new user: 1. Press MENU on the front panel or remote control. Select SYSTEM > USER CONFIGURATION. 3. Select the FUNCTIONs and MENU ACCESS options for the new user. 6. Allow the user to view live and recorded data for... only the selected cameras. Enter a PASSWORD and CONFIRM for the user. 7. This is made. Allow the user control of the Backup Viewer application when a local backup is a Server side feature only. Allow the user to perform an export or backup saved data...

User Guide
Page 43
... > SCHEDULE. 3. MOTION-detection recording. Press MENU on the Mouse-over menu and select SETUP. 2. CONTINUOUS recording. or Click MENU on the front panel or remote control.
... > SCHEDULE. 3. MOTION-detection recording. Press MENU on the Mouse-over menu and select SETUP. 2. CONTINUOUS recording. or Click MENU on the front panel or remote control.

User Guide
Page 45
Press MENU on the Mouse-over menu and select SETUP. 2. or Click MENU on the front panel or remote control. Select RECORD > RECORD CONFIGURATION > SCHEDULE. 3. Create a recording schedule in Instant Record setup. Select ADD to 32 individual HOLIDAY recording schedules. ...channels at the recording rate configured in the H.DAY row. 4. You can add up to add the holiday. Instant Recording The DVR remote controller has an Instant Recording button. Type a description in the graphic search bar. All the channels, regardless of recording mode & recording on/off,...
Press MENU on the Mouse-over menu and select SETUP. 2. or Click MENU on the front panel or remote control. Select RECORD > RECORD CONFIGURATION > SCHEDULE. 3. Create a recording schedule in Instant Record setup. Select ADD to 32 individual HOLIDAY recording schedules. ...channels at the recording rate configured in the H.DAY row. 4. You can add up to add the holiday. Instant Recording The DVR remote controller has an Instant Recording button. Type a description in the graphic search bar. All the channels, regardless of recording mode & recording on/off,...

User Guide
Page 46
... Recording on the DVR: • Press the REC key on the front panel of the DVR or remote control, or click the Instant recording button on the front panel of the DVR or remote control. Set the picture quality (affects file size). Setup Instant Recording Configure the recording settings for Instant Recording...
... Recording on the DVR: • Press the REC key on the front panel of the DVR or remote control, or click the Instant recording button on the front panel of the DVR or remote control. Set the picture quality (affects file size). Setup Instant Recording Configure the recording settings for Instant Recording...

User Guide
Page 48
... SAVE to save settings and exit setup. 48 Press SETUP on the front of the DVR or remote control. 2. When finished selecting motion areas press ENTER on the front of the DVR or remote control to save the selected motion grid. 6. Select Record > Motion/Event Configuration and set a motion area (global setting...
... SAVE to save settings and exit setup. 48 Press SETUP on the front of the DVR or remote control. 2. When finished selecting motion areas press ENTER on the front of the DVR or remote control to save the selected motion grid. 6. Select Record > Motion/Event Configuration and set a motion area (global setting...

User Guide
Page 50
... all relays. OFF / 1~4 [Associate an alarm relay with event]. 50 Setup Action S.M.A.R.T. This function is used to a preset position when an event occurs. See PTZ Control for more information.] NOTIFY - Alarm The S.M.A.R.T. ALARM option is active]. page. Delay - 0~100 Seconds [Delay time before relay activates]. Duration - 0~100 Seconds [Time that the...
... all relays. OFF / 1~4 [Associate an alarm relay with event]. 50 Setup Action S.M.A.R.T. This function is used to a preset position when an event occurs. See PTZ Control for more information.] NOTIFY - Alarm The S.M.A.R.T. ALARM option is active]. page. Delay - 0~100 Seconds [Delay time before relay activates]. Duration - 0~100 Seconds [Time that the...

User Guide
Page 54
TYPE - Port Information BAUD RATE / DATA BIT / PARITY / STOP BIT 54 MODEL - Select appropriate model. Setup Serial Configuration Configure connected serial devices. None / External Controller.
TYPE - Port Information BAUD RATE / DATA BIT / PARITY / STOP BIT 54 MODEL - Select appropriate model. Setup Serial Configuration Configure connected serial devices. None / External Controller.