
Reference Guide
Page 7
... Alarm Output Connection 22 PTZ Dome Connections 22 Honeywell IP Utility Logon Window 31 IP Utility User Interface 33 IP Network Settings Set Automatically or Manually 35 ActiveX Prompt 38 Internet Options 38 Security Settings 39 Web-Client Interface After Logging On 40 Launching the HNVE1 Web-Client from IP Utility 43 Web...
... Alarm Output Connection 22 PTZ Dome Connections 22 Honeywell IP Utility Logon Window 31 IP Utility User Interface 33 IP Network Settings Set Automatically or Manually 35 ActiveX Prompt 38 Internet Options 38 Security Settings 39 Web-Client Interface After Logging On 40 Launching the HNVE1 Web-Client from IP Utility 43 Web...

Reference Guide
Page 23
...the distance between the HNVE1 and a dome or camera must be removed. If it does not illuminate, check the removable terminal block connections and the power source. Note To ease installation, the terminal block can be performed by a qualified service technician. Secure the power leads by... plastic or metal cable covers. Note Check the power source from the external power supply before applying power to either power lead to the HNVE1. 1. Use a screwdriver to first loosen the ~AC24V/...
...the distance between the HNVE1 and a dome or camera must be removed. If it does not illuminate, check the removable terminal block connections and the power source. Note To ease installation, the terminal block can be performed by a qualified service technician. Secure the power leads by... plastic or metal cable covers. Note Check the power source from the external power supply before applying power to either power lead to the HNVE1. 1. Use a screwdriver to first loosen the ~AC24V/...

Reference Guide
Page 24
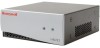
... a video-in feed • Protects the encoder from a 12 VDC source or a CAT5 Ethernet connector (PoE); Install the HNVE1 in the cover. never both at the same time. Mounting in a Rack Securely mount the HNVE1 in a 19 in the rack: 1. Attach the mounting brackets (supplied) to extreme fluctuations in temperature Mounting Considerations Do...
... a video-in feed • Protects the encoder from a 12 VDC source or a CAT5 Ethernet connector (PoE); Install the HNVE1 in the cover. never both at the same time. Mounting in a Rack Securely mount the HNVE1 in a 19 in the rack: 1. Attach the mounting brackets (supplied) to extreme fluctuations in temperature Mounting Considerations Do...

Reference Guide
Page 25
Secure the mounting brackets to the rack using screws (not supplied). Place the HNVE1 on a shelf in your rack (not supplied). 3. Document 800-04195 Rev B 25 11/09 HNVE1 V2.1 1-Channel Encoder Reference Guide 2.
Secure the mounting brackets to the rack using screws (not supplied). Place the HNVE1 on a shelf in your rack (not supplied). 3. Document 800-04195 Rev B 25 11/09 HNVE1 V2.1 1-Channel Encoder Reference Guide 2.

Reference Guide
Page 32
...Utility and Web-Client Software 3. Note During the installation set up, you must log on the network - The Honeywell IP Utility program searches for additional security. After the initial discovery, the network automatically continues to discover devices that are automatically discovered and listed in the user...or manually refresh the list of the 6. When you logged onto the system. • You do not need to do anything to the Honeywell IP Utility user interface. 5. including the devices on at a time. • The default Guest password is guest. Only an Administrator login ...
...Utility and Web-Client Software 3. Note During the installation set up, you must log on the network - The Honeywell IP Utility program searches for additional security. After the initial discovery, the network automatically continues to discover devices that are automatically discovered and listed in the user...or manually refresh the list of the 6. When you logged onto the system. • You do not need to do anything to the Honeywell IP Utility user interface. 5. including the devices on at a time. • The default Guest password is guest. Only an Administrator login ...
Reference Guide
Page 37
... the Discovery pane, click to select the device to launch the Web-Client and log on- Click . There are prompted to upgrade to Honeywell secure ActiveX control. c. c. Internet Explorer From Internet Explorer (v6.0+), type in the URL (IP address of the device) in a Password. ...from Internet Explorer. Note It is important to click Apply to open the logon window. 2. Installing Honeywell IP (ActiveX Plug-in Internet Explorer. Honeywell IP Utility a. HNVE1 V2.1 1-Channel Encoder Reference Guide Note After the IP Utility software is installed for the first time...
... the Discovery pane, click to select the device to launch the Web-Client and log on- Click . There are prompted to upgrade to Honeywell secure ActiveX control. c. c. Internet Explorer From Internet Explorer (v6.0+), type in the URL (IP address of the device) in a Password. ...from Internet Explorer. Note It is important to click Apply to open the logon window. 2. Installing Honeywell IP (ActiveX Plug-in Internet Explorer. Honeywell IP Utility a. HNVE1 V2.1 1-Channel Encoder Reference Guide Note After the IP Utility software is installed for the first time...

Reference Guide
Page 38
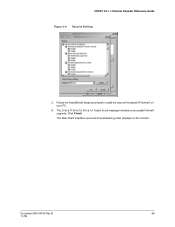
... Custom Level ... . 3. Open Internet Explorer, then on your web browser is set to Tools ➤ Internet Options ... ➤ Security tab (see Figure 3-6). 4. Click OK. 38 The Security Settings dialog displays. Confirm that your web browser menu bar, navigate to accept ActiveX. Installing the Honeywell IP Utility and Web-Client Software Figure 3-4 ActiveX Prompt 1.
... Custom Level ... . 3. Open Internet Explorer, then on your web browser is set to Tools ➤ Internet Options ... ➤ Security tab (see Figure 3-6). 4. Click OK. 38 The Security Settings dialog displays. Confirm that your web browser menu bar, navigate to accept ActiveX. Installing the Honeywell IP Utility and Web-Client Software Figure 3-4 ActiveX Prompt 1.
Reference Guide
Page 39
Click Finish. The InstallShield Wizard Completed message indicates a successful ActiveX upgrade. HNVE1 V2.1 1-Channel Encoder Reference Guide Figure 3-6 Security Settings 5. The Web-Client interface opens and live streaming video displays on your PC. 6. Follow the InstallShield Wizard prompts to install the secure Honeywell IP ActiveX on the monitor. Document 800-04195 Rev B 39 11/09
Click Finish. The InstallShield Wizard Completed message indicates a successful ActiveX upgrade. HNVE1 V2.1 1-Channel Encoder Reference Guide Figure 3-6 Security Settings 5. The Web-Client interface opens and live streaming video displays on your PC. 6. Follow the InstallShield Wizard prompts to install the secure Honeywell IP ActiveX on the monitor. Document 800-04195 Rev B 39 11/09

Reference Guide
Page 73
... Utility. From the desktop, double-click the Honeywell IP Utility icon . 6 System Administration This chapter covers: • Working with passwords • Upgrading the firmware to your EQUIP Series HNVE1 encoder • Uninstalling the Honeywell IP Utility and secure IP ActiveX Changing Passwords Changing the Honeywell IP Utility User Password To change a user password: 1. Document 800...
... Utility. From the desktop, double-click the Honeywell IP Utility icon . 6 System Administration This chapter covers: • Working with passwords • Upgrading the firmware to your EQUIP Series HNVE1 encoder • Uninstalling the Honeywell IP Utility and secure IP ActiveX Changing Passwords Changing the Honeywell IP Utility User Password To change a user password: 1. Document 800...

Reference Guide
Page 92
... Place North Ryde, NSW 2113, Australia www.honeywellsecurity.com.au +61.2.9353.7000 Honeywell Systems Group Asia 35F Tower A, City Center, 100 Zun Yi Road Shanghai 200051, China www.asia.security.honeywell.com +86 21.5257.4568 Honeywell Systems Group Middle East/N. The information contained herein is believed to be issued to...
... Place North Ryde, NSW 2113, Australia www.honeywellsecurity.com.au +61.2.9353.7000 Honeywell Systems Group Asia 35F Tower A, City Center, 100 Zun Yi Road Shanghai 200051, China www.asia.security.honeywell.com +86 21.5257.4568 Honeywell Systems Group Middle East/N. The information contained herein is believed to be issued to...