User Manual
Page 1
Rev. 1.01 September 2005 - HJZTP/HJZTPX Joystick Controller for PTZ Cameras, DVRs, and Multiplexers User Manual 900.0570 -
Rev. 1.01 September 2005 - HJZTP/HJZTPX Joystick Controller for PTZ Cameras, DVRs, and Multiplexers User Manual 900.0570 -
User Manual
Page 10
... PTZ TOUR OPERATION...44 SECTION 9: TECHNICAL SPECIFICATIONS 45 APPENDIX A: MENU NAVIGATION ...47 APPENDIX B: DIAGNOSTICS ...49 B.1 JOYSTICK AUTO CALIBRATION 49 B.2 KEY TEST...49 APPENDIX C: VCL (ORBITER/RAPIDDOME) DATA INPUT 51 APPENDIX D: PASSWORDS...53 LIST OF FIGURES Figure 1: HJZTP Rear Panel ...3 Figure 2. SAMPLE SYSTEM OF CASCADED KEYBOARDS 8 Rev. 1.01 x 900.0570 8-Sept-05 DOME...
... PTZ TOUR OPERATION...44 SECTION 9: TECHNICAL SPECIFICATIONS 45 APPENDIX A: MENU NAVIGATION ...47 APPENDIX B: DIAGNOSTICS ...49 B.1 JOYSTICK AUTO CALIBRATION 49 B.2 KEY TEST...49 APPENDIX C: VCL (ORBITER/RAPIDDOME) DATA INPUT 51 APPENDIX D: PASSWORDS...53 LIST OF FIGURES Figure 1: HJZTP Rear Panel ...3 Figure 2. SAMPLE SYSTEM OF CASCADED KEYBOARDS 8 Rev. 1.01 x 900.0570 8-Sept-05 DOME...
User Manual
Page 11
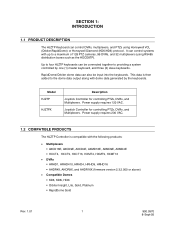
... maximum of 128 PTZ cameras, 99 DVRs, and 32 multiplexers (using Honeywell VCL (Orbiter/RapidDome) or Honeywell Diamond (KD6/HD6) protocol. Power supply requires 230 VAC. 1.2 COMPATIBLE PRODUCTS The HJZTP Controller is then added to the dome data output along with up to ... PRODUCT DESCRIPTION The HJZTP Keyboard can control systems with dome data generated by one (1) master keyboard, and three (3) slave keyboards. It can control DVRs, multiplexers, and PTZs using RS485 distribution boxes such as the HDCD8TP). Power supply requires 120 VAC. Joystick Controller for controlling ...
... maximum of 128 PTZ cameras, 99 DVRs, and 32 multiplexers (using Honeywell VCL (Orbiter/RapidDome) or Honeywell Diamond (KD6/HD6) protocol. Power supply requires 230 VAC. 1.2 COMPATIBLE PRODUCTS The HJZTP Controller is then added to the dome data output along with up to ... PRODUCT DESCRIPTION The HJZTP Keyboard can control systems with dome data generated by one (1) master keyboard, and three (3) slave keyboards. It can control DVRs, multiplexers, and PTZs using RS485 distribution boxes such as the HDCD8TP). Power supply requires 120 VAC. Joystick Controller for controlling ...

User Manual
Page 12
1.3 PACKAGE CONTENTS Quantity Description 1 HJZTP or HJZTPX Joystick Controller 1 HJZMU001150 User Manual 1 120 VAC to 12VDC 300mA power supply (HJZTP) or 230 VAC to 12VDC 300mA power supply (HJZTPX) 2 Cable, 8-Way RJ45 Connector on both ends (connect between keyboards and DVRs/Multiplexers) 1 Cable, RJ45 connector one end and fly leads with green wire and blue wire on other end 1 Cable, 8-Way RJ45 Connector one end and fly lead with white/orange and orange wires on other end Rev. 1.01 2 900.0570 8-Sept-05
1.3 PACKAGE CONTENTS Quantity Description 1 HJZTP or HJZTPX Joystick Controller 1 HJZMU001150 User Manual 1 120 VAC to 12VDC 300mA power supply (HJZTP) or 230 VAC to 12VDC 300mA power supply (HJZTPX) 2 Cable, 8-Way RJ45 Connector on both ends (connect between keyboards and DVRs/Multiplexers) 1 Cable, RJ45 connector one end and fly leads with green wire and blue wire on other end 1 Cable, 8-Way RJ45 Connector one end and fly lead with white/orange and orange wires on other end Rev. 1.01 2 900.0570 8-Sept-05
User Manual
Page 23
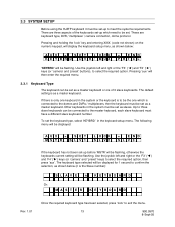
... the 'F3' ('◄') and 'F4' ('►') keys (or 'camera' and 'preset' buttons), to select the required option, then press 'aux'. Use the joystick left and right or the 'F3' ('') and 'F4' ('') keys (or 'camera' and 'preset' keys) to select the required option. 3.3 SYSTEM... SETUP Before using the HJZTP keyboard it must be set-up to the master keyboard, each slave keyboard must have a different slave keyboard number. The following menu will be displayed...
... the 'F3' ('◄') and 'F4' ('►') keys (or 'camera' and 'preset' buttons), to select the required option, then press 'aux'. Use the joystick left and right or the 'F3' ('') and 'F4' ('') keys (or 'camera' and 'preset' keys) to select the required option. 3.3 SYSTEM... SETUP Before using the HJZTP keyboard it must be set-up to the master keyboard, each slave keyboard must have a different slave keyboard number. The following menu will be displayed...
User Manual
Page 24
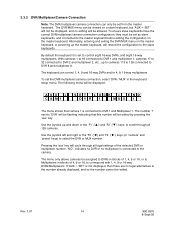
... connected to DVR 2 and multiplexer 2, etc., up and down or the 'F1' ('') and 'F2' ('') keys, to scroll through all 128 cameras. Use the joystick up to cameras 113 to 128 connected to control eight 16-way DVRs, and eight 16-way multiplexers. Use the... joystick left and right or the 'F3' ('') and 'F4' ('') keys (or 'camera' and 'preset' keys) to the slave keyboards. Pressing the 'aux' key will ...
... connected to DVR 2 and multiplexer 2, etc., up and down or the 'F1' ('') and 'F2' ('') keys, to scroll through all 128 cameras. Use the joystick up to cameras 113 to 128 connected to control eight 16-way DVRs, and eight 16-way multiplexers. Use the... joystick left and right or the 'F3' ('') and 'F4' ('') keys (or 'camera' and 'preset' keys) to the slave keyboards. Pressing the 'aux' key will ...
User Manual
Page 29
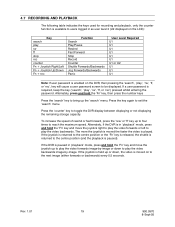
... play the video backwards image-by-image. If the DVR is in 'playback' mode, press and hold the 'Fn' key and move the joystick right to play the video forwards or left to play the video backwards. 4.7 RECORDING AND PLAYBACK The following table indicates the keys used for recording...available to users logged in as user level 2 (U2 displayed on the LCD): Key search play rw ff stop rec counter Fn + Joystick Right/Left Fn + Joystick Up/Down Fn + rec Function Search Play/Pause Rewind Fast Forward Stop Record Counter Shuttle Forwards/Backwards Jog Forwards/Backwards Panic User Level ...
... play the video backwards image-by-image. If the DVR is in 'playback' mode, press and hold the 'Fn' key and move the joystick right to play the video forwards or left to play the video backwards. 4.7 RECORDING AND PLAYBACK The following table indicates the keys used for recording...available to users logged in as user level 2 (U2 displayed on the LCD): Key search play rw ff stop rec counter Fn + Joystick Right/Left Fn + Joystick Up/Down Fn + rec Function Search Play/Pause Rewind Fast Forward Stop Record Counter Shuttle Forwards/Backwards Jog Forwards/Backwards Panic User Level ...
User Manual
Page 35
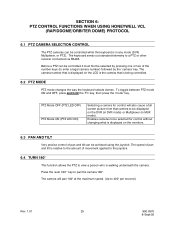
... 180° This function allows the PTZ to view a person who is relative to the amount of pan and tilt can be achieved using the joystick. Enables cameras to be selected for control will pan 180° at the maximum speed. (Up to 400° per second.) Rev. 1.01 25 900..., then press the 'mode' key. Press the 'auto 180°' key to a PTZ or other receiver connected via RS485. SECTION 6: PTZ CONTROL FUNCTIONS WHEN USING HONEYWELL VCL (RAPIDDOME/ORBITER DOME) PROTOCOL 6.1 PTZ CAMERA SELECTION CONTROL The PTZ cameras can be controlled it must first be selected by pressing one or two...
... 180° This function allows the PTZ to view a person who is relative to the amount of pan and tilt can be achieved using the joystick. Enables cameras to be selected for control will pan 180° at the maximum speed. (Up to 400° per second.) Rev. 1.01 25 900..., then press the 'mode' key. Press the 'auto 180°' key to a PTZ or other receiver connected via RS485. SECTION 6: PTZ CONTROL FUNCTIONS WHEN USING HONEYWELL VCL (RAPIDDOME/ORBITER DOME) PROTOCOL 6.1 PTZ CAMERA SELECTION CONTROL The PTZ cameras can be controlled it must first be selected by pressing one or two...
User Manual
Page 36
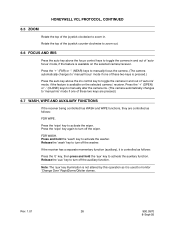
... to toggle the camera in . Note: The 'aux' key illumination is not altered by this operation as it is controlled as follows: FOR WIPE. HONEYWELL VCL PROTOCOL, CONTINUED 6.5 ZOOM Rotate the top of 'auto-iris' mode, if the feature is available on the selected camera/receiver. Release the 'wash...and WIPE functions, they are controlled as follows: Press the '0' key, then press and hold the 'wash' key to zoom in and out of the joystick clockwise to activate the washer. Press the '+' (OPEN) or '-' (CLOSE) keys to manually alter the camera iris. (The camera automatically changes to ...
... to toggle the camera in . Note: The 'aux' key illumination is not altered by this operation as it is controlled as follows: FOR WIPE. HONEYWELL VCL PROTOCOL, CONTINUED 6.5 ZOOM Rotate the top of 'auto-iris' mode, if the feature is available on the selected camera/receiver. Release the 'wash...and WIPE functions, they are controlled as follows: Press the '0' key, then press and hold the 'wash' key to zoom in and out of the joystick clockwise to activate the washer. Press the '+' (OPEN) or '-' (CLOSE) keys to manually alter the camera iris. (The camera automatically changes to ...
User Manual
Page 37
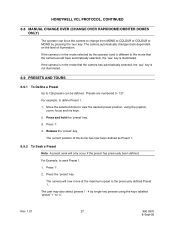
... camera will only occur if the preset has previously been defined. If the camera is in the mode selected by single key presses using the joystick, zoom, focus and iris keys. 2. Press '1'. 4. If the camera is not illuminated. 6.9 PRESETS AND TOURS 6.9.1 To Define a Preset Up... 0 - 127. The user may also select presets 1 - 4 by the operator (and is different to '4'. Rev. 1.01 27 900.0570 8-Sept-05 HONEYWELL VCL PROTOCOL, CONTINUED 6.8 MANUAL CHANGE OVER (CHANGE OVER RAPIDDOME/ORBITER DOMES ONLY) The operator can be defined. The camera automatically changes back dependant on the...
... camera will only occur if the preset has previously been defined. If the camera is in the mode selected by single key presses using the joystick, zoom, focus and iris keys. 2. Press '1'. 4. If the camera is not illuminated. 6.9 PRESETS AND TOURS 6.9.1 To Define a Preset Up... 0 - 127. The user may also select presets 1 - 4 by the operator (and is different to '4'. Rev. 1.01 27 900.0570 8-Sept-05 HONEYWELL VCL PROTOCOL, CONTINUED 6.8 MANUAL CHANGE OVER (CHANGE OVER RAPIDDOME/ORBITER DOMES ONLY) The operator can be defined. The camera automatically changes back dependant on the...
User Manual
Page 40
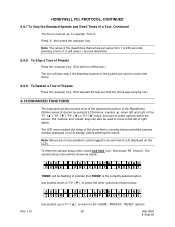
HONEYWELL VCL PROTOCOL, CONTINUED 6.9.7 To Vary the Standard Speeds and Dwell Times of... will be flashing to 254 seconds. To enter the camera setup menu, press and hold 'lock', then press 'F6' ('menu'). Use joystick down , left or right option. Entering a time of '0' will select 1 second dwell time. 6.9.8 To Stop a Tour of Presets ...users logged in as below : Rev. 1.01 AUX = S E T L OCK = E ND Z OOM I R / L A MP A U T O1 8 0 Use joystick up . To operate 'Tour 3': Press '3', then press the 'autopan' key. The camera setup menu will start the last tour that the dome was carrying out...
HONEYWELL VCL PROTOCOL, CONTINUED 6.9.7 To Vary the Standard Speeds and Dwell Times of... will be flashing to 254 seconds. To enter the camera setup menu, press and hold 'lock', then press 'F6' ('menu'). Use joystick down , left or right option. Entering a time of '0' will select 1 second dwell time. 6.9.8 To Stop a Tour of Presets ...users logged in as below : Rev. 1.01 AUX = S E T L OCK = E ND Z OOM I R / L A MP A U T O1 8 0 Use joystick up . To operate 'Tour 3': Press '3', then press the 'autopan' key. The camera setup menu will start the last tour that the dome was carrying out...

User Manual
Page 41
... to define the tours and presets. Once the required privacy setup has been entered press 'lock' to toggle the preset status between 'PRIVACY' and 'PRESET'. HONEYWELL VCL PROTOCOL, CONTINUED 6.10.1 Home Select 'HOME' in the camera setup menu, then press 'aux' to display the home menu as shown below: AUX = S E T L ... L OCK = E ND T I ME OU T n n n nnn is the preset number. Note: Before the Home Preset (preset 0) or Home Tour (tour 1) can be edited using the joystick up and down or 'F1' ('▲'), 'F2' ('▼') keys. Selected the required preset number by using the numeric keys.
... to define the tours and presets. Once the required privacy setup has been entered press 'lock' to toggle the preset status between 'PRIVACY' and 'PRESET'. HONEYWELL VCL PROTOCOL, CONTINUED 6.10.1 Home Select 'HOME' in the camera setup menu, then press 'aux' to display the home menu as shown below: AUX = S E T L ... L OCK = E ND T I ME OU T n n n nnn is the preset number. Note: Before the Home Preset (preset 0) or Home Tour (tour 1) can be edited using the joystick up and down or 'F1' ('▲'), 'F2' ('▼') keys. Selected the required preset number by using the numeric keys.
User Manual
Page 46
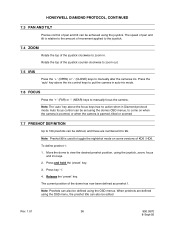
HONEYWELL DIAMOND PROTOCOL, CONTINUED 7.3 PAN AND TILT Precise control of KD6 / HD6. Note: Preshot 99...be edited Rev. 1.01 36 900.0570 8-Sept-05 Press key '1'. 4. Release the 'preset' key. The current position of the joystick counter-clockwise to zoom out. 7.5 IRIS Press the '+' (OPEN) or '-' (CLOSE) keys to toggle the nightshot mode on when ... the desired preshot position, using the OSD menus. Note. Move the dome to 99. Note: Preshots can be defined using the joystick, zoom, focus and iris keys. 2. The 'auto' key above the iris control keys to put the camera in auto-iris ...
HONEYWELL DIAMOND PROTOCOL, CONTINUED 7.3 PAN AND TILT Precise control of KD6 / HD6. Note: Preshot 99...be edited Rev. 1.01 36 900.0570 8-Sept-05 Press key '1'. 4. Release the 'preset' key. The current position of the joystick counter-clockwise to zoom out. 7.5 IRIS Press the '+' (OPEN) or '-' (CLOSE) keys to toggle the nightshot mode on when ... the desired preshot position, using the OSD menus. Note. Move the dome to 99. Note: Preshots can be defined using the joystick, zoom, focus and iris keys. 2. The 'auto' key above the iris control keys to put the camera in auto-iris ...
User Manual
Page 48
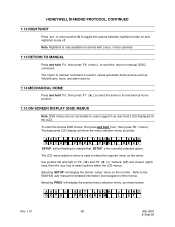
... will show the menu selection menu as VectorScans, tours, and alarm actions. 7.14 MECHANICAL HOME Press and hold 'lock', then press 'F6' ('menu'). Use joystick left and right or 'F3' ('◄') and 'F4' ('►') or 'camera' (left) and 'preset' (right) keys, then the 'aux' key ...to toggle the camera between nightshot mode on the dome. HONEYWELL DIAMOND PROTOCOL, CONTINUED 7.12 NIGHTSHOT Press 'aux' or enter preshot 99 to select options within the LCD menus. Refer to select the required menu on...
... will show the menu selection menu as VectorScans, tours, and alarm actions. 7.14 MECHANICAL HOME Press and hold 'lock', then press 'F6' ('menu'). Use joystick left and right or 'F3' ('◄') and 'F4' ('►') or 'camera' (left) and 'preset' (right) keys, then the 'aux' key ...to toggle the camera between nightshot mode on the dome. HONEYWELL DIAMOND PROTOCOL, CONTINUED 7.12 NIGHTSHOT Press 'aux' or enter preshot 99 to select options within the LCD menus. Refer to select the required menu on...
User Manual
Page 55
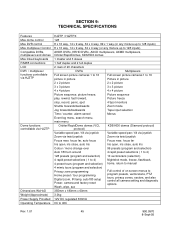
... Control Compatible DVRs, multiplexers and domes Max linked keyboards RS485 connections LCD DVR / multiplexer functions controllable via HJZTP Dome functions controllable via HJZTP Dimensions WxHxD Weight (Approximate) Power Supply Provided Operating Temperature HJZTP / HJZTPX 128 8 x 16 way, 14 x 9 way, 32 x 4 way, 99 x ... domes (VCL protocol) KD6/HD6 domes (Diamond protocol) Variable speed pan / tilt via joystick Variable speed pan / tilt via joystick Zoom via twist joystick Zoom via twist joystick Focus near, focus far, auto focus Focus near, focus far Iris open, iris close...
... Control Compatible DVRs, multiplexers and domes Max linked keyboards RS485 connections LCD DVR / multiplexer functions controllable via HJZTP Dome functions controllable via HJZTP Dimensions WxHxD Weight (Approximate) Power Supply Provided Operating Temperature HJZTP / HJZTPX 128 8 x 16 way, 14 x 9 way, 32 x 4 way, 99 x ... domes (VCL protocol) KD6/HD6 domes (Diamond protocol) Variable speed pan / tilt via joystick Variable speed pan / tilt via joystick Zoom via twist joystick Zoom via twist joystick Focus near, focus far, auto focus Focus near, focus far Iris open, iris close...
User Manual
Page 59
... given if any key is performed. Rev. 1.01 49 900.0570 8-Sept-05 It is important that the joystick is at its centre position when this is pressed out of sequence. APPENDIX B: DIAGNOSTICS B.1 JOYSTICK AUTO CALIBRATION Pressing and holding the 'lock' key and entering 2323 on the numeric keypad will calibrate the...
... given if any key is performed. Rev. 1.01 49 900.0570 8-Sept-05 It is important that the joystick is at its centre position when this is pressed out of sequence. APPENDIX B: DIAGNOSTICS B.1 JOYSTICK AUTO CALIBRATION Pressing and holding the 'lock' key and entering 2323 on the numeric keypad will calibrate the...
