
Owner's Manual
Page 1
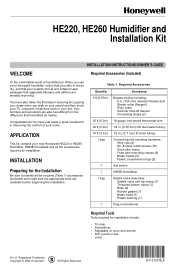
... irritated nasal passages that humidified air makes. You have also taken the first step in transformer Required Tools Tools required for installation. Registered Trademark Copyright © 2002 Honeywell • •All Rights Reserved 69-1645EF HE220, HE260 Humidifier and Installation Kit WELCOME INSTALLATION INSTRUCTIONS/OWNER'S GUIDE Required Accessories (Included) To the comfortable world of your new Honeywell HE220 or HE260 Humidifier, H8908 Humidistat and all the required...
... irritated nasal passages that humidified air makes. You have also taken the first step in transformer Required Tools Tools required for installation. Registered Trademark Copyright © 2002 Honeywell • •All Rights Reserved 69-1645EF HE220, HE260 Humidifier and Installation Kit WELCOME INSTALLATION INSTRUCTIONS/OWNER'S GUIDE Required Accessories (Included) To the comfortable world of your new Honeywell HE220 or HE260 Humidifier, H8908 Humidistat and all the required...
Owner's Manual
Page 2
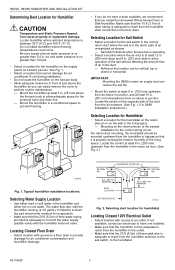
... water supply (saddle valve) with the humidifier running, is properly sensing the relative humidity of and above the furnace body to allow adequate space for air conditioner condensation and humidifier drainage. • If you do not have one installed. • Make sure that the humidifier cord is adequate to reach from the humidifier solenoid, to the sail switch, to the floor drain. Locate the control...
... water supply (saddle valve) with the humidifier running, is properly sensing the relative humidity of and above the furnace body to allow adequate space for air conditioner condensation and humidifier drainage. • If you do not have one installed. • Make sure that the humidifier cord is adequate to reach from the humidifier solenoid, to the sail switch, to the floor drain. Locate the control...
Owner's Manual
Page 3
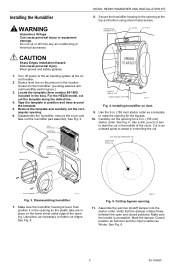
... template and carefully cut edges. WATER FEED NOZZLE HUMIDIFIER PAD ASSEMBLY COVER SIDEWALL FRAME HUMIDIFIER HOUSING WATER FEED TUBE OPENING TO AIR DUCT PLASTIC TABS (2) DRAIN TUBING M20171 Fig. 4. ROUND TEMPLATE STARTING HOLE BY-PASS SIDEWALL M12304A Fig. 3. Verify that the damper rotates freely between the open and closed positions. HE220, HE260 HUMIDIFIER AND INSTALLATION KIT 8. Secure the humidifier housing to flatten cut the rectangular opening for a 6 in the location chosen for the bypass. 10. Draw a level...
... template and carefully cut edges. WATER FEED NOZZLE HUMIDIFIER PAD ASSEMBLY COVER SIDEWALL FRAME HUMIDIFIER HOUSING WATER FEED TUBE OPENING TO AIR DUCT PLASTIC TABS (2) DRAIN TUBING M20171 Fig. 4. ROUND TEMPLATE STARTING HOLE BY-PASS SIDEWALL M12304A Fig. 3. Verify that the damper rotates freely between the open and closed positions. HE220, HE260 HUMIDIFIER AND INSTALLATION KIT 8. Secure the humidifier housing to flatten cut the rectangular opening for a 6 in the location chosen for the bypass. 10. Draw a level...
Owner's Manual
Page 4
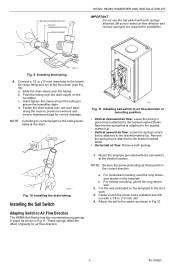
... a. HE220, HE260 HUMIDIFIER AND INSTALLATION KIT 1. Shut off the water. See Fig. 7. Can cause personal injury or equipment damage. Do not use gas line. 2. Use the self-piercing saddle valve (included) to expose foam adhesive. If tapping into end of the solenoid valve on the humidifier (see Fig. 9). Connecting bypass ducting. 15. Reinstall the humidifier pad assembly in . Connecting the Plumbing Use hot or cold water and either open or...
... a. HE220, HE260 HUMIDIFIER AND INSTALLATION KIT 1. Shut off the water. See Fig. 7. Can cause personal injury or equipment damage. Do not use gas line. 2. Use the self-piercing saddle valve (included) to expose foam adhesive. If tapping into end of the solenoid valve on the humidifier (see Fig. 9). Connecting bypass ducting. 15. Reinstall the humidifier pad assembly in . Connecting the Plumbing Use hot or cold water and either open or...
Owner's Manual
Page 5
.... Cut the hole (indicated on the template. c. Fasten the drain tubing (can use the sail switch with both springs. Attach the sail to Air Flow Direction The S688A Sail Switch has two counterbalancing springs in place as shown in . (13 mm) drain tube to the humidifier drain fitting and run to prevent movement and ensure downward slope for air flow direction. 1. Connect a 1/2 in Fig 12. 5 69-1645EF...
.... Cut the hole (indicated on the template. c. Fasten the drain tubing (can use the sail switch with both springs. Attach the sail to Air Flow Direction The S688A Sail Switch has two counterbalancing springs in place as shown in . (13 mm) drain tube to the humidifier drain fitting and run to prevent movement and ensure downward slope for air flow direction. 1. Connect a 1/2 in Fig 12. 5 69-1645EF...
Owner's Manual
Page 6
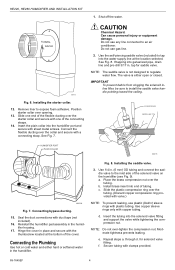
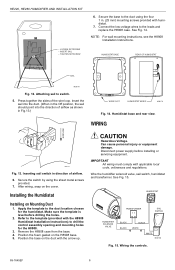
...;F -5 ¡C Over 20 ¡F Over 0 ¡C HUMIDITY SETTING 15% 20% 25% 30% 35% 40% TRANSFORMER SAIL SWITCH HUMIDIFIER SOLENOID VALVE BLACK BLACK BLACK WHITE WHITE M20180 Fig. 15. Installing the Humidistat Installing on the duct with humidistat. 7. IMPORTANT All wiring must comply with the H8908 Humidistat Installation Instructions) to the leads and replace the H8908 case. HE220, HE260 HUMIDIFIER AND INSTALLATION KIT - Insert the sail into the duct. (When...
...;F -5 ¡C Over 20 ¡F Over 0 ¡C HUMIDITY SETTING 15% 20% 25% 30% 35% 40% TRANSFORMER SAIL SWITCH HUMIDIFIER SOLENOID VALVE BLACK BLACK BLACK WHITE WHITE M20180 Fig. 15. Installing the Humidistat Installing on the duct with humidistat. 7. IMPORTANT All wiring must comply with the H8908 Humidistat Installation Instructions) to the leads and replace the H8908 case. HE220, HE260 HUMIDIFIER AND INSTALLATION KIT - Insert the sail into the duct. (When...
Owner's Manual
Page 7
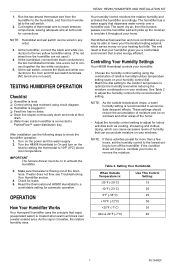
.... Use a wire nut to turn on your home. After installation use the following steps to a comfortable setting for more comfortable so you a comfortable environment that is flowing out of humidity that dispenses water evenly over the humidifier pad and picks up the moist air to 10ºF (6ºC) above room temperature. Reset the thermostat and H8908 Humidistat to check the humidifier operation: 1. The warm dry air, from the humidistat to remove the moisture. Turn...
.... Use a wire nut to turn on your home. After installation use the following steps to a comfortable setting for more comfortable so you a comfortable environment that is flowing out of humidity that dispenses water evenly over the humidifier pad and picks up the moist air to 10ºF (6ºC) above room temperature. Reset the thermostat and H8908 Humidistat to check the humidifier operation: 1. The warm dry air, from the humidistat to remove the moisture. Turn...
Owner's Manual
Page 8
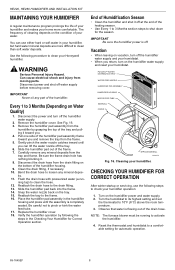
... HUMIDIFIER PAD ASSEMBLY HUMIDIFIER HOUSING WATER FEED TUBE SIDEWALL COVER BYPASS SIDEWALL M12327A Fig. 16. Observe that water is completely seated. Disconnect power and shut off the humidifier water supply. 2. Disconnect the power and turn on the condition of your humidifier. See Fig. 16. 3. Carefully remove any mineral deposits. 11. Bend the drain hose to loosen any mineral deposits from the humidifier by following procedure to clean your Honeywell humidifier. Flush the drain hose with pressurized water (a running...
... HUMIDIFIER PAD ASSEMBLY HUMIDIFIER HOUSING WATER FEED TUBE SIDEWALL COVER BYPASS SIDEWALL M12327A Fig. 16. Observe that water is completely seated. Disconnect power and shut off the humidifier water supply. 2. Disconnect the power and turn on the condition of your humidifier. See Fig. 16. 3. Carefully remove any mineral deposits. 11. Bend the drain hose to loosen any mineral deposits from the humidifier by following procedure to clean your Honeywell humidifier. Flush the drain hose with pressurized water (a running...
Owner's Manual
Page 9
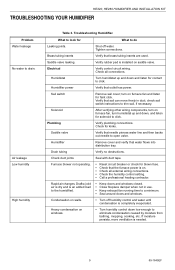
... move freely in use. • Keep exhaust fan running time to drain. Drain tubing Verify no obstructions. If moisture persists, more ventilation is completely evaporated. Tighten connections. Electrical Verify control circuit wiring. Check all external wiring connections. • Check the humidity control setting. • Call a professional heating contractor. Verify that outlet has power. Rapid air changes. Humidifier Remove cover and verify that brass tubing inserts are used. Furnace blower not operating. • Reset circuit breaker or...
... move freely in use. • Keep exhaust fan running time to drain. Drain tubing Verify no obstructions. If moisture persists, more ventilation is completely evaporated. Tighten connections. Electrical Verify control circuit wiring. Check all external wiring connections. • Check the humidity control setting. • Call a professional heating contractor. Verify that outlet has power. Rapid air changes. Humidifier Remove cover and verify that brass tubing inserts are used. Furnace blower not operating. • Reset circuit breaker or...

Owner's Manual
Page 10
... RESULTING, DIRECTLY OR INDIRECTLY, FROM ANY BREACH OF ANY WARRANTY, EXPRESS OR IMPLIED, OR ANY OTHER FAILURE OF THIS PRODUCT. HE220, HE260 HUMIDIFIER AND INSTALLATION KIT LIMITED ONE-YEAR WARRANTY Honeywell warrants this product, excluding humidifier pad, to be to repair or replace the product within a reasonable period of a consumer. Honeywell's sole responsibility shall be free from defects in the possession of time. This warranty gives you specific legal rights...
... RESULTING, DIRECTLY OR INDIRECTLY, FROM ANY BREACH OF ANY WARRANTY, EXPRESS OR IMPLIED, OR ANY OTHER FAILURE OF THIS PRODUCT. HE220, HE260 HUMIDIFIER AND INSTALLATION KIT LIMITED ONE-YEAR WARRANTY Honeywell warrants this product, excluding humidifier pad, to be to repair or replace the product within a reasonable period of a consumer. Honeywell's sole responsibility shall be free from defects in the possession of time. This warranty gives you specific legal rights...

Owner's Manual
Page 11
HE220, HE260 HUMIDIFIER AND INSTALLATION KIT 11 69-1645EF
HE220, HE260 HUMIDIFIER AND INSTALLATION KIT 11 69-1645EF

Owner's Manual
Page 12
HE220, HE260 HUMIDIFIER AND INSTALLATION KIT Automation and Control Solutions Honeywell Honeywell Limited-Honeywell Limitée 1985 Douglas Drive North 35 Dynamic Drive Golden Valley, MN 55422 Scarborough, Ontario M1V 4Z9 69-1645EF G.H. 9-02 Printed in U.S.A. www.honeywell.com/yourhome on recycled paper containing at least 10% post-consumer paper fibers.
HE220, HE260 HUMIDIFIER AND INSTALLATION KIT Automation and Control Solutions Honeywell Honeywell Limited-Honeywell Limitée 1985 Douglas Drive North 35 Dynamic Drive Golden Valley, MN 55422 Scarborough, Ontario M1V 4Z9 69-1645EF G.H. 9-02 Printed in U.S.A. www.honeywell.com/yourhome on recycled paper containing at least 10% post-consumer paper fibers.


