
Owner's Manual
Page 1
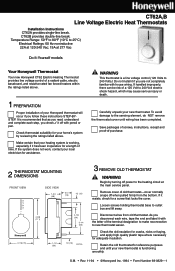
..., nicks or fraying, and apply high quality plastic tape where necessary for reference purposes and until wiring has been completed. S.M. • Rev. 11-94 • ©Honeywell Inc. 1994 • Form Number 69-0829-1 WARNING This thermostat is recommended that locks the cover... (120 Volts to the sensing element, do NOT remove the thermostat cover until your Honeywell thermostat will occur if you are not completely familiar with pencil or pen. CT62B provides double-line break. CT62A,B Line Voltage Electric Heat Thermostats Installation Instructions CT62A provides single...
..., nicks or fraying, and apply high quality plastic tape where necessary for reference purposes and until wiring has been completed. S.M. • Rev. 11-94 • ©Honeywell Inc. 1994 • Form Number 69-0829-1 WARNING This thermostat is recommended that locks the cover... (120 Volts to the sensing element, do NOT remove the thermostat cover until your Honeywell thermostat will occur if you are not completely familiar with pencil or pen. CT62B provides double-line break. CT62A,B Line Voltage Electric Heat Thermostats Installation Instructions CT62A provides single...
Owner's Manual
Page 2
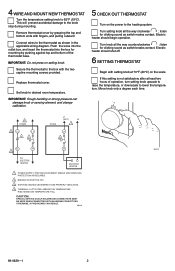
...pushing against top and bottom of operation, turn setting knob upscale to raise the temperature, or downscale to lower the temperature. Connect wires to the knob stop during mounting. Electric heater should shut off. 6 SETTING THERMOSTAT Begin with fingers, and pulling outward. If this...the heating system. OTHERWISE, A FIRE HAZARD CAN RESULT. IMPORTANT: Rough handling or strong pressure can damage knob or sensing element, and change calibration. 1 CT62B 3 L2 2 L1 4 CT62A L1 (HOT) L2 1 L1 4 55 60 80 85 5 CHECK OUT THERMOSTAT Turn on setting knob. PROVIDE DISCONNECT...
...pushing against top and bottom of operation, turn setting knob upscale to raise the temperature, or downscale to lower the temperature. Connect wires to the knob stop during mounting. Electric heater should shut off. 6 SETTING THERMOSTAT Begin with fingers, and pulling outward. If this...the heating system. OTHERWISE, A FIRE HAZARD CAN RESULT. IMPORTANT: Rough handling or strong pressure can damage knob or sensing element, and change calibration. 1 CT62B 3 L2 2 L1 4 CT62A L1 (HOT) L2 1 L1 4 55 60 80 85 5 CHECK OUT THERMOSTAT Turn on setting knob. PROVIDE DISCONNECT...
Owner's Manual
Page 3
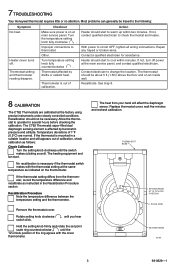
...contact qualified electrician to circuit OFF, tighten all wiring connections. Recalibration should start . No recalibration is on at the main service panel, and contact qualified electrician. Remove the thermostat cover. 7 TROUBLESHOOTING Your Honeywell thermostat requires little or no attention. Checkout ...CLOCK POSITION SCALE RING SETTING KNOB M5796 3 69-0829-1 Thermostat setting and thermometer reading disagree. Repair any frayed or broken wires. The heat from the thermometer, record the temperature difference and recalibrate as indicated on an inside wall. See step 8....
...contact qualified electrician to circuit OFF, tighten all wiring connections. Recalibration should start . No recalibration is on at the main service panel, and contact qualified electrician. Remove the thermostat cover. 7 TROUBLESHOOTING Your Honeywell thermostat requires little or no attention. Checkout ...CLOCK POSITION SCALE RING SETTING KNOB M5796 3 69-0829-1 Thermostat setting and thermometer reading disagree. Repair any frayed or broken wires. The heat from the thermometer, record the temperature difference and recalibrate as indicated on an inside wall. See step 8....


