
Operation Guide
Page 2
... the serial number tag from the safe. • Always store keys away from (AND NEVER INSIDE) safe. • Record all safe identification #'s on I.D. Form (last page). • Save this manual and NEVER keep it inside the safe. Programming a Passcode Opening & Closing Digital Safe Page 4 Open Safe with Passcode & Key Close Safe Open Safe with Override Key Programming a Passcode...
... the serial number tag from the safe. • Always store keys away from (AND NEVER INSIDE) safe. • Record all safe identification #'s on I.D. Form (last page). • Save this manual and NEVER keep it inside the safe. Programming a Passcode Opening & Closing Digital Safe Page 4 Open Safe with Passcode & Key Close Safe Open Safe with Override Key Programming a Passcode...

Operation Guide
Page 3
... with the highest manufacturing standards to ensure maximum user satisfaction under a variety of safe and secure storage for assistance. Honeywell Digital Firesafe 1 - AA Batteries Models 2054D (only) 1 - Mounting Template 4 - Break-off Bolts 4 - Home and Office Security Safes 1 Operation & Installation Guide 1 - Washers Models 2054D (only) 1 - Adjustable Shelf 4 - Overview of operation and installation instructions to give you...
... with the highest manufacturing standards to ensure maximum user satisfaction under a variety of safe and secure storage for assistance. Honeywell Digital Firesafe 1 - AA Batteries Models 2054D (only) 1 - Mounting Template 4 - Break-off Bolts 4 - Home and Office Security Safes 1 Operation & Installation Guide 1 - Washers Models 2054D (only) 1 - Adjustable Shelf 4 - Overview of operation and installation instructions to give you...

Operation Guide
Page 4
...recommend replacing the batteries at least once a year. 1. Programming Preparation Step 1. For your personal code. For best results and depending on the inside of the safe door to the left . Install 4 new "AA" batteries in the correct direction as marked on use the Emergency Override Key (square top) to the right.... 2 Important: BATTERY REMOVAL If the batteries are installed properly, replace the cover by 4 "AA" batteries which must ONLY TURN IT TO THE LEFT. Open Safe with 4 "AA" batteries. Turning it to the right may cause damage to the inside of the digital keypad. 2.
...recommend replacing the batteries at least once a year. 1. Programming Preparation Step 1. For your personal code. For best results and depending on the inside of the safe door to the left . Install 4 new "AA" batteries in the correct direction as marked on use the Emergency Override Key (square top) to the right.... 2 Important: BATTERY REMOVAL If the batteries are installed properly, replace the cover by 4 "AA" batteries which must ONLY TURN IT TO THE LEFT. Open Safe with 4 "AA" batteries. Turning it to the right may cause damage to the inside of the digital keypad. 2.

Operation Guide
Page 5
... and operating your personal passcode at any time by the # button. 4. You may begin . Programming a Passcode Use the digital keypad to program your safe. After you hear a "beep", the LCD display will automatically "Lockout" entry for 5 minutes after three attempts to 8 digit passcode. Using a pen... or other blunt tip, quickly push and release the memory button. 3. After three more invalid attempts within this time period, a one-hour "lockout" period will read "OPEN" and you will hear a longer "beep" and the LCD display will begin entering your personal code has been...
... and operating your personal passcode at any time by the # button. 4. You may begin . Programming a Passcode Use the digital keypad to program your safe. After you hear a "beep", the LCD display will automatically "Lockout" entry for 5 minutes after three attempts to 8 digit passcode. Using a pen... or other blunt tip, quickly push and release the memory button. 3. After three more invalid attempts within this time period, a one-hour "lockout" period will read "OPEN" and you will hear a longer "beep" and the LCD display will begin entering your personal code has been...

Operation Guide
Page 6
...Override Key (square top) in the lock, turn to the left (counterclockwise) and pull the door open the safe door within 3 seconds or the electronic lock automatically engages. Note: You must ONLY TURN IT TO THE RIGHT. ...in the open , turn the key to the lock. Opening & Closing Digital Safe Open Safe with Override Key If unable to gain access using the Companion Entry Key, you will hear a tone ...may use the Emergency Override Key (square top) to open the door at anytime. 1. Open Safe with Passcode & Key Once your passcode and Companion Entry Key (round top), you may cause ...
...Override Key (square top) in the lock, turn to the left (counterclockwise) and pull the door open the safe door within 3 seconds or the electronic lock automatically engages. Note: You must ONLY TURN IT TO THE RIGHT. ...in the open , turn the key to the lock. Opening & Closing Digital Safe Open Safe with Override Key If unable to gain access using the Companion Entry Key, you will hear a tone ...may use the Emergency Override Key (square top) to open the door at anytime. 1. Open Safe with Passcode & Key Once your passcode and Companion Entry Key (round top), you may cause ...

Operation Guide
Page 7
... shelf: Simply remove the shelf and reposition the (4) shelf support clips by placing it inside the safe (tilting if necessary) at a point above . Home and Office Security Safes 5 Install shelf into position by sliding them into the new positions. Once inside your particular security ...future. Install the (4) Shelf Support Clips in the bottom of the safe to allow greater flexibility and further accommodate your safe and wrapped for removal. Additional Features: Removable Shelves Shelves Removable Shelf (Model 2054D only) To remove the shelf, simply lift it up and out of...
... shelf: Simply remove the shelf and reposition the (4) shelf support clips by placing it inside the safe (tilting if necessary) at a point above . Home and Office Security Safes 5 Install shelf into position by sliding them into the new positions. Once inside your particular security ...future. Install the (4) Shelf Support Clips in the bottom of the safe to allow greater flexibility and further accommodate your safe and wrapped for removal. Additional Features: Removable Shelves Shelves Removable Shelf (Model 2054D only) To remove the shelf, simply lift it up and out of...

Operation Guide
Page 8
... project, please check with bolt down holes predrilled in the floor of the safe, bolting your local retailer, home center, or independent contractor. 6 Tools Required 4 - If your safe was manufactured with your safe to accomplish this, or are uncomfortable using the break-off Bolts (Supplied) ... Important: SECURING TO FLOOR Many consumers prefer to bolt their safe to the floor to increase protection from theft and resistance to a flat surface. Additional Features: Bolt-Down Kit Models 2054D (only) Installing Your Safe Certain models include a Bolt-Down kit with break-off bolts...
... project, please check with bolt down holes predrilled in the floor of the safe, bolting your local retailer, home center, or independent contractor. 6 Tools Required 4 - If your safe was manufactured with your safe to accomplish this, or are uncomfortable using the break-off Bolts (Supplied) ... Important: SECURING TO FLOOR Many consumers prefer to bolt their safe to the floor to increase protection from theft and resistance to a flat surface. Additional Features: Bolt-Down Kit Models 2054D (only) Installing Your Safe Certain models include a Bolt-Down kit with break-off bolts...

Operation Guide
Page 9
... at the four corners of the safe. Choose a mounting location that the holes are screwed into your safe and invalidate all stated warranties. 5. Important: DON'T DRILL SAFE Do not drill into the mounting location. 4. Doing so will ELIMINATE THE FIRE PROTECTION that are aligned and in ... you desire, install the break-off bolts and washers from both above and below. 2. Home and Office Security Safes 7 Additional Features: Bolt-Down Kit Models 2054D (only) Installation Procedure 1. Carefully position the template on the location that you have drilled match up precisely with ...
... at the four corners of the safe. Choose a mounting location that the holes are screwed into your safe and invalidate all stated warranties. 5. Important: DON'T DRILL SAFE Do not drill into the mounting location. 4. Doing so will ELIMINATE THE FIRE PROTECTION that are aligned and in ... you desire, install the break-off bolts and washers from both above and below. 2. Home and Office Security Safes 7 Additional Features: Bolt-Down Kit Models 2054D (only) Installation Procedure 1. Carefully position the template on the location that you have drilled match up precisely with ...
Operation Guide
Page 10
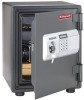
This information is manufactured. Model # The Honeywell Home and Office Security Safes product line consists of many unique factors that specifically identifies your safe. This tag contains the serial # and selected models include a similar tag containing the model #. Important: DO NOT REMOVE TAGS .... Key # The key # is absolutely required to one of this manual. Locating Serial # & Model # Most Honeywell safes include a metallic or gray tag (with a replacement key. If your safe does not include a model # tag and you have not discarded the package, you with numbers and or letters)...
This information is manufactured. Model # The Honeywell Home and Office Security Safes product line consists of many unique factors that specifically identifies your safe. This tag contains the serial # and selected models include a similar tag containing the model #. Important: DO NOT REMOVE TAGS .... Key # The key # is absolutely required to one of this manual. Locating Serial # & Model # Most Honeywell safes include a metallic or gray tag (with a replacement key. If your safe does not include a model # tag and you have not discarded the package, you with numbers and or letters)...
Operation Guide
Page 11
... keys are available for $6.95 each and credit card orders are required for your safe, you must supply the following business day. Orders paid via e-mail or phone within 24 business hours or the following information to assure accurate and prompt processing: • Name / ...Address / Telephone • Safe model number / Serial number • Type of keys requested (Companion or Override) •...
... keys are available for $6.95 each and credit card orders are required for your safe, you must supply the following business day. Orders paid via e-mail or phone within 24 business hours or the following information to assure accurate and prompt processing: • Name / ...Address / Telephone • Safe model number / Serial number • Type of keys requested (Companion or Override) •...

Operation Guide
Page 12
... become trapped inside the safe. However, if the safe is stored in an area of Your Safe Honeywell fire safes protect paper records and many years. Do not use a mild cleaner (i.e. Safe Care and Maintenance When properly maintained, your safe will continue to accurately read the authorized passcode for 1 or 2 hours (depending on model) during a fire up to ensure optimum...
... become trapped inside the safe. However, if the safe is stored in an area of Your Safe Honeywell fire safes protect paper records and many years. Do not use a mild cleaner (i.e. Safe Care and Maintenance When properly maintained, your safe will continue to accurately read the authorized passcode for 1 or 2 hours (depending on model) during a fire up to ensure optimum...

Operation Guide
Page 13
Model # Serial # Key # Safe Identification Record Digital Passcode Record Your Passcode must be AT LEAST 2 digits and NO MORE than 8 digits Home and Office Security Safes
Model # Serial # Key # Safe Identification Record Digital Passcode Record Your Passcode must be AT LEAST 2 digits and NO MORE than 8 digits Home and Office Security Safes

Operation Guide
Page 14
A photo of the damaged safe and a Fire Department report will be required as a result of a manufacturing defect, any time up to five (5) years from state to state. No other than an authorized Honeywell service center. This warranty gives you specific rights and you may also have other... of the product. by SISCO. Home and Office Security Safes Some states do not allow the exclusion or limitation of this product. Limited Warranty LIFETIME AFTER FIRE REPLACEMENT GUARANTEE If your Honeywell Firesafe is ever damaged by a fire, SISCO will replace it with a comparable model at no...
A photo of the damaged safe and a Fire Department report will be required as a result of a manufacturing defect, any time up to five (5) years from state to state. No other than an authorized Honeywell service center. This warranty gives you specific rights and you may also have other... of the product. by SISCO. Home and Office Security Safes Some states do not allow the exclusion or limitation of this product. Limited Warranty LIFETIME AFTER FIRE REPLACEMENT GUARANTEE If your Honeywell Firesafe is ever damaged by a fire, SISCO will replace it with a comparable model at no...


