User Guide
Page 11
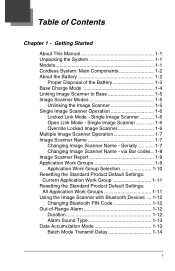
... Application Work Groups 1-11 Using the Image Scanner with Bluetooth Devices ... 1-12 Changing Bluetooth PIN Code 1-12 Out-of Contents Chapter 1 - Getting Started About This Manual 1-1 Unpacking the System 1-1 Models 1-1 Cordless System: Main Components 1-2 About the Battery 1-2 Proper Disposal of the Battery 1-3 Base Charge Mode 1-4 Linking Image Scanner to Base 1-5 Image...
... Application Work Groups 1-11 Using the Image Scanner with Bluetooth Devices ... 1-12 Changing Bluetooth PIN Code 1-12 Out-of Contents Chapter 1 - Getting Started About This Manual 1-1 Unpacking the System 1-1 Models 1-1 Cordless System: Main Components 1-2 About the Battery 1-2 Proper Disposal of the Battery 1-3 Base Charge Mode 1-4 Linking Image Scanner to Base 1-5 Image...

User Guide
Page 13
... 3-2 Beeper Duration - Good Read 3-1 Beeper Pitch - Good Read 3-2 Number of Beeps - Good Read 3-2 Good Read Delay 3-3 User-Specified Good Read Delay 3-3 Image Scanner Trigger Modes 3-3 Manual/Serial Trigger, Low Power 3-3 Automatic Trigger 3-5 Presentation Mode 3-5 Hands Free Time-Out 3-6 Reread Delay 3-6 User-Specified Reread Delay 3-6 Centering Window 3-7 Preferred Symbology 3-8 iii Connecting the...
... 3-2 Beeper Duration - Good Read 3-1 Beeper Pitch - Good Read 3-2 Number of Beeps - Good Read 3-2 Good Read Delay 3-3 User-Specified Good Read Delay 3-3 Image Scanner Trigger Modes 3-3 Manual/Serial Trigger, Low Power 3-3 Automatic Trigger 3-5 Presentation Mode 3-5 Hands Free Time-Out 3-6 Reread Delay 3-6 User-Specified Reread Delay 3-6 Centering Window 3-7 Preferred Symbology 3-8 iii Connecting the...

User Guide
Page 21
... storage or shipping. • Check for the most common terminal and communications settings. Models Models 2020-5BE 2020-CBE 3820SR0C0BE 3820iSE Description Cordless Base that supports the following information: • Unpacking the System &#... an Interface Unpacking the System After you need to an option indicates the default setting. Honeywell bar code image scanners are also provided. If you open the shipping carton containing the...system. 1 Getting Started About This Manual This manual contains information to help you ordered is accomplished by scanning the bar codes in this guide...
... storage or shipping. • Check for the most common terminal and communications settings. Models Models 2020-5BE 2020-CBE 3820SR0C0BE 3820iSE Description Cordless Base that supports the following information: • Unpacking the System &#... an Interface Unpacking the System After you need to an option indicates the default setting. Honeywell bar code image scanners are also provided. If you open the shipping carton containing the...system. 1 Getting Started About This Manual This manual contains information to help you ordered is accomplished by scanning the bar codes in this guide...

User Guide
Page 25
.... If the image scanner provides a single good read beep and the green LED lights, the image scanner has successfully linked to the base. 2. At this manual. Unlink Image Scanner 1 - 5 Linking Image Scanner to Base When newly shipped or defaulted to factory settings, the base and image scanner are linked, both devices... error beep and the red LED lights, the image scanner has not linked to it will no longer communicate with Bluetooth devices, other than the 2020 base. Image Scanner* Green LED Red LED...
.... If the image scanner provides a single good read beep and the green LED lights, the image scanner has successfully linked to the base. 2. At this manual. Unlink Image Scanner 1 - 5 Linking Image Scanner to Base When newly shipped or defaulted to factory settings, the base and image scanner are linked, both devices... error beep and the red LED lights, the image scanner has not linked to it will no longer communicate with Bluetooth devices, other than the 2020 base. Image Scanner* Green LED Red LED...

User Guide
Page 28
... the first image scanner, scan the 1 bar code on the Programming Chart inside the back cover of this manual and scan Save. via Bar codes If you wanted to set up your image scanners with a bar code ...name. Scan the Reset bar code (page 1-8 or on the Programming Chart inside the back cover of this manual). Image Scanner Name If you cannot send serial commands to the base before scanning the next bar code. ...name with names 0001-0007, you may download Quick*View from the Honeywell International Inc. You may change and wait for image scanner number 2, 3, 4 etc.
... the first image scanner, scan the 1 bar code on the Programming Chart inside the back cover of this manual and scan Save. via Bar codes If you wanted to set up your image scanners with a bar code ...name. Scan the Reset bar code (page 1-8 or on the Programming Chart inside the back cover of this manual). Image Scanner Name If you cannot send serial commands to the base before scanning the next bar code. ...name with names 0001-0007, you may download Quick*View from the Honeywell International Inc. You may change and wait for image scanner number 2, 3, 4 etc.

User Guide
Page 32
... the Bluetooth security features. To change the PIN, scan the bar code below , follow the instructions supplied with Bluetooth devices other than the 2020 base. After you are using the imager with your Bluetooth device to locate the image scanner and connect to the Bluetooth device. Note: The...allows the image scanner to your selection. Non-Base BT Connection Changing Bluetooth PIN Code Some devices require a PIN code as part of this manual. Bluetooth PIN Note: Refer to save your PDA or PC. Out-of range with other Bluetooth devices. To activate the alarm options for ...
... the Bluetooth security features. To change the PIN, scan the bar code below , follow the instructions supplied with Bluetooth devices other than the 2020 base. After you are using the imager with your Bluetooth device to locate the image scanner and connect to the Bluetooth device. Note: The...allows the image scanner to your selection. Non-Base BT Connection Changing Bluetooth PIN Code Some devices require a PIN code as part of this manual. Bluetooth PIN Note: Refer to save your PDA or PC. Out-of range with other Bluetooth devices. To activate the alarm options for ...
User Guide
Page 33
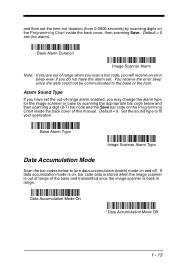
... 0-3000 seconds) by scanning the appropriate bar code below to turn data accumulation (batch) mode on the Programming Chart inside the back cover of this manual.
... 0-3000 seconds) by scanning the appropriate bar code below to turn data accumulation (batch) mode on the Programming Chart inside the back cover of this manual.
User Guide
Page 39
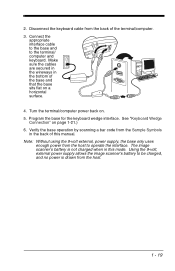
... sits flat on a horizontal surface. 4. Note: Without using the 9-volt external, power supply, the base only uses enough power from the Sample Symbols in this manual. Verify the base operation by scanning a bar code from the host to the terminal/ computer and keyboard. Program the base for the keyboard wedge interface...
... sits flat on a horizontal surface. 4. Note: Without using the 9-volt external, power supply, the base only uses enough power from the Sample Symbols in this manual. Verify the base operation by scanning a bar code from the host to the terminal/ computer and keyboard. Program the base for the keyboard wedge interface...

User Guide
Page 41
... . IBM PC AT and Compatibles with the integral keyboard. Keyboard Wedge Connection If you scan one of the codes, power cycle the host terminal to manual.
... . IBM PC AT and Compatibles with the integral keyboard. Keyboard Wedge Connection If you scan one of the codes, power cycle the host terminal to manual.

User Guide
Page 43
.... 1. Verify the base operation by scanning the appropriate programming bar code. 3. Make sure the cables are secured in the wireways in the back of this manual. 1 - 23 Program the base for Code 128 with IBM 4683 Port 9 HHBCR-2 Interface Connecting the Base with IBM 4683 Port 5B, IBM 4683 Port 9B...
.... 1. Verify the base operation by scanning the appropriate programming bar code. 3. Make sure the cables are secured in the wireways in the back of this manual. 1 - 23 Program the base for Code 128 with IBM 4683 Port 9 HHBCR-2 Interface Connecting the Base with IBM 4683 Port 5B, IBM 4683 Port 9B...

User Guide
Page 49
Terminal ID Save Note: After scanning one of this manual to program the image scanner for the 2020-5BE is not a standard PC AT, refer to save your selection. Scan the Terminal ID bar code below, then scan the numeric bar code(s) from the ...Programming Chart inside the back cover of 003. For example, an IBM AT terminal has a Terminal ID of this manual, then Save. If...
Terminal ID Save Note: After scanning one of this manual to program the image scanner for the 2020-5BE is not a standard PC AT, refer to save your selection. Scan the Terminal ID bar code below, then scan the numeric bar code(s) from the ...Programming Chart inside the back cover of 003. For example, an IBM AT terminal has a Terminal ID of this manual, then Save. If...
User Guide
Page 66
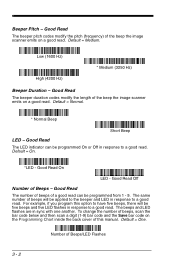
.... Default = One. Default = Normal. * Normal Beep Short Beep LED - Good Read On LED - The same number of a good read . For example, if you program this manual. Number of Beeps/LED Flashes 3 - 2
.... Default = One. Default = Normal. * Normal Beep Short Beep LED - Good Read On LED - The same number of a good read . For example, if you program this manual. Number of Beeps/LED Flashes 3 - 2
User Guide
Page 67
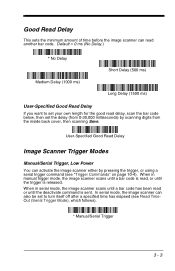
... digits from 0-30,000 milliseconds) by pressing the trigger, or using a serial trigger command (see Read TimeOut (Serial Trigger Mode), which follows). * Manual/Serial Trigger 3 - 3 When in manual trigger mode, the image scanner scans until a bar code is sent. In serial mode, the image scanner can also be set to set... to turn itself off after a specified time has elapsed (see "Trigger Commands" on page 10-4). User-Specified Good Read Delay Image Scanner Trigger Modes Manual/Serial Trigger, Low Power You can read , or until the deactivate command is read another bar code.
... digits from 0-30,000 milliseconds) by pressing the trigger, or using a serial trigger command (see Read TimeOut (Serial Trigger Mode), which follows). * Manual/Serial Trigger 3 - 3 When in manual trigger mode, the image scanner scans until a bar code is sent. In serial mode, the image scanner can also be set to set... to turn itself off after a specified time has elapsed (see "Trigger Commands" on page 10-4). User-Specified Good Read Delay Image Scanner Trigger Modes Manual/Serial Trigger, Low Power You can read , or until the deactivate command is read another bar code.

User Guide
Page 68
... there is the equivalent of the image scanner's trigger when using a serial trigger command. Scan the appropriate Image Scanner Power Time-Out bar code to Manual/ Serial Trigger. Note: Scanning zero (0) is no time-out. 3 - 4 Once the image scanner has timed out, you can activate the image scanner either by scanning...
... there is the equivalent of the image scanner's trigger when using a serial trigger command. Scan the appropriate Image Scanner Power Time-Out bar code to Manual/ Serial Trigger. Note: Scanning zero (0) is no time-out. 3 - 4 Once the image scanner has timed out, you can activate the image scanner either by scanning...

User Guide
Page 70
...back cover, and Save. User-Specified Reread Delay 3 - 6 Hands Free Time-Out The Automatic Trigger and Presentation Modes are effective in manual trigger mode by scanning digits from the inside back cover, then scanning Save. Setting a reread delay protects against accidental rereads of sale). ...Longer delays are referred to manual trigger mode. Default = Medium. You can read the same bar code a second time. Once the time-out value is pulled when ...
...back cover, and Save. User-Specified Reread Delay 3 - 6 Hands Free Time-Out The Automatic Trigger and Presentation Modes are effective in manual trigger mode by scanning digits from the inside back cover, then scanning Save. Setting a reread delay protects against accidental rereads of sale). ...Longer delays are referred to manual trigger mode. Default = Medium. You can read the same bar code a second time. Once the time-out value is pulled when ...

User Guide
Page 71
... the centering window you set up. To change the left or right edge of the centering window, scan Centering On, then scan one of this manual. Centering Window Use the centering feature to narrow the image scanner's field of view so the image scanner reads only the bar code you want...
... the centering window you set up. To change the left or right edge of the centering window, scan Centering On, then scan one of this manual. Centering Window Use the centering feature to narrow the image scanner's field of view so the image scanner reads only the bar code you want...
User Guide
Page 74
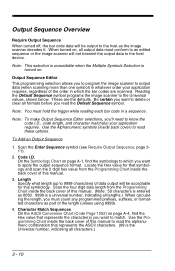
...Require Output Sequence, page 311). 2. Output Sequence Overview Require Output Sequence When turned off, the bar code data will be acceptable for this manual to 9999 characters) of the length (unless using 9999). 4. Output Sequence Editor This programming selection allows you must count any programmed prefixes, ... Locate the Hex value for that symbology and scan the 2 digit hex value from the Programming Chart inside the back cover of this manual. (Note: 50 characters is entered as 0050. 9999 is the Universal number, indicating all lengths.) When calculating the length, you to ...
...Require Output Sequence, page 311). 2. Output Sequence Overview Require Output Sequence When turned off, the bar code data will be acceptable for this manual to 9999 characters) of the length (unless using 9999). 4. Output Sequence Editor This programming selection allows you must count any programmed prefixes, ... Locate the Hex value for that symbology and scan the 2 digit hex value from the Programming Chart inside the back cover of this manual. (Note: 50 characters is entered as 0050. 9999 is the Universal number, indicating all lengths.) When calculating the length, you to ...

User Guide
Page 79
... settings. To Add a Prefix or Suffix: Step 1. Default prefix = None. Determine the 2 digit Hex value from the Programming Chart inside the back cover of this manual or scan 9, 9 for specific symbologies (as an added prefix or suffix character. Scan the 2 hex digits from the Symbology Chart (included in which you want...
... settings. To Add a Prefix or Suffix: Step 1. Default prefix = None. Determine the 2 digit Hex value from the Programming Chart inside the back cover of this manual or scan 9, 9 for specific symbologies (as an added prefix or suffix character. Scan the 2 hex digits from the Symbology Chart (included in which you want...

User Guide
Page 80
... another symbology. Scan Save, or scan Discard to add a prefix or suffix for the symbology from the Programming Chart inside the back cover of this manual. Step 1. Step 2. Repeat Steps 4 and 5 for the CR (carriage return). Step 8. To add a backslash (\), scan 5, C, 5, C. To Clear One ...Chart (included in the Appendix A) for the prefix or suffix you select is deleted from the Programming Chart inside the back cover of this manual. Step 4. Scan Add Suffix. Step 6. When you Clear One Prefix (Suffix), the specific character you wish to create the backslash itself...
... another symbology. Scan Save, or scan Discard to add a prefix or suffix for the symbology from the Programming Chart inside the back cover of this manual. Step 1. Step 2. Repeat Steps 4 and 5 for the CR (carriage return). Step 8. To add a backslash (\), scan 5, C, 5, C. To Clear One ...Chart (included in the Appendix A) for the prefix or suffix you select is deleted from the Programming Chart inside the back cover of this manual. Step 4. Scan Add Suffix. Step 6. When you Clear One Prefix (Suffix), the specific character you wish to create the backslash itself...

User Guide
Page 81
Scan the 2 digit hex value from the Programming Chart inside the back cover of this manual or scan 9, 9 for all symbologies. To Add a Carriage Return Suffix to All Symbologies Scan the following bar code if you wish to add a carriage return suffix to all symbologies. Your change is automatically saved. This action first clears all current suffixes, then programs a carriage return suffix for all symbologies at once. Step 3. Prefix Selections Add CR Suffix All Symbologies Add Prefix Clear All Prefixes Clear One Prefix 4 - 3
Scan the 2 digit hex value from the Programming Chart inside the back cover of this manual or scan 9, 9 for all symbologies. To Add a Carriage Return Suffix to All Symbologies Scan the following bar code if you wish to add a carriage return suffix to all symbologies. Your change is automatically saved. This action first clears all current suffixes, then programs a carriage return suffix for all symbologies at once. Step 3. Prefix Selections Add CR Suffix All Symbologies Add Prefix Clear All Prefixes Clear One Prefix 4 - 3